AI simulated drone flight track

Human Vs. AI Drone Racing At The University Of Zurich

[Thomas Bitmatta] and two other champion drone pilots visited the Robotics and Perception Group at the University of Zurich. The human pilots accepting the challenge to race drones against Artificial Intelligence “pilots” from the UZH research group.

The human pilots took on two different types of AI challengers. The first type leverages 36 tracking cameras positioned above the flight arena. Each camera captures 400 frames per second of video. The AI-piloted drone is fitted with at least four tracking markers that can be identified in the captured video frames. The captured video is fed into a computer vision and navigation system that analyzes the video to compute flight commands. The flight commands are then transmitted to the drone over the same wireless control channel that would be used by a human pilot’s remote controller.

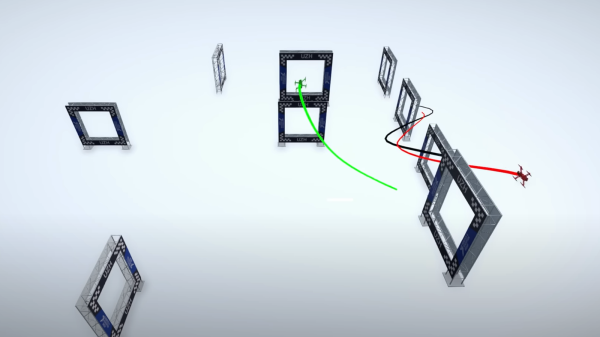
The second type of AI pilot utilizes an onboard camera and autonomous machine vision processing. The “vision drone” is designed to leverage visual perception from the camera with little or no assistance from external computational power.

Ultimately, the human pilots were victorious over both types AI pilots. The AI systems do not (yet) robustly accommodate unexpected deviation from optimal conditions. Small variations in operating conditions often lead to mistakes and fatal crashes for the AI pilots.

Both of the AI pilot systems utilize some of the latest research in machine learning and neural networking to learn how to fly a given track. The systems train for a track using a combination of simulated environments and real-world flight deployments. In their final hours together, the university research team invited the human pilots to set up a new course for a final race. In less than two hours, the AI system trained to fly the new course. In the resulting real-world flight of the AI drone, its performance was quite impressive and shows great promise for the future of autonomous flight. We’re betting on the bots before long.

Continue reading “Human Vs. AI Drone Racing At The University Of Zurich”

A two picture montage of the blackout logger, the left picture being the front e-ink display of the data logger in a black case and the second picture of the back of the data logger, with the raspberry pi pico show attached to an e-ink display, both sitting on a wooden table.

Blackout Logger Keeps Track Of Power Outages

[Dmytro Panin] lives in Kyiv, Ukraine where there have been rolling blackouts to stabilize the power grid. To help keep track of when the blackouts might happen, be they planned or emergency, and to get more information on how long the blackouts last, [Dmytro] has created a blackout logger.

The build consists of a Raspberry Pi Pico that connects to a DS3231 real time clock (RTC) with a Waveshare 3.7 inch eInk display which [Dmytro] puts into a custom 3D printed case. The RTC has it’s own small power supply, often times from a coin cell battery attached to the module, allowing it to keep time when the module and other devices attached to it are powered off.

The Raspberry Pi Pico is programmed to “poll” every 30 seconds, writing the current time to a file. Should the unit lose power, the last time, within a 30 second window, is available when power is restored and the unit wakes up again. Since the RTC has kept the current time, there is enough information to display the duration of the blackout. The eInk screen ensures that the information is readily available, even when there is no power.

War is not the only reason blackouts can occur and we’ve covered some issues with blackouts in Texas and California in the US.

Turn Your Furniture Into A Light Show With Hyelicht

There’s something about the regimented square shapes of the IKEA Kallax shelf that convinced [Eike Hein] it could benefit from some RGB LED lighting, and while he could have simply used a commercial solution, he decided instead to develop Hyelicht: an incredibly well documented open source lighting system featuring multiple control interfaces and APIs. We’d say it was overkill, but truth be told, we dream of a world where everyone takes their personal projects to this level.

Hyelicht’s default touch UI

In the boilerplate configuration, [Eike] shows off controlling the LEDs using a graphical user interface running on a Waveshare 7″ touch screen mounted to the side of the shelf. That’s the most direct way of controlling the LEDs, as the touch screen is plugged into the Raspberry Pi 4B that’s actually running the software. But the same interface can also be remotely accessed by your smartphone or desktop.

You can also skip the GUI entirely and control the LEDs with a command line interface, or maybe poke Hyelicht’s HTTP REST interface instead. The system can even integrate with the Philips Hue ecosystem, if you prefer going that route.

The 5×5 Kallax shelf is the project’s official reference hardware, but of course it will work with anything else you might wish to cover with controllable LEDs. We’ve seen similar setups used to light storage bins in the past, but nothing that can even come close to the documentation and customization possibilities offered by Hyelicht. This is definitely a project to keep a close eye on if you’ve got the urge to add a little color to your world.

A display with the magic mirror webpage shown running on it

Magic Mirror – On A Low CPU Budget

For quite a few hackers out there, it’s still hard to find a decently powerful Raspberry Pi for a non-eye-watering price. [Rupin Chheda] wanted to build a magic mirror with a web-based frontend, and a modern enough Raspberry Pi would’ve worked just fine. Sadly, all he could get was single-1 GHz-core 512MB-RAM Zero W boards, which he found unable to run Chromium well enough given the stock Raspbian Desktop install, let alone a webserver alongside it. Not to give up, [Rupin] gives us a step-by-step breakdown on creating a low-footprint Raspbian install showing a single webpage.

Starting with Raspbian Lite, a distribution that doesn’t ship with any desktop features by default, he shows how to equip it with a minimal GUI – no desktop environment needed, just an X server with the OpenBox window manager, as you don’t need more for a kiosk mode application. In place of Chromium, you can install Midori, which is a lean browser that works quite well in single-website mode, and [Rupin] shows you how to make it autostart, as well as the little quirks that make sure your display doesn’t go to sleep. The webserver runs in Heroku cloud, but we wager that, with such a minimal install, it could as well run on the device itself.

With these instructions, you can easily build a low-power single-page browser when all you have is a fairly basic Raspberry Pi board. Of course, magic mirrors are a well-researched topic by now, but you can always put a new spin on an old topic, like in this this retro-tv-based build. You don’t have to build a magic mirror to make use of this hack, either – build a recipe kiosk!

Tesla Coil Makes Sodium Plasma

Looking for a neat trick to do with your Tesla coil? [The Action Lab] uses his coil to make a metal plasma — in particular, sodium. You can see the results in the video below.

To create a metal plasma, you need a metal vapor and sodium can create a vapor at a relatively low temperature, especially in a vacuum. The resulting glow is pretty to look at, but you will need a bit of lab gear to pull it off.

Continue reading “Tesla Coil Makes Sodium Plasma”

A two picture montage of a boy wearing a sonic the hedgehog costume with LEDs in them. The left picture is at night with the boy wearing sunglasses and a face mask with the sonic costume head piece lit up. The right picture is during the day with the boy wearing a face mask, holding a plastic pu mpkin bucket for candy and wearing a lit up sonic the hedgehog costume in the front yard of a house.

LEDs Put New Spin On A Sonic The Hedgehog Costume

[Wentworthm] couldn’t say no to his son’s plea for a Sonic the Hedgehog costume for Halloween but also couldn’t resist sprucing it up with LEDs either. The end result is a surprisingly cool light up Sonic the Hedgehog costume.

a picture of a breadboard with an Arduino Nano on it, with wires going out to 3d printed tear dropped shapes that have LED strips in them, with some LED strips on.

After some experimentation, [Wentworthm] ordered two costumes and ended up mixing and matching the head piece of one with the body suit of the other. For the head, [Wentworthm] created six 3D printed “quills” that had slots for the WS2812B LED strips to slide into and diffuse out the sides, with each quill sliding into the folds of the Sonic head “spikes”. Sewn strips of cloth were used to house the LED strips that were placed down the sides of the costume. An additional 3D printed switch housing was created to allow for a more robust interface to the two push buttons to activate the LEDs. An Arduino Nano, soldered to a protoboard, was used to drive the LED strips with a USB battery pack powering the whole project.

[Wentworthm] goes into more detail about the trials and errors, so the post is definitely worth checking out for more detail on the build. Halloween is always a great source of cool costumes and we’ve featured some great ones before, like a light up crosswalk costume to making a giant Gameboy colour costume.

Video after the break!

Continue reading “LEDs Put New Spin On A Sonic The Hedgehog Costume”

A slide from the presentation, showing the power trace of the chip, while it's being pulsed with the laser at various stages of execution

Defeating A Cryptoprocessor With Laser Beams

Cryptographic coprocessors are nice, for the most part. These are small chips you connect over I2C or One-Wire, with a whole bunch of cryptographic features implemented. They can hash data, securely store an encryption key and do internal encryption/decryption with it, sign data or validate signatures, and generate decent random numbers – all things that you might not want to do in firmware on your MCU, with the range of attacks you’d have to defend it against. Theoretically, this is great, but that moves the attack to the cryptographic coprocessor.

In this BlackHat presentation (slides), [Olivier Heriveaux] talks about how his team was tasked with investigating the security of the Coldcard cryptocurrency wallet. This wallet stores your private keys inside of an ATECC608A chip, in a secure area only unlocked once you enter your PIN. The team had already encountered the ATECC608A’s predecessor, the ATECC508A, in a different scenario, and that one gave up its secrets eventually. This time, could they break into the vault and leave with a bag full of Bitcoins?

Lacking a vault door to drill, they used a powerful laser, delidding the IC and pulsing different areas of it with the beam. How do you know when exactly to pulse? For that, they took power consumption traces of the chip, which, given enough tries and some signal averaging, let them make educated guesses on how the chip’s firmware went through the unlock command processing stages. We won’t spoil the video for you, but if you’re interested in power analysis and laser glitching, it’s well worth 30 minutes of your time.

You might think it’s good that we have these chips to work with – however, they’re not that hobbyist-friendly, as proper documentation is scarce for security-through-obscurity reasons. Another downside is that, inevitably, we’ll encounter them being used to thwart repair and reverse-engineering. However, if you wanted to explore what a cryptographic coprocessor brings you, you can get an ESP32 module with the ATECC608A inside, we’ve seen this chip put into an IoT-enabled wearable ECG project, and even a Nokia-shell LoRa mesh phone!

Continue reading “Defeating A Cryptoprocessor With Laser Beams”