Building An Autonomous Robot From An Xbox 360 Controller

Wow, it’s amazing what [Carl] was able to build using an Xbox 360 control PCB as the base for his robot. His forum posts just touches the surface of the build, but he linked to a PDF file which has the full details.

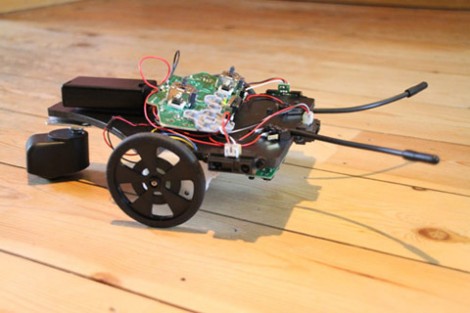
This build basically attaches sensors and replacement motors to the controller board… and that is it! Some distance sensors are connected to the analog inputs for the left and right trigger. The whiskers use a couple of leaf switches soldered to controller button pads. The motors are geared replacements that use the same connectors as the rumble motors did.

The idea is that the controller is connected to a PC via the wireless radio it has on the PCB. Once the connection is made the PC software can read from all of the sensors and drive the motors accordingly. It would also be really easy to use a single-board solution like the RPi to do away with the need for a remote PC. But this is a fantastic start, and an approach which we had never before considered. See some video of the little guy getting around the room after the break.

Continue reading “Building An Autonomous Robot From An Xbox 360 Controller”

Retrotechtacular: The Miracle Of Vacuum Tubes

We take our digital life for granted these days, but back in 1943 it was vacuum tubes, not transistors, which made it all possible. This video on the types and industrial uses of vacuum tubes was sent into the tips line by [Polar Bear]. The nearly 70-year-old video is part of a collection preserved by the New Jersey Amateur Radio Club.

The video was underwritten by Westinghouse, and as you can expect it has a bit of propaganda spin for the company. The time period in which the reel was produced is also telling. Coming about two years after the attack on Pearl Harbor, the applications for technology of the time are almost all military in focus. But we’re sure you’ll be entertained by both the film style and the tech explanation. It’s something of a How It’s Made of yesteryear. All twenty-one minutes of it are found embedded after the break.

Continue reading “Retrotechtacular: The Miracle Of Vacuum Tubes”

Hackaday RBC Team Finished!

Our Project: “Minotaur’s Revenge”

We built two giant marble mazes. The maze itself is all mechanical, with a 2 person team controlling x and y axis. The fun happens though when you hit buttons to activate magnets and traps on the other team’s table.

Check out the Live Stream. Nothing is happening at the moment, but a couple of dedicated Hackaday fans are checking out an empty couch. We have a very strange readership.

[sonofabit] recorded the last 8 hours of the build at 1fps and made a time lapse video. It’s an hour long, and we thank [sonofabit]’s CPU for all its hard work. You can also check out the video after the break.

Continue reading “Hackaday RBC Team Finished!”

Reclaiming The Numpad For Laptop Users Everywhere

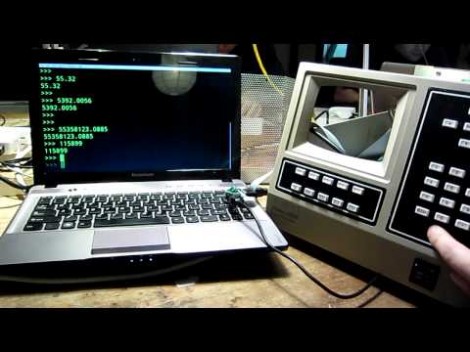
We have to agree with NYCResistor, the exclusion of numeric pads from laptops is a real loss for productivity. Ever try to working with a huge spreadsheet ledger without a 10-key? Sure, there are usually function key alternatives hiding somewhere on those reduced keyboards. But that’s hardly the same thing. We think it’s time to take back the numpad. This project shows you how easy it is by using some old time lab equipment to replace the missing keys.

They’re using a Teensy microcontroller board to translate the key matrix into USB inputs. Most of the work is already done for you because of the USB HID Keyboard library available for the development board. Scanning your own key matrix, or decoding the buttons from some rad hardware like this Walters 600E is up to you. A demo of the rig in action can be found after the jump.

Is there anyone else who wishes the 10-key had an ‘X’ on it for coding hex values? Perhaps that will be a future project for us.

Continue reading “Reclaiming The Numpad For Laptop Users Everywhere”

RC PVC Bot

This hunk of PVC pipe is radio controlled. The wheels on the ends provide the locomotion, but it wouldn’t be going anywhere if it weren’t for that little tail strapped to the center of the tube.

When the motors are turning the body of the bot needs something to push against. In this case the tail hits the ground and keeps the chassis from spinning. We have seen attempts to go without a tail by using lopsided wheels to provide angular momentum, but this method is much more reliable.

The control for the bot is scrapped from a toy RC car. Once hooked up to the gearhead motors it’s ready to roll. The real difficulty of the build came in fitting everything into the pipe. A frame was built from a few disks used as mounting platforms which were separated by threaded rod. See it making its way around a gravel road in the clip after the break.

Continue reading “RC PVC Bot”

Comparing Altium And Cadence PCB Layout Tools

We see a lot of projects using Eagle for the schematics and PCB layout. There are a few that use Kicad, but we hear very little about other alternatives. Recently, [Limpkin] has been working with Altium and Cadence and wrote about how they compare when it comes to PCB layout. Neither are free packages so it’s good to know what you’re getting into before taking the plunge.

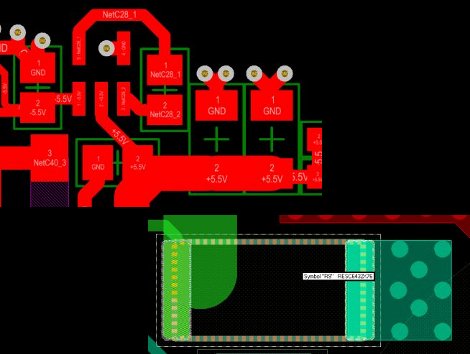
[Limpkin] begins his overview by mentioning that the schematic editors are comparable; the differences start to show themselves in the PCB layout tools. Here you can see that Altium always labels the pads so you know what net each of them belongs to. Cadence (whose PCB layout tool is called Allegro) will display the net if you hover over the pad with your mouse. Both have 3D rendering, with Altium’s looking a bit more pleasant but what real use is it anyway? Okay, we will admit we love a good photorealistic board rendering, but we digress. The most interesting differences show themselves once traces are all on the board and need to be rejiggered. Cadence will actually move traces on other layers automatically to avoid collision with a via that is late to the party, and Altium shows some strange behavior when dragging traces. [Limpkin] doesn’t register a final judgement, but the comparison alone is worth the read.

Flip-dot Display Is An Advertising Experience We Can Get Behind

This huge and mesmerizing interactive display is just a big piece of advertising. It is a flip-dot display. Each pixel is a mechanical disk, white on one side and black on the other. The team over at BreakfastNY hacked the display modules and wrote their own software so that it can be refreshed with lighting quickness. To the left you can see the high contrast text, but on the right it’s showing the camera-based interactivity. A few seconds later this gentleman sweeps his arm to the side and all the pixels scatter as if blown away by a forceful wind. You might as well just skip down to the video after the break right now.

The display is an advertisement for a new show on the TNT network called Perception. We’ve got to say, if you’re going to advertise this is the way to do it. Make something cool, then share the details. We get to enjoy the clickity-clack of all those dots flipping into place and they got us to at least recognize the network and say the name of the show. Everyone wins.

Continue reading “Flip-dot Display Is An Advertising Experience We Can Get Behind”