Solar Oven Built To Last

The problem with most solar ovens is that they’re flimsy builds that will stand up to only a handful of uses. But this one stands apart from that stereotype. It’s big, sturdy, and used a lot of math to efficiently gather the sun’s energy when cooking food.

This is the third version of the build and each has included many improvements. The obvious change here is a move from aluminum reflectors to actual mirror reflectors. These attach at a carefully calculated angle to get the most power from the rays they are redirecting. The orange mounting brackets for the mirrors also serve as a storage area for transport. The rectangular reflectors fit perfectly between them (stacked on top of the tempered glass that makes up the transparent side of the cooking chamber).

The body of the oven doesn’t track the sun and one of the future improvements mentions adding tilt functionality to the base. We’d suggest taking a look at some of the solar tracking setups used for PV arrays.

[Thanks John]

Thinking Outside The IDE To Make A Fast-counting Arduino

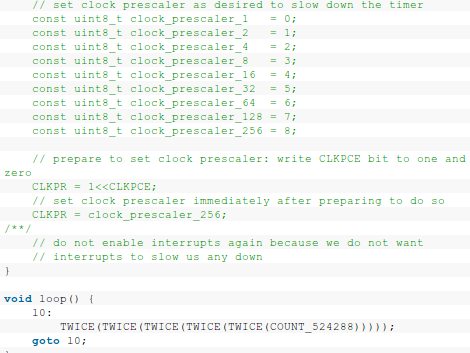
[Udo Klein] took on the challenge of counting as fast as possible using an Arduino board. The quest involves a search for short-cuts that will let him drive a 20-bit counter as quickly as possible using the stock hardware. But the catch is that the Arduino environment has some overhead running in the background which will slow things down. He looks into each of these road bumps, then shows one way to get around them.

The code uses a command we don’t normally see in modern C embedded programming; the goto statement. He’s using this to bypass the extra cycles used by the Arduino’s in-built loop() function. The only command that is run within his hacked loop is a deeply nested set of macros. They’re toggling output pins using the hardware XOR built into the AVR chip. This is directly addressing the registers and thereby dumps the slowdown added by the digitalWrite() function.

The result is a software counter that toggles the output lights (see the clip after the break) at about 98.9% of the hardware clock speed. Pretty impressive, but [Udo] figures he can make it just a bit faster yet.

Continue reading “Thinking Outside The IDE To Make A Fast-counting Arduino”

EMIC2 Text To Speech Module

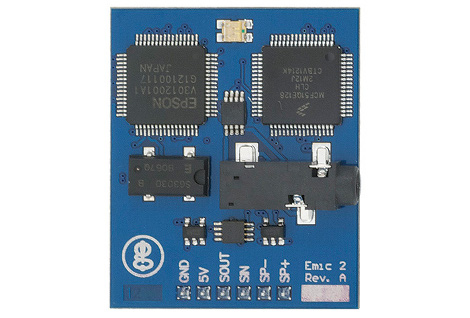
This is the EMIC2 text-to-speech module. You can see from the logo on the bottom left it’s the latest gadget coming out of [Joe Grand’s] Grand Idea Studios. [Dino] tipped us off about his first experience with a prototype of the board. He’s driving it with an Arduino and the video after the break shows that the sound rendering is high quality and the words are very easy to understand. One of the things that we think is interesting is that the serial communications used to drive the board are not uni-directional. In fact, there’s a serial terminal that provides documentation on how to use the chip. Obviously this is most suited to the Arduino, which always has a PC-side terminal window available to it.

[Joe] himself shows some of the potential for the board. He gave new life to a broken toy by replacing its internals with a PIC-based circuit to drive the EMIC2. That video is also found after the break. He’s just using the demo clips, but from that you will get a good idea of the vocal modulations this device is capable of. The board rings up at $60 and is available from Parallax.

Continue reading “EMIC2 Text To Speech Module”

BlinkM Gets Upgraded To A USB Mass-market Device

[TodBot] has a new piece of hardware on the way up. His Blink(1) is currently about 50% funded on Kickstarter. It’s a USB nub that has an RGB LED inside of it. When plugged into a computer it can be used as a status indicator. At first that sounds like a let down, but his marketing is fantastic as the myriad of uses really caught our attention. If you’re on the road you can use it to report back your server statistic. Plug one into each rack-mounted servers for quick visual indication of which one has crashed. Or find your own use.

You probably remember [TodBot] as the creator of the BlinkM. Recently he was calling it the world’s smallest Arduino. Well this Blink(1) is being marketed as Arduino programmable as well. The board size is about the same, and both have an RGB LED module. The difference is that the BlinkM had an ATtiny85 and needed a serial converter to program it. This has a USB plug so we’d bet he’s swapped the tiny for an ATmega8u2 or something from the same family.

Don’t think one blinky LED is going to cut it? For folks that just need more resolution there are other hardware options out there. For instance, this project gives you a wireless 8×8 RGB led display to use as an indicator.

Playing Footsie With Your Video Games

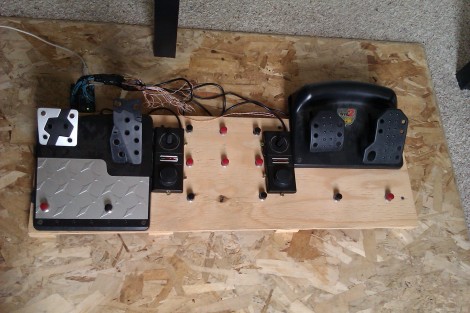
[Jon] will be tapping away with his toes during gaming session thanks to this foot controller which is packed with buttons and sensors. It’s the second iteration of the build. The original had some solder joints break and the USB stopped working. He had also been experiencing some erratic behavior and so he decided to upgrade the control hardware and add a few more things in the process.

This version uses an Arduino Uno as the interface board. He did a bunch of prototyping to find the best way to hook up all the analog sensors, and how to properly debounce the buttons. Once he was happy with the inputs he set about finding a better way to use the USB HID standard with the device. We were surprised to hear that the ATmega16u2 (one of the new AVR chips which includes USB hardware) doesn’t play nicely with Linux. But [Jon] managed to hack his way around that issue and now he’s gaming with an even better foot controller than before.

Time-based One-Time Passwords With An Arduino

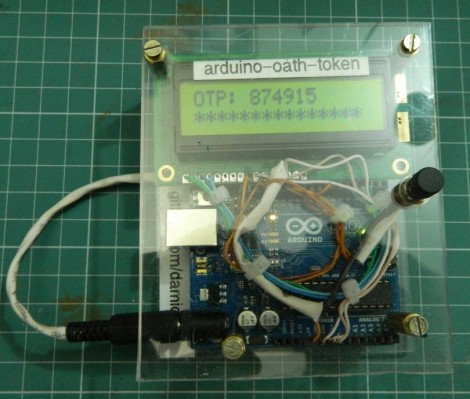
Get your feet wet with Time-based One-Time Password (TOTP) security by building your own Arduino OATH system. OATH is an open standard authentication system that provides a platform to generate tokens, making your login more secure than a password alone would.

The TOTP approach is what is used with many companies that issue hardware-based dongles for logging in remotely. This security may have been compromised but it’s still better than passwords alone. Plus, if you’re building it around an Arduino we’d bet you’re just trying to learn and not actually responsible for protecting industrial or state secrets.

The hardware setup requires nothing more than the Arduino board with one button and a screen as a user interface. Since the board has a crystal oscillator it keeps fairly accurate time (as long as it remains powered). It will push out a new token every thirty seconds. The video after the break shows that the Arduino-calculated value does indeed match what the test box is displaying.

Continue reading “Time-based One-Time Passwords With An Arduino”

Laser-charged Glow In The Dark Message Board

This entry in the Red Bull Creation contest uses a laser to charge up a glow-in-the-dark message board. The concept is something we’ve seen several times before. Since light can excite a phosphorescent surface, moving pixels of light over that surface leaves a fading trail. Most recently we saw a spinning ring message board. This contest entry is different in that the board is stationary and the print head moves.

It’s basically a two-wheeled robot with a laser diode which can swivel perpendicular to the direction of travel. In this way, the laser prints the rows, and the motion of the robot takes care of advancing the columns. Since laser light has incredible intensity it is able to excite the phosphors much more thoroughly than LEDs. So the message will last longer than that spinning ring project or this awesome turntable hack. Don’t miss the video after the break that shows off the hack along with a bag full of theatrics.

Continue reading “Laser-charged Glow In The Dark Message Board”