Despite the repeated warnings of system administrators, IT personnel, and anyone moderately aware of operational security, there are still quite a few people who will gladly plug a mysterious flash drive into their computers to see what’s on it. Devices which take advantage of this well-known behavioral vulnerability have a long history, the most famous of which is Hak5’s USB Rubber Ducky. That emulates a USB input device to rapidly execute attacker-defined commands on the target computer.
The main disadvantage of these keystroke injection attacks, from the attacker’s point of view, is that they’re not particularly subtle. It’s usually fairly obvious when something starts typing thousands of words per minute on your computer, and the victim’s next move is probably a call to IT. This is where [Krzysztof Witek]’s open-source Rubber Ducky clone has an advantage: it uses a signal detected by a SYN480R1 RF receiver to trigger the deployment of its payload. This does require the penetration tester who uses this to be on the site of the attack, but unlike with an always-on or timer-delayed Rubber Ducky, the attacker can trigger the payload when the victim is distracted or away from the computer.
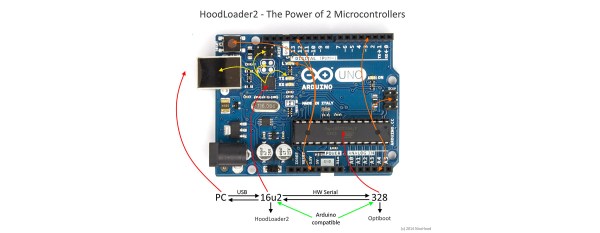
This project is based around the ATmega16U2, and runs a firmware based on microdevt, a C framework for embedded development which [Krzysztof] also wrote. The project includes a custom compiler for a reduced form of Hak5’s payload programming language, so at least some of the available DuckyScript programs should be compatible with this. All of the project’s files are available on GitHub.
Perhaps due to the simplicity of the underlying concept, we’ve seen a few open source implementations of malicious input devices. One was even built into a USB cable.