Mini Tetris Game Packs A Tiny85

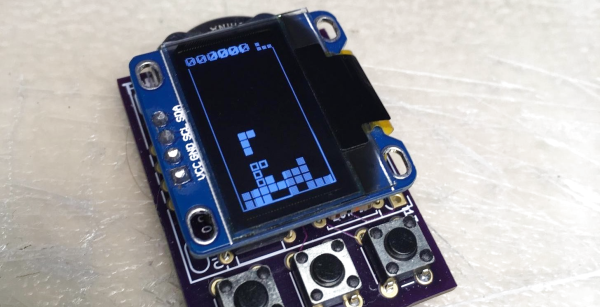
[dombeef] originally built pocketTETRIS as a Father’s Day gift for his Tetris-loving pops. However, having finished the project he’s decided to share it with the universe, and it’s looking rather sweet.

He made the game the smallest he could make, with size limitations imposed by a 0.96” OLED display, the coin-cell battery pack, and his desire for a durable 3D-printed case. It uses a ATtiny85 for the brains, mounted on a custom PCB that [dombeef] designed in KiCad. The Arduino code was modified from Andy Jackson’s ATtinyArcade code, giving it three-button capability instead of two. [dombeef] has details on the project page on Hackaday.io as well as 3D-design and PCB-design files on the project’s code repository on GitHub.

We’ve published a fair number of Tetris posts in the past, including skyscraper Tetris, playing Tetris on a soldering iron, and Tetris in 446 bytes. What’s the smallest Tetris you’ve seen?

Using A Logic Analyzer To Generate Screenshots From A Game Boy

Wouldn’t you like to go back to a dead handheld and extract the proof of your 90s-era high scores? Of course you would.

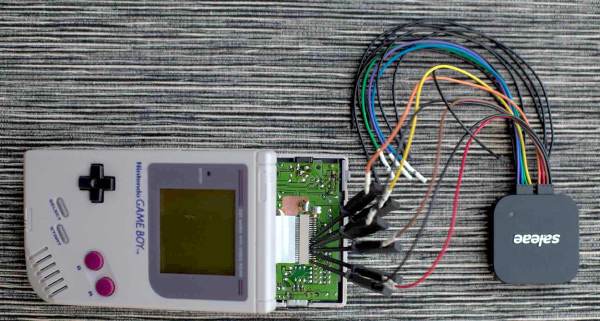
[svendahlstrand] bought his first logic analyzer, a Logic 8 from Saleae and decided to play around with an old Game Boy. He opened up the handheld with a tri-point screwdriver and hooked six wires up to the LCD data bus, generating screen shots from the logged data. He got screens from Solomon’s Club, Mole Mania, Kid Dracula, and more.

The first few attempts were fraught with mishap as [sven] worked to figure out the settings of his new analyzer. In one instance he had the DATA 0 and DATA 1 signals reversed, also reversing two of the gray values. After figuring it out he posted his LCD sniffing tutorial to GitHub, where he also has a C program for manually piecing together the screen shots, pixel by pixel.

Thanks to [sven] for posting this project to our recent Everything You Need to Know About Logic Probes post.


Low-Cost Rain Gauge Looks For Floods

We’ve seen a lot of uses for the now-ubiquitous ESP chip, including a numerous wilderness-monitoring devices.

Pluvi.on stands out with some attractive solutions and a simple design.

A lot of outdoor projects involve some sort of stock weather-resistance enclosure, but this project has a custom-designed acrylic box. About 4 inches across, the gauge uses a seesaw-like bucket to measure rain—a funnel, built into the enclosure, sends water into the gauge which records each time the bucket mechanism tilts, thereby recording the intensity of the rain. A NodeMCU packing an ESP8266 WiFi SoC sends the data to the cloud, helping predict the possibility of a flood in the area.

[Diogo Tolezano] and [Pedro Godoy] developed Pluvi.on as part of a Red Bull Basement hacker residency in São Paolo, Brazil. Interested in building your own Pluvi.on? They have building steps up on Instructables.

More ESP projects abound on Hackday, including this ESP mini robot, a data-logging hamster wheel, and an ESP32 information display. Continue reading “Low-Cost Rain Gauge Looks For Floods”

Hackaday Prize Entry: 18-DOF Hexaopod Aiming To Float

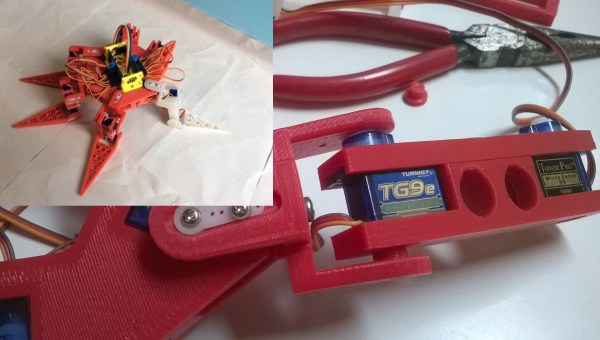
[Ken Conrad] didn’t like spiderbot projects he saw on the Internet: they mostly had 2 degrees of freedom per leg—if not fewer. He set out to make a hexapod robot with 18 DOF and the ability to move in any direction. Measuring around 20” from tip to tip, the custom, 3D-printed chassis was designed around eighteen SG90 9g micro servos. Each leg has 3 servos, one to move the tip, one for the middle, and one to move the entire leg back and forth, crab-style.

Perhaps the most intriguing notion of the project are the big paddle-like legs. [Ken] hopes get the robot to achieve some degree of flotation by laying its lower legs flat, staying afloat either due to surface tension, or maybe with the help of some buoyant material added to the legs.

[Ken] still has to figure out a control system for this beast, but we’re in awe of his creative use of zip-ties in place of traditional fasteners.

Nixie Tachometer Displays In Style

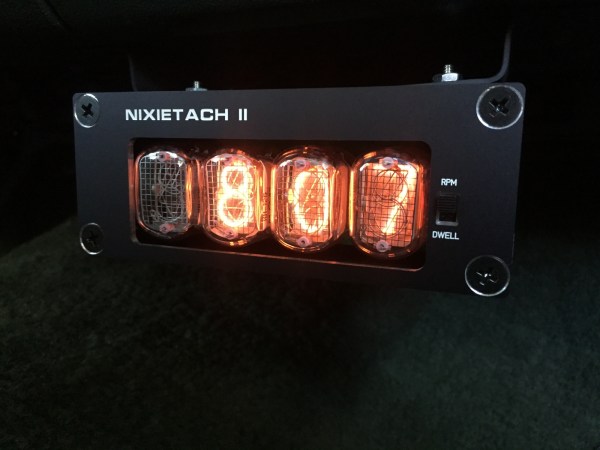
Nixietach II is a feature-rich tachomoter [Jeff LaBundy] built for his 1971 Ford LTD. It displays RPM with an error rate of only 0.03 RPM at 1,000 RPM

The latest iteration of a long-running project, [Jeff] approached it with three goals: the tachometer had to be self-contained and easy to install, the enclosure had to be of reasonable size, and it had to include new and exciting features over the first two versions.

The finished project consists of an enclosure mounted under the dash with a sensor box in the engine bay connected to the ignition coil. He can also flip a switch and the Nixietach serves as a dwell sensor able to measure the cam’s angle of rotation during which the ignition system’s contact points are closed.  The dash-mounted display consists of those awesome Soviet nixie tubes with a lovely screen-printed case. Its reverse has a USB plug for datalogging and a programming interface.

Hackaday has published some great car projects recently, like this chess set built from car parts and a 90-degree gearbox harvested from a wrecked car.


Where A Wood Shop Goes, A Hackerspace Follows

The 2×4 Contest at my local hackerspace captured my interest. The challenge was to build something cool out of a single eight-foot 2×4 with the winner getting free wood storage in the space. I had half an idea for a project, but I ran out of time and never even started it. My idea was to cut the board into half-thickness strips and glue them edge-to-edge with some biscuits holding them together — to basically make wider, thinner boards to do… something cool with it.

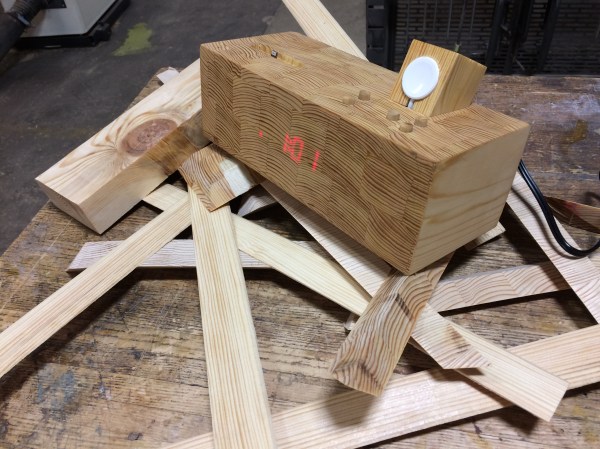
One of the entries is pictured above. [Jon Alt] designed this clock and phone charger that includes a capacitive charger for his smart watch. He makes use of the 2×4’s grain to make a gorgeous enclosure, carving away the rear of the front panel so only a credit-card’s thickness of wood remained, allowing the 7-segments to shine through. The other entries were great as well and I especially liked the 2×4 guitar.

Mostly what interested me about the contest was what it showed about the wood shop: thanks to the volunteers and board, that is a wood shop doing well. Stuff is going on! A sad wood shop doesn’t hold contests. By extension, when the shop is doing well, that means the hackerspace is also doing well.

A wood shop is one of those areas of a hackerspace that is tool-driven. It’s not just a gathering place for like-minded folks; people go to use a specific tool or tools they can’t afford, and let’s face it, there’s always tools to buy that costs a bunch of money.

I’ve seen this particular shop begin as an empty concrete room with a cheap drill press and someone’s old bandsaw. Pretty soon worktables, shelving, and storage were built. More tools arrived, some donated, some loaned, some purchased with dues. So how can other spaces replicate this wood shop success story?

Continue reading “Where A Wood Shop Goes, A Hackerspace Follows”

Tell Time With A Reverse-Sundial Watch

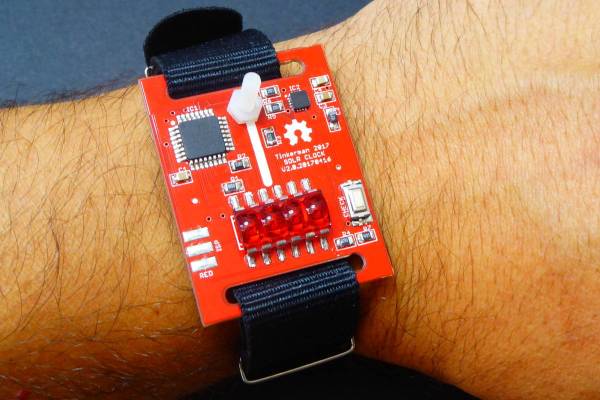
[Xose Pérez] set out to make a sundial wristwatch by combining a magnetometer a small nylon bolt for the gnomon, but it doesn’t work like you’d think. Instead of using the magnetometer to point the sundial north, you angle the watch until the bolt’s shadow matches the white line on the PCB, and the ATmega328P computes the azimuth of the sun and determines the time thereby. To display the time he used one of those QDSP-6064 bubble displays, because sundials are retro.

His description of the project build includes a lot of fun anecdotes, like him attempting to solder the LCC connections of the HMC5883 magnetometer before giving up and making use of Seeedstudio’s PCBA service. He got 10 boards back with the ATmega and magnetometer populated while leaving the rest for [Xose] to fill in.

One fun detail of the project? You can’t tell what time it is without the sun, but you can’t read the bubble display in bright sunlight.

If you’re looking for more watch projects we’ve published, check out this wrist-controlled watch, the Chronio DIY watch, and this cool nixie-tube watch.