Reverse Engineering An LCD Display

ipod

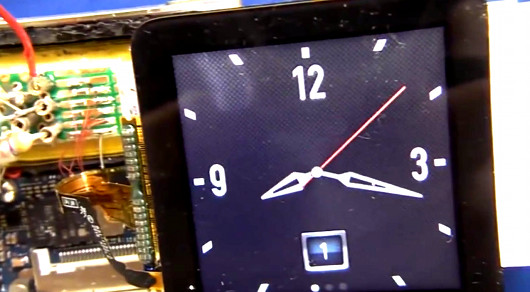
The current marketplace allows hobbyists to easily find inexpensive, well-documented displays, but what if you wanted to interface with something more complicated, such as the screen on an iPod Nano 6? [Mike] has given us a detailed and insightful video showing his process for reverse engineering a device with little-to-no documentation. Here he covers the initial investigation, where one scours the web in search of any available information. In [Mike’s] example, the display uses an MIPI D-PHY interface, which he has never worked with. He learns that the MIPI Alliance will provide design specs in exchange for a signed NDA (Non-Disclosure Agreement) and a modest $8000 fee. Nice.

[Mike] shows off some serious hardware hackery, tackling some extremely difficult soldering in order to set up a proper test platform. He then demonstrates how to use a rather awesome oscilloscope to better understand the display protocol. We found it fascinating to see the video signals displayed as waveforms, especially when he shows how it is possible to count the individual binary values. The amount of information he uncovers with the oscilloscope is nothing short of amazing, proving these little devices are more complex than they seem.

[via Hacked Gadgets]

Continue reading “Reverse Engineering An LCD Display”

Reverse Engineering Serial Ports

Can you spot the serial port in the pic above? You can probably see the potential pads, but how do you figure out which ones to connect to? [Craig] over at devttys0 put together an excellent tutorial on how to find serial ports. Using some extreme close-ups, [Craig] guides us through his thought process as he examines a board. He discusses some of the basics every hobbyist should know, such as how to make an educated guess about which ports are ground and VCC. He also explains the process to guessing the transmit/receive pins, although that is less straightforward.

Once you’ve identified the pins, you need to actually communicate with the device. Although there’s no easy way to guess the data, parity, and stop bits except for using the standard 8N1 and hoping for the best, [Craig] simplifies the process a bit with some software that helps to quickly identify the baud rate. Hopefully you’ll share [Craig’s] good fortune if you reach this point, greeted by boot messages that allow you further access.

Wii Nunchuck-Controlled Tetris On A Raspberry Pi

tetris

[Vince] teaches an Embedded Systems class at the University of Maine, and some of his students were working on video games for their finals. He decided to “test the hardware” that the students were using by putting two 8×8 displays, one 4×7 segment display, and a Wii Nunchuck on the I2C bus. He then wrote a version of Tetris that accepts trigger presses and accelerometer input for control. Judging by the video (embedded after the break), the Raspberry Pi runs the game without issue. The bus is, of course, more than capable of handling everything.

Unfortunately, [Vincent] had some trouble getting the controls just right. Sometimes dropping a piece can cause the next to drop too quickly, and the accelerometer control seems a bit too sensitive. We imagine using the joystick for rotation and adding some strategic pauses in the game could help. He graciously released the source code for the project, so maybe we’ll see some embracing and extending in the near future.

Continue reading “Wii Nunchuck-Controlled Tetris On A Raspberry Pi”

Internet-Enabling A Lamp With The Raspberry Pi

lampcontrol

[Jack] sent in his writeup for internet enabling a home lamp. While we will certainly have some comments saying this is too simple, it does a great job of breaking things down to the basics. For those that aren’t confident in their electronic skills, this is an easy hack to a commercial device that greatly expands it’s capabilities. [Jack] started with a cheap wireless outlet controller. By opening the remote and wiring each switch to a 2N222A transistor, you can very easily control the remote from the GPIO pins on the Raspberry Pi. In [Jack’s] case, he set up a web page using Flask that allows quick on/off control.

Of course, this method can be used in any number of instances where you have a wireless controller, from small lamps to garage doors. Given it’s simplicity, anyone can do it with even basic skills. If you’re a beginner who’s been itching to do some home automation, follow [Jack’s] writeup and check an item off your todo list!

Hanging Plotter With A Color Twist

hangbot

[Jack Boland], a mechanical engineer at the University of Wisconsin, built a cool hanging plotter project called HangBot. It’s a fairly standard setup, where he converts an image to G-Code files, and it is plotted using two stepper motors for control. We’ve seen vertical plotters before, but they tend to only have a single pen. [Jack] expanded this one to bring color into the mix by splitting an image into separate CMYK layers, and plotting each onto separate transparency film. When overlaid, they create something close to a full color image. His idea is to use this setup as a replacement for typical window signage.

Since it’s drawing a continuous line, he appears to be employing a grid instead of a traditional dot pattern. That, combined with the inaccuracy of a marker tip means resolution will be limited. Still, you can tell that he’s made a great start in this (albeit blurry) photo. Check out the video of it’s operation after the break.

Continue reading “Hanging Plotter With A Color Twist”

Solar Powered, Tweeting Bird Feeder

feeder-v3

The folks at Manifold created their version of a tweeting bird feeder, and [Chad] wrote up a behind-the-scenes of their design. The goal is something we’ve seen before: When the bird lands to eat, take a picture and tweet it. In this case, they had some corporate money behind the project, and that allowed them to buy a nice solar panel and battery pack to keep the whole thing running.

The write-up is full of the experimentation that we all enjoy: They found that detecting motion through the camera feed wasn’t reliable, so they switched over to a PIR sensor. The PIR sensor was too sensitive to heat changes during the day, so they went with an ultrasonic rangefinder, but wind caused issues there. They finally came up with a solution which involves using two sensors to confirm motion. This seems a bit more complicated than it needs to be, but it works well for them.

We think it is nice to see companies getting behind quirky projects. All told, they spent dozens of hours on this, and they chose to give all of their findings back to the community in the form of thorough explanations and project diagrams. It would be nice to see more of this.

The weather in Colorado hasn’t been the best lately, so the birdhouse hasn’t been tweeting for a while. In our experience, a project that’s turned off is in the dangerous position of being scavenged for parts. Hopefully that isn’t the case here, and we will see it back in action when Spring starts.

Solder Fume Extractor With Heat Recovery

solderhood

When snow covers the landscape outside, you do your best to preserve the heat inside. [Tom] came up with a smart design for a solder fume extractor that includes a heat recovery ventilator. He created a housing which contains input and output sections. A fan is used to bring in outside air, passing it through a heat exchanger made of alternating panels of coroplast. (See diagrams of his setup after the break) This is really a simple design, and could be built in a couple of hours.

A little digging turns up some good information on making a heat exchanger like this one. [Tom] doesn’t mention the indoor temperature, so it’s difficult to calculate the efficiency he’s getting out of it. Apparently they can attain up to 70% heat transfer, depending on the size of the heat exchanger.

In the video, [Tom] mentions some obvious improvements that could be made, including more efficient fans, and a better housing that allows the core to be removed for cleaning. Still, this is a simple setup that provides a good proof of concept. Perhaps we’ll get to see a more permanent installation from [Tom] in the future.

Continue reading “Solder Fume Extractor With Heat Recovery”