homemade table saw

Homemade Table Saw Starts With Circular Saw

How often do us tinkerers go out into our basement/garage shop and don’t have the correct tool for the job? Most would say it happens more often than they would prefer. One option would be to buy the tool, but it is always more fun to build what you need! [kadambi] was in need of a table saw and decided to build his own.

He’s using a circular saw as his starting point but this isn’t just any old circular saw. This one has a riving knife that prevents work piece kickback and human contact with the back of the spinning blade. The saw is mounted upside-down to a wooden table that is supported by a wooden box frame. The boxy frame has another function, it acts as a dust collector. A vacuum is ported into the box frame creating a low pressure condition and most of the sawdust is sucked into (and settles on) the bottom of the box. Only a small amount of dust makes its way into the vacuum, preventing otherwise inevitable filter clogs. Out front is an industrial on/off switch as well as a separate e-stop switch.

[kadambi] has done some test cuts and is happy with his saw’s performance. If you’re interested in more DIY table saws, check out this mini saw or feature-filled one.

rotary cell phone

Rotary Phone Converted For Mobile Use

As a society we are moving away from land line phones while mobile devices are becoming more and more prevalent. It is not uncommon for people to only have a cell phone and completely skip out on the corded home phone. While this move may be for convenience, there is one difference between the two phone types that didn’t ring well with [Stavros]. He’s an angry phone talker and misses the ability to slam down a phone handset. Now [Stavros] could just have a corded home phone but he wanted a mobile option for handset slams so he came up with a project called iRotary. It’s an old school rotary phone converted to be battery powered and uses cell phone networks for making calls.

At the heart of the project is an Arduino. The Arduino is a great choice as it can easily decode the phone’s rotary dial pulses. The Arduino code takes all of the individual dialed numbers and combines them into a phone number. The sketch is set up so that after the 10th digit is read, the phone call is placed using an off the shelf GSM shield and associated library.

Since a battery would be necessary to make this phone mobile, one was installed inside the case along with a charging circuit. [Stavros] hasn’t done any long-term endurance studies but he has had the phone on for several hours at a time without any problems. So, now he can rest easy knowing that an angry hang-ups are never out of his reach, regardless of where he may be. And since he’s a nice guy, he’s made the source code available for anyone wanting to make something similar.

Continue reading “Rotary Phone Converted For Mobile Use”

bike wheel wind turbine

Juice-Spewing Wind Turbine Bootstrapped From Bike Parts

Wind Turbines are great, they let us humans harness the energy of the wind. Wind is free and that is good, but spending a ton of money on a wind turbine setup begins to make the idea less appealing. [Ted] has spent many years building low cost wind turbines and this one is not only simple but can be made from mostly found parts.

It’s easy to identify the main rotor hub and blade frame which are made from an old bicycle wheel. The blades are standard aluminum flashing normally used in home construction and are attached directly to the spokes of the bike wheel. Mounted below the bike rim is a permanent magnet motor that acts as a generator. A belt couples the motor to the main rotor and uses the tire-less rim as a pulley.

[Ted] has strapped this beast to the roof of his car to measure how it performs. At 12 mph, he’s getting between 18-20 volts at 2 amps. Not too bad! Bikes and bike parts are cheap (or free) and there is no surprise that they have been used in wind turbine projects before, like this one that hangs from a kite.

MAME Frame

MAMEFrame – Sweet All In One Portable MAME System

Video game enthusiast [NEIN] loves MAME. The one thing he doesn’t like much about MAME is moving large heavy MAME cabinets around. So what do you do if you want to take your games on the road? [NEIN] decided to come up with a portable MAME solution that includes everything all in one box so there is virtually no set-up time to get playing. He calls it ‘The MAMEFrame‘.

It may appear that this is a standard 2-player DIY controller, however, it is anything but. The display is housed inside the encloure — a video projector that connects to the Raspberry Pi via an HDMI cable. [NEIN] opted to use a Raspberry Pi instead of a large PC to help keep things light and samll. It’s almost like the two were made for each other. The projector has a built in battery and USB port. The Raspberry Pi is powered by the 5 volts supplied from the projector’s USB port making this unit completely portable and wireless. Just plop it down on a table, point it at a wall and you’re ready to guide Pac-Man to level 256!

Did you know one of the very first Raspberry Pi hacks ever was a MAME build?

Continue reading “MAMEFrame – Sweet All In One Portable MAME System”

PVC CNC

PVC CNC Machine Build Results In A Great Learning Experience

Hobby level CNC machines are fun to use and are a great tool to make your projects with. So how does a CNC newb get started? Our opinion is that it’s best to jump right in and get doing. [WTH] wanted to learn more about CNC machines and decided to build his own using parts that were kicking around his house.

As you can see, the frame is made from PVC pipe. In addition, the linear rails are also PVC and the linear bearings….. larger diameter PVC. Scavenged stepper motors and threaded rod are responsible for moving the X and Y axes. Electronics-wise, an Arduino Uno running GRBL and a Protoneer CNC Shield outfitted with StepSticks drive the motors. Here’s a test drawing completed by the machine:

PVC CNC

Admittedly, this CNC machine won’t be milling out steel parts any time soon but that is not the point. [WTF] has learned the mechanics, electronics and software associated with CNC machines and that was the point of the project. We are looking forward to seeing how his next machine comes out.

This isn’t the first PVC CNC machine we’ve seen on Hackaday, check out this unorthodox one.

hand in hand clock

Odd Clock Moves Minute Hand To Hour Hand

We see a lot of clocks here on Hackaday. Some make it easy to tell the time, others are more cryptic. [dragonator] has done something that is so simple, we are surprised it isn’t more common. In a typical mechanical hand clock the minute and hour hands rotate around the same axis. [dragonator] decided to take the minute hand and move it out to the tip of the hour hand.

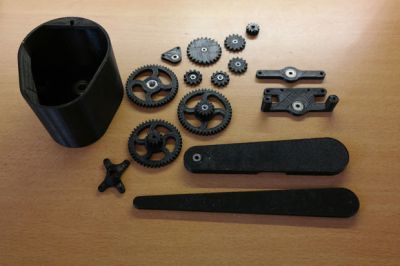
It works because of a gear system hidden behind the thick hour hand. As the hour hand turns, the gear system rotates, the last gear of which is connected to the minute hand. Since the minute hand rotates 12 times for every one revolution of the hour hand, the gear ratio can easily be calculated.

hand in hand clockThe 3D printed parts were designed by [dragonator] himself. All of the design files are available here for anyone who wants to build one of these neat clocks.

The clock uses a Trinket microcontroller board to keep track of the time and to send step signals to a StepStick that drives a NEMA 17 stepper motor. There is no on-board battery power for this clock, 9-12vdc comes in via a wall wart and is stepped down to 5v by the micro controller’s regulator. Even still, this is a great project that makes it fun to watch time pass, check the video out after the break.

Continue reading “Odd Clock Moves Minute Hand To Hour Hand”

Sea Rendering

Project Sea Rendering Autonomously Renders Sea Bottoms

[Geir] has created a pretty neat device, it’s actually his second version of an autonomous boat that maps the depths of lakes and ponds. He calls it the Sea Rendering. The project is pretty serious as the hull was specially made of fiberglass. The propulsion is a simple DC motor and the rudder is powered by an RC servo. A light and flag adorn the top deck making the small craft visible to other larger boats that may be passing by. Seven batteries are responsible for all of the power requirements.

Sea Rendering

The craft’s course is pre-programmed in Mission Planner and uses ArduPilot loaded on an Arduino to steer to the defined way points. An onboard GPS module determines the position of the boat while a transducer measures the depth of the water. Both position and depth values are then saved to an SD card. Those values can later be imported into a software called Dr Depth that generates a topographic map of the water-covered floor.

[Geir] has sent this bad boy out on an 18 km journey passing through 337 way points. That’s pretty impressive! He estimates that the expected run time is 24 hours at a top speed of 3 km/h, meaning it could potentially travel 72 km on a single charge while taking 700 depth measurements during the voyage.

Continue reading “Project Sea Rendering Autonomously Renders Sea Bottoms”