Part Finder, Vacuum Attachment

Super Cheap Vac Attachment Helps Find Small Dropped Parts

It’s pretty much guaranteed that when working with small parts, you will drop at least one. This phenomenon is just how the universe works, there is no avoiding it. Digging though a carpet or dirty shop floor usually results in frustration and subsequent scrambling for a replacement part. Tired of crawling around on his knees looking for runaway parts, [Frank] decided to do something about it. He made a vacuum attachment that helps with the search… and it’s made from stuff he had kicking around the house.

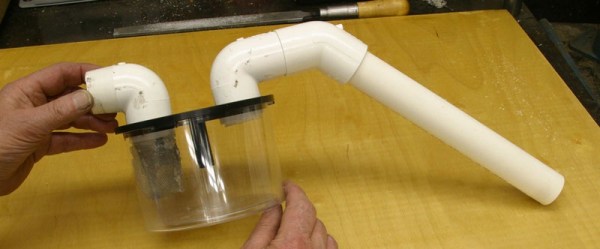
The idea here is to suck up and contain the part without having it making it’s way into the vacuum. To do this there would have to be an intermediate chamber. For this, [Frank] used a multi-pack CD container. This was a great choice because it is clear, allowing him to see what enters the container, and it unscrews quickly making it easy to retrieve the tiny part. The inlet and outlet connectors are made from PVC and are attached to the CD container’s base with adhesive. To keep the debris from getting past the CD container, an old kitchen strainer was cut up and the screen material was used to only let air pass. Once a shop-vac is connected to the outlet pipe, the sucking can begin. [Frank] shows that he has to sift through a bunch of shop-floor crud to find his dropped screw, but it works!

MDF CNC

DIY MDF CNC Machine Is Small And Solid

In the world of hobby-level CNC cost and simplicity are usually the name of the game. Using inexpensive and easily found materials makes a big difference in the feasibility of a project. [FreeRider] had built a CNC router before but it was big, flexible and not as accurate as he wanted. He set off to design his own table top router, influenced from other designs found on the ‘net, but also keeping the costs down and ease of build up.

The machine frame is made from 3/4″ MDF and was cut on [FreeRider’s] first router, the JGRO. Notice how all the holes are counterbored for the many bolt heads. It is clear that much attention to detail went into the design of this machine. Aluminum angle act as linear rails on which v-wheel bearings travel. Skate bearings support 5/16″ threaded rod used as lead screws. Lead nuts are tapped HDPE blocks and seem to be doing a satisfactory job with minimal backlash.

[FreeRider] says his new machine is capable of 60 inches per minute travel, double that of his old machine. Since the new machine is stiffer, he’s able to route aluminum and has successfully made some brackets out of 1/8″ plate. He reports the dimensional accurate to be about 0.002-0.003 inches. For more inexpensive MDF-based CNC machines, check out this drawer slide bearing one or this one that uses a drill for a spindle.

Nice Looking Countdown Timer For The Home Game Show Enthusiast

Every couple of weeks, [Roo’s] place of employment, TMW Unlimited, has a contest. This contest takes place in the form of a game show and the contestants have 30 seconds to pitch their current project to the group. A panel of judges vote on the best pitches. Winners receive cupcakes and drinks. Originally, stopwatches were used to keep track of the elapsed time, however, a stopwatch is not very game showy. [Roo] set out to make a countdown timer to add some authenticity to the bi-weekly event.

The main enclosure is a plastic fence post. Fifteen holes and 15 large LEDs are covered up by large plastic translucent spheres. End caps were designed and 3D printed to not only make the rig look good but also to serve as a speaker mount. Inside resides an Arduino that does the counting and turns off the row of lights, one every 2 seconds, as the countdown continues. A speaker not only ticks and tocks its way down with the lights, it also buzzes when time is up. Starting and resetting the timer is as easy as pushing a single button mounted on the case.

If you’ve already built a game show timer, you may want to check out this DIY game buzzer system!

Continue reading “Nice Looking Countdown Timer For The Home Game Show Enthusiast”

tweet pinata

Tweet-Powered Bat Removes Effort Required To Obtain Pinata Contents

A child filled game-launch event was happening in London and [Roo] was asked to use his serious making skills to construct a machine that would hit a pinata with a baseball bat. This is a great idea, well, because giving bats to a bunch of kids at a populated event probably wouldn’t end well. One of the characters from the game Skylanders is named ‘Painyatta‘ and that is whom the pinata is modeled after. Tweeting #HitPainyatta initiates a bat swing. The swing tweeter gets to keep any treats that happen to fall out.

The physical machine is pretty simple. Most of it is made of MDF and wood. A large base supports a tall, skinny box. Mounted on top is a large stepper motor with a long wooden arm holding an aluminum bat. Once a tweet came in, a moderator would check for offensive content (hey, there are kids around) using a custom Twitter API app, and if acceptable, the tweet would be displayed on an LED matrix while an Arduino controlled a stepper driver to spin the motor and swing the bat.

…no children were harmed in the making of this project…

Continue reading “Tweet-Powered Bat Removes Effort Required To Obtain Pinata Contents”

psp media player

PSP Media Player For The Home Workshop

It’s a common occurrence that some items we buy become more and more obsolete as time passes. This is especially true for electronics gear since technology progresses so quickly. [Rochefoucauld] had a PSP that he didn’t use anymore and was trying to figure out what to do with it. Then one day in his basement shop while yearning for some tunes, it hit him: use the PSP as a media player.

The PSP is actually not modified and uses the standard media player, it is the project’s execution that is interesting. Some old computer speakers were taken apart to harvest the amplifier. [Rochefoucauld] had an external hard drive that broke so he scavenged the sleek looking case and mounted the amplifier PCB inside. The speaker outputs were routed to terminal blocks mounted on the back of the case. The PSP now resides on a mount made out of a floor joist hanging bracket from the hardware store. The PSP and amplifier share the same power supply and master power switch. The whole unit powers a pair of bookshelf speakers.

In the end, [Rochefoucauld] solved his lack-of-music problem with parts he had kicking around and is also now making use of his PSP that was otherwise collecting dust. For more non-traditional uses for PSPs, check out this status monitor or this extended display.

printrbot simple metal fix

Cheap Hot End Modification Allows Easy Future Repairs

We’ve seen a lot of experimenting with 3D printers over the years, and that is a good thing. However, [Tyler] has had a bad experience with experimenting. He has a Printrbot Simple Metal and decided to try nylon weed wacker line. Since he wanted to get straight to printing, he skipped the apparently important step of drying the trimmer line before printing. This experimentation ended in several clogged nozzles. Removing and cleaning the nozzle several times put undo stress on the Ubis hot end wires and they broke. Things were not going well.

In an effort to make his printer more repairable, [Tyler] ordered up an aluminum RepRap heater block, heating resistor and thermistor. The heater block was tapped with standard M6 threads but the Ubis was 1/4 inch. This was remedied by drilling and tapping the M6 hole to 1/4-20.

Now for the nozzles, [Tyler] bought a handful of cheap brass acorn nuts. He drilled a hole for the molten plastic to exit the nozzle, then used a Dremel to grind the acorn nut’s dome into a cone. He reports it only took him about 5 minutes per nozzle.

It looks like [Tyler] got back to printing with a little creative thinking. Unfortunately, the Ubis and J-Head hot ends are not interchangeable. A couple of other ex-Ubis users have made J-Head adapters for their Printrbots.

spa sitter

Pool/Hot Tub Monitoring And Data Collection

Pools and hot tubs, although enjoyable, require monitoring and maintenance to keep the water clean and clear. [bhuebner] didn’t like having to constantly testing his hot tub’s vitals using test strips and water test kits. In an effort to autonomously monitor his hot tub’s water, he came up with a project he’s calling SpaSitter that records and tracks water quality indicators.

spa sitter The hardware is based on a Nanode (think Arduino with on-board Ethernet). Three sensors are connected to the Nanode and placed in his hot tub’s water.  The sensors measure pH, ORP and Temperature. That data is then uploaded to xively.com where the data is not just stored, but tracked over time and displayed in graph-form. Checking the vitals on your phone can also get a bit tedious so [bhuebner] set up an email notification if one of the measured data streams go outside of a predetermined range. He still has to add chemicals manually and hopes to see some automation added to the next project revision.

[bhuebner] made his code available and also posted detailed instructions, including how to calibrate the sensors, for anyone wanting to do the same thing.