This Halloween, crafting most of your props and replicas wont be as easy as hitting “print.” This Mass Effect M-6 Carnifex Rubber Band Gun is the exception, though, and it’s all thanks to the detailed efforts of [eggfooyoung]. Like many others in childhood, [eggfooyoung] dreamed of sporting his own rubber-band gun. Year’s later, he’s made that dream a reality, and one for many others as well.
Mechanically, rubber-band guns, especially semi-automatic ones, are a finely tuned escapade into complex levers and joints. [eggfooyoung] took it upon himself to learn from the best in the craft, in this case, YouTube user [RBGuns] who has posted designes for numerous rubber band weapons. Overall, the M-6 Carnifex is a triumph of shared knowledge, as it’s an iteration of [RBGun’s] M9 build. [eggfooyoung’s] documentation is also everything we’d love to see in a weekend project: design files [PDF], detailed pictures documenting the step-by-step gluing process, and resources to dig more deeply into building your own rubber band guns.
These days, our automobiles sport glittering consoles adorned with dials and digits to keep us up-to-date with our car’s vitals. In the future, though, perhaps we just wont need such vast amounts of information at our fingertips if our cars are driving themselves around. No information? How will we tell the car what to do? On that end, [Felix] has us covered with Stewart, a tactile gesture-input interface for the modern, self driving car.
Stewart is a 6-DOF “Stewart Interface” capable of both gesture input and haptic-output. Gesture input enables the car’s passenger to deliver driving suggestions to the car. The gentle twist of a wrist can signal an upcoming turn at the next intersection; pulling back on Stewart’s head “joystick style” signals a “whoa–slow down, there, bub!” Haptic output via 6 servos pushes around Stewart’s head in the car’s intended direction. If the passenger agrees with the car, she can let Stewart gesture itself in the desired direction; if she disagrees; she can veto the car’s choices by moving her hand directly against Stewart’s current output gesture. Overall, the interface unites the intentions of the car and the intentions of the passenger with a haptic device that makes the connection feel seamless!
We know we’re not supposed to comment on the “how” with art projects–but we’re engineers–and this one makes us giddy with delight. We’re imagining those rc car shock absorbers dramatically dampening the jittery servos and giving the user a nice resistive feel. Interconnects are laser cut acrylic, and the shell is a smoothly contoured 3d print. We’ve seen Stewart Interfaces before, but nothing with the look-and-feel of a sleek design feature on its way to being dropped into the cockpit of our future self-driving cars.
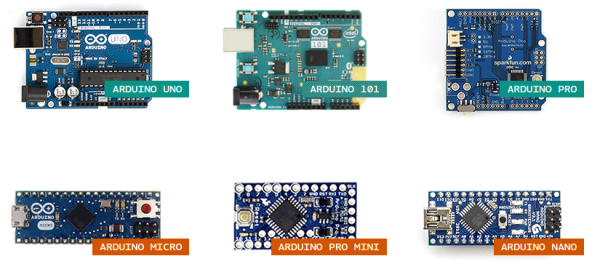
For over ten years, Arduino has held onto its popularity as “that small dev-board aimed to get both artists and electronics enthusiasts excited about physical computing.” Along the way, it’s found a corner in college courses, one-off burning man rigs, and countless projects that have landed here. Without a doubt, the Arduino has a cushy home among hobbyists, but it also lives elsewhere. Arduino lives in engineering design labs as consumer products move from feature iterations into user testing. It’s in the chem labs when scientists need to get some sensor data into their pc in a pinch. Despite the frowns we’ll see when someone blinks an LED with an Arduino and puts it into a project box, Arduino is here to stay. I thought I’d dig a little bit deeper into why both artists and engineers keep revisiting this board so much.
Arduino, do we actually love to hate it?
It’s not unusual for the seasoned engineers to cast some glares towards the latest Arduino-based cat-feeding Kickstarter, shamelessly hiding the actual Arduino board inside that 3D-printed enclosure. Hasty? Sure. Crude, or unpolished? Certainly. Worth selling? Well, that depends on the standards of the consumer. Nevertheless, those exact same critical engineers might also be kicking around ideas for their next Burning Man Persistence-of-Vision LED display–and guess what? It’s got an Arduino for brains! What may seem like hypocrisy is actually perfectly reasonable. In both cases, each designer is using Arduino for what it does best: abstracting away the gritty details so that designs can happen quickly. How? The magic (or not) of hardware abstraction.
Meet HAL, the Hardware-Abstraction Layer
In a world where “we just want to get things blinking,” Arduino has a few nifty out-of-the-box features that get us up-and-running quickly. Sure, development tools are cross-platform. Sure, programming happens over a convenient usb interface. None of these features, however, can rival Arduino’s greatest strength, the Hardware Abstraction Layer (HAL).
A HAL is nothing new in the embedded world, but simply having one can make a world of difference, one that can enable both the artist and the embedded engineer to achieve the same end goal of both quickly and programmatically interacting with the physical world through a microcontroller. In Arduino, the HAL is nothing more than the collection of classes and function calls that overlay on top of the C++ programming language and, in a sense, “turn it into the Arduino programming language” (I know, there is no Arduino Language). If you’re curious as to how these functions are implemented, take a peek at the AVR directory in Arduino’s source code.
With a hardware abstraction layer, we don’t need to know the details about how our program’s function calls translate to various peripherals available on the Uno’s ATMEGA328p chip. We don’t need to know how data was received when Serial.available() is true. We don’t “need to know” if Wire.begin() is using 7-bit addressing or 10-bit addressing for slave devices. The copious amounts of setup needed to make these high-level calls possible is already taken care of for us through the HAL. The result? We save time reading the chip’s datasheet, writing helper functions to enable chip features, and learning about unique characteristics and quirks of our microcontroller if we’re just trying to perform some simple interaction with the physical world.
Cross-Platform Compatibility
Teensy 3.2 keeps form factor but adds on-chip hardware features compared to 3.1
There are some cases where the HAL starts to break down. Maybe the microcontroller doesn’t have the necessary hardware to simultaneously drive 16 servos while polling a serial port and decoding serial data. In some cases, we can solve this issue by switching Arduino platforms. Maybe we actually do need three serial ports instead of one (Teensy 3.2). Maybe we do need pulse-width-modulation (PWM) capability on every pin (Due). Because of the hardware abstraction layer, the rest of the source code can remain mostly unchanged although we may be switching chip architectures and even compilers in the process! Of course, in an environment where developing code for the target platform does matter, it doesn’t make sense to go to such efforts to write the general-purpose code that we see in Arduino, or even use Arduino in the first place if it doesn’t have the necessary features needed for the target end-goal. Nevertheless, for producing an end-to-end solution where “the outcome matters but the road to getting there does not,” writing Arduino code saves time if the target hardware needs to change before getting to that end goal.
HAL’s drawbacks
Of course, there’s also a price to pay for such nice things like speedy development-time using the HAL, and sometimes switching platforms won’t fix the problem. First off, reading the Arduino programming language documentation doesn’t tell us anything about the limitations of the hardware it’s running on. What happens, let’s say, if the Serial data keeps arriving but we don’t read it with Serial.read() until hundreds of bytes have been sent across? What happens if we do need to talk to an I2C device that mandates 10-bit addressing? Without reading the original source code, we don’t know the answers to these questions. Second, if we choose to use the functions given to us through the HAL, we’re limited by their implementation, that is, of course, unless we want to change the source code of the core libraries. It turns out that the Serial class implements a 64-byte ring buffer to hold onto the most recently received serial data. Is 64 bytes big enough for our application? Unless we change the core library source code, we’ll have to use their implementation.
Both of the limitations above involve understanding how the original HAL works and than changing it by changing the Arduino core library source code. Despite that freedom, most people don’t customize it! This odd fact is a testament to how well the core libraries were written to suit the needs of their target audience (artists) and, hence, Arduino garnered a large audience of users.
Pros of Bare-Metalspeak
digitalWrite takes a whopping 52-55 cycles to change pin direction! [image source]Are there benefits to invoking the hardware directly? Absolutely. A few curious inquirers before us have measured the max pin-toggling frequency with digitalWrite to be on the order of ~100 KHz while manipulating the hardware directly results in a pin-toggling frequency of about 2 MHz, about 20 times faster. That said, is invoking the hardware directly worth it? Depends, but in many cases where tight timing isn’t a big deal and where the goal of a functional end-to-end system matters more than “how we got there,” then probably not! Of course, there are cases when tight timing does matter and an Arduino won’t make the cut, but in that case, it’s a job for the embedded engineer.
Use the HAL, Luke!
To achieve an end-to-end solution where the process of “how we got there” matters not, Arduino shines for many simple scenarios. Keep in mind that while the HAL keeps us from knowing too many details about our microcontroller that we’d otherwise find in the datasheet, I don’t proclaim that everyone throw out their datasheets from here on out. I am, however, a proponent of “knowing no more than you need to know to get the job done well.” If I’m trying to log some sensor data to a PC, and I discover I’ll be saving a few days reading a datasheet and configuring an SPI port because someone already wrote SPI.begin(), I’ll take an Arduino, please.
If you’ve rolled up your sleeves and pulled out an Arduino as your first option at work, we’d love to hear what uses you’ve come up with beyond the occasional side-project. Let us know in the comments below.
Hardware and software combined, Arduino does many things right. It lowers the entry level into embedded systems development with a nifty hardware abstraction layer. It aims for cross-platform compatibility by supporting Windows, Mac OSX, and Linux operation systems. It throws out the need for an external programmer to get you up-and-blinkin’ those LEDs quickly.
One thing most of us never cease to curse about, though, is the IDE. Many have cried out wildly against the Java-based text-editor for its cryptic compiling-and-linking process, its inability to accommodate bare C or C++ source files, and (shh!) its lack of Vim keybindings. Fortunately, our cries have been heard, and the like many community-based projects, the community fights back with a custom solution.
Calling all Grumpy Engineers: The Arduino-Makefile
What began as [Sudar’s] lightweight program to escape the IDE has become a fully-blown, feature rich Makefile that has evolved and adapted to grow with the changes of Arduino. With a community of 47 contributors, the Makefile enables you to escape from the IDE entirely by writing code in the cushy text editor of your choice and compiling with a simple incantation of make into your terminal, be you in Linux, Mac, or Windows.
Without further ado, let’s take a walking tour of the project’s highlights.
Welcome back to part II in this ensemble of techniques with laser-cut Delrin. Thanks for many of the great insights along the way in the comments. In this guide, I’d like to go over some of the more immediate kinks that come to mind when getting started with this material.
Sourcing Delrin Sheets
When it comes to shopping, there are a variety of suppliers to choose from, but there are a few key words and thoughts to keep in mind.
Names
First, Delrin, is the “brand name” that refers to the Acetal homopolymer. Variants may also be labeled, acetal or acetal homopolymer. Delrin’s natural color is a soft white, but dyes can take it into a range of other colors. Black and white are, by far, the most common, though.
Tolerances
In the previous guide, all of the examples were cut from a small range of sheet thicknesses (0.0625[in], 0.09375[in], and .125[in]) sourced from OnlineMetals. As the thickness of the sheet increases, the tolerances on the thickness rating will also become more loose. You might buy a .125[in] plate and find it to be .124[in] in some places and .126[in] in others. If you purchase a .250[in] sheet, however, you’ll find that it may vary as much as .126[in] oversize though!
Buy it Flat
Despite McMaster-Carr being my go-to solution for one-off prototypes where rapid build iterations trump BOM cost, I don’t recommend purchasing Delrin from them as their sheets don’t have a flatness rating and often gets shipped bent in (oddly sized) boxes. (Seriously, has anyone else gotten a few oddly-sized parts in a gigantic McMaster-box before?)
Internal Stresses
Extruded Delrin has internal stresses built up inside of the sheet. There are a variety of reasons why this could be the case, but my biggest hunch is that the extrusion process at the factory results in different parts of the sheets solidifying at different times as the sheet cools, possibly causing some parts of the sheet to tighten from the cooling before other gooier sections have yet to finish cooling. What this means for you is that as your part gets lased out of the sheet, you’re, in a sense, relieving that stress. As a result, the part that you cut–especially for thin sheets–may come out of the laser cutter slightly warped.
Need a simple fab process to go from a humble vector graphic to a final part — in a matter of minutes? The CO2 laser cutter might be the right choice. As these tools open themselves up to widespread use through hackerspaces, I decided to give Delrin some well-deserved time under the spotlight.
The laser cutter yet-again proves itself a formidable tool with the construction of GameCube-Bot V2
This guide is a brief collection of tips and techniques that I’ve either learned from others or discovered on my own over the last couple years working with laser-cut Delrin (a.k.a Acetal) for functional prototypes. I hope this guide serves you well as we keep exploring the limits of the material.
As a disclaimer, keep in mind that in no way are these techniques unique or limited to Delrin. Many are not only years old but also common practice in either engineering design or the local machine shop. This article simply highlights the techniques shown here that perform both repeatably and predictably with Delrin and a couple hand-tools, and I hope to share them with a growing audience of laser cutter enthusiasts.
For many hardware enthusiasts, it’s hard to stop imagining the possibilities of an almighty fablab in our garage — a glorious suite of machines that can make the widgets of our dreams. Over the years, many of us start to build just that, assembling marvelous workbenches for the rest of us to drool over. The question is: “how do we get there?”
Ok, let’s say we’ve got a blank garage. We might be able to pick up a couple of tools and just “roll with it,” teaching ourselves the basics as we go and learning from our mistakes. With enough endurance, we’ll wake up ten years later and realize that, among the CNC mill, lathe, o-scope, logic analyzer, and the graveyard of projects on the shelves–we’ve made it!
Image Credit: [Rupunzell] on EEVBlog
“Just rolling with it,” though, can squeeze the last bits of change out of our wallets–not to mention ten years being a long journey while flying solo the whole time. Hardware costs money. Aimless experimentation, without understanding the space of “what expectations are realistic,” can cost lots of money when things break.
These days, the internet might do a great job of bringing people together with the same interest. But how does it fare in exchanging the technical know-how that’s tied directly to tools of the trade? Can we get the same experience from a chatroom as we might from a few minutes with the local ‘CNC Whisperer’ who can tell us the ins-and-outs about tuning the machine’s PID controllers?
I’d say that we just can’t. “Getting started” in any subject often seems daunting, but we’re at a compounded disadvantage in that the gurus on the forum have some shared implicit knowledge and jargon on the subject that we wont have if we truly are taking our first steps. (Not to fear, though; none of us were born with this stuff!)
Ruling out forums for taking our first baby steps, where can we find the “seasoned gurus” to give us that founding knowledge? It’s unlikely that any coffee shop would house the local hardware guru sippin’ a joe and taking questions. Fear not, though; there are places for hackers to get their sustenance.


 It’s not unusual for the seasoned engineers to cast some glares towards the latest Arduino-based cat-feeding Kickstarter, shamelessly hiding the actual Arduino board inside that 3D-printed enclosure. Hasty? Sure. Crude, or unpolished? Certainly. Worth selling? Well, that depends on the standards of the consumer. Nevertheless, those exact same critical engineers might also be kicking around ideas for their next Burning Man Persistence-of-Vision LED display–and guess what? It’s got an Arduino for brains! What may seem like hypocrisy is actually perfectly reasonable. In both cases, each designer is using Arduino for what it does best: abstracting away the gritty details so that designs can happen quickly. How? The magic (or not) of hardware abstraction.
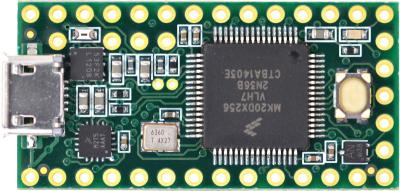
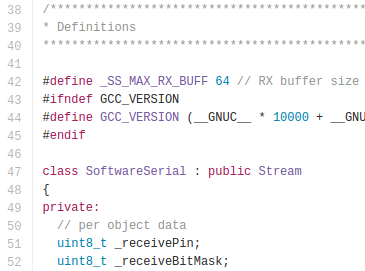 Of course, there’s also a price to pay for such nice things like speedy development-time using the HAL, and sometimes switching platforms won’t fix the problem. First off, reading the Arduino programming language documentation doesn’t tell us anything about the limitations of the hardware it’s running on. What happens, let’s say, if the Serial data keeps arriving but we don’t read it with Serial.read() until hundreds of bytes have been sent across? What happens if we do need to talk to an I2C device that mandates 10-bit addressing? Without reading the original source code, we don’t know the answers to these questions. Second, if we choose to use the functions given to us through the HAL, we’re limited by their implementation, that is, of course, unless we want to change the source code of the core libraries. It turns out that the Serial class implements a 64-byte ring buffer to hold onto the most recently received serial data. Is 64 bytes big enough for our application? Unless we change the core library source code, we’ll have to use their implementation.
![digitalWrite takes a whopping 52-55 cycles to change pin direction! [image source]](https://hackaday.com/wp-content/uploads/2015/10/arduino-digital-write-pin-toggle.jpg?w=400)


![Image Credit: [Rupunzell] on EEVBlog](https://hackaday.com/wp-content/uploads/2015/08/eevblogrupunzel.jpg)


