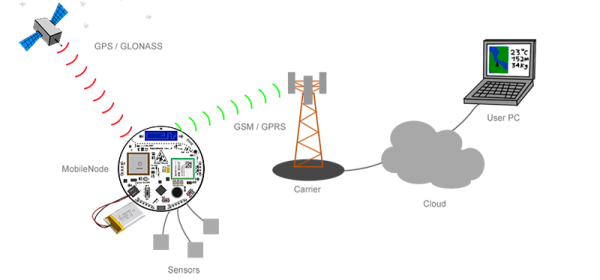
The future is the Internet of Things, or so we’re told, and with that comes the requirement for sensors attached to the Internet that also relay GPS and location data. [Camilo]’s MobileNodes do just that. He’s designed a single device that will listen to any sensor, upload that data to the Internet over GSM or GPRS, and push all that data to the cloud.
The MobileNode is a small circular (7cm) PCB with a standard ATMega32u4 microcontroller. Attached to this PCB are GSM/GPRS and GPS/GLONASS modules to receive GPS signals and relay all that data to the cloud. To this, just about any sensor can be added, including light sensors, PIR sensors, gas and temperature sensors, and just about anything else that can be measured electronically.
Of course the biggest problem with a bunch of sensors on an Internet of Things device is pulling the data from the Internet. For that, [Camilo] designed a web interface that shows sensor data directly on a Google Map. You can check out the project video below.
When you think about serial communications, Microsoft Excel isn’t typically the first program that springs to mind. But this spreadsheet has a rather powerful scripting language hidden away inside it, which can, with a little coding, be used to send and receive data over your serial port (Internet Archive Link, as of 2023). The scripting language is called Visual Basic for Applications (VBA), and it has been a part of Microsoft’s Office suite since 1993. Since then, it has evolved into a powerful (if sometimes frustrating) language that offers a subset of the features from Visual Basic.
It can be a useful tool. Imagine, for instance, that you are logging data from an instrument that has a serial port (or even an emulated one over USB). With a bit of VBA, you could create a spreadsheet that talks to the instrument directly, grabbing the data and processing it as required straight into the spreadsheet. It’s a handy trick that I have used myself several times, and [Maurizio] does a nice job of explaining how the code works, and how to integrate this code into Excel.
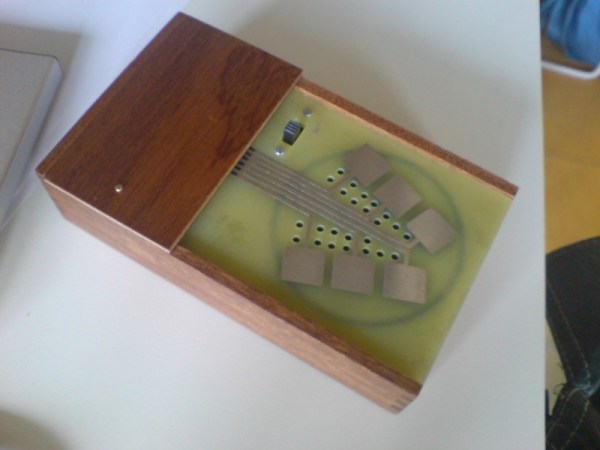
A friend from the newly founded Yeovil Hackerspace introduced me to a device known as “The Kraakdoos” or cracklebox.
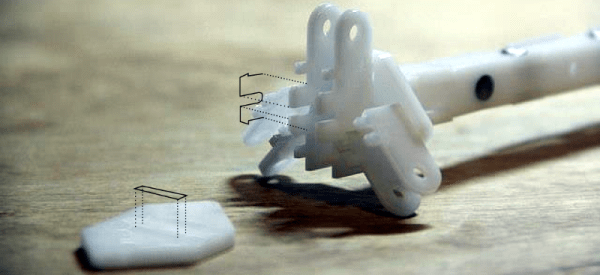
The cracklebox is an early electronic instrument produced by STEIM in the 1970s. The instrument consists of a single PCB with a number of copper pads exposed on one side. The player touches the pads and the instrument emits… sounds which can perhaps best be described as squeeze and squeals.
While the cracklebox was original sold as a complete instrument, the device has been reverse engineered, and the schematic documented. What lies inside is quite fascinating.
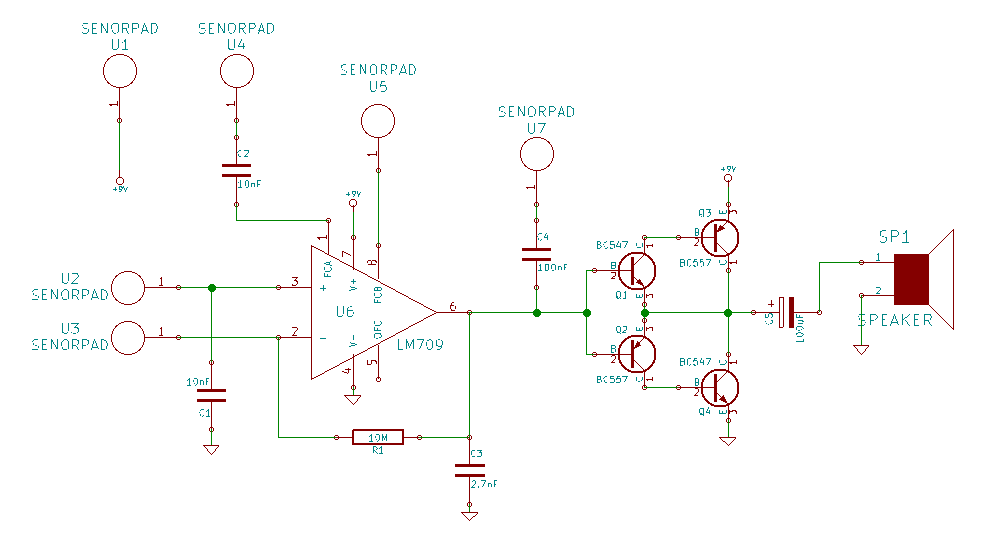
The heart of the cracklebox is an ancient opamp, the LM709. The LM709 is the predecessor to the famous LM741. Unlike the 741 the 709 had no internal frequency compensation. Frequency compensation is used to intentionally limit the bandwidth of an opamp. As input frequency increases, the phase shift of the opamp also increases. This can result in undesirable oscillation, as the feedback network forms an unintentional phase-shift oscillator.
Most modern opamps have internal frequency compensation, but the 709 doesn’t. Let’s see how this is used in the cracklebox:
Rather than using the frequency compensation pins as intended the cracklebox just routes them out to pads. In fact the cracklebox routes almost all the pins on the opamp out to pads, including the inverting and non-inverting inputs. A single 1MOhm feedback resistor is used in a non-inverting configuration. However reports suggest the instrument can work without a feedback resistor at all!
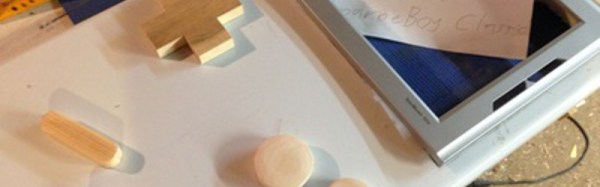
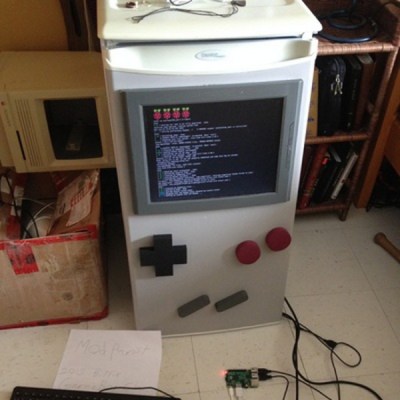
The plain old white mini fridge, a staple of many dorm rooms could use a little decoration. The resemblance to a classic gameboy is not that hard to imagine with some novelty stickers, but [ModPurist] went the extra mile with his Cold Boy.
Making a mini fridge into a playable gameboy involves taking apart the door, once in a Raspberry Pi 2 is fitted in along with a second hand “square screen” LCD. The front of the door is cut for some custom wooden buttons, which are connected to tactile switches. Once everything is fit and finished the door is reassembled, so the fridge can resume its normal life keeping soda and hot dogs good and cold. [ModPurist] covered the progression of the hack in his work log.
While it’s a little low to the ground, it should be a hit at college parties where being on the floor is not unusual. Join us after the break for a demonstration video and get your game on. It is, of course, missing one thing. There needs to be some type of latch inside to secure the beverages until the Konami code is entered.
Need a simple fab process to go from a humble vector graphic to a final part — in a matter of minutes? The CO2 laser cutter might be the right choice. As these tools open themselves up to widespread use through hackerspaces, I decided to give Delrin some well-deserved time under the spotlight.
The laser cutter yet-again proves itself a formidable tool with the construction of GameCube-Bot V2
This guide is a brief collection of tips and techniques that I’ve either learned from others or discovered on my own over the last couple years working with laser-cut Delrin (a.k.a Acetal) for functional prototypes. I hope this guide serves you well as we keep exploring the limits of the material.
As a disclaimer, keep in mind that in no way are these techniques unique or limited to Delrin. Many are not only years old but also common practice in either engineering design or the local machine shop. This article simply highlights the techniques shown here that perform both repeatably and predictably with Delrin and a couple hand-tools, and I hope to share them with a growing audience of laser cutter enthusiasts.
Join us for a Meetup on Saturday, September 12th near Washington DC. The Hackaday Crew is headed out to the DC area a week from Saturday and we want to hang out with you. We’ll be hosting a meetup at Nova Labs hackerspace in Reston, Virgina which is on the Northwest side of DC.
We’ll get things rolling at 6pm on Saturday, September 12. The event includes a few lightning talks, some food and drink, and a lot of socializing. This is free to all but you do need to RSVP to let us know you’re coming. We want you to bring a hack to show off. We love to see what people are working on no matter the level of complexity or stage of completion.
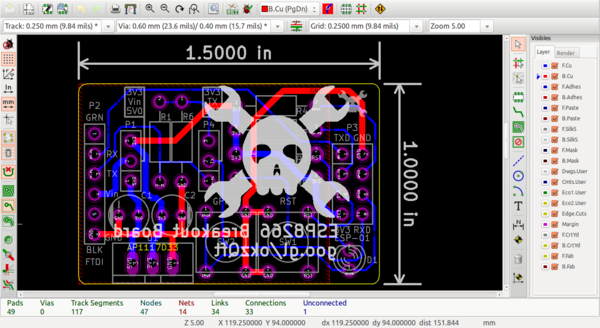
Breakout board laid out in KiCAD
This all started when [Anool Mahidharia] mentioned that he’d be at Nova Labs on September 11-13 to lead a KiCAD PCB design workshop. This 2.5 day boot-camp starts with installing the Open Source EDA software on your laptop and ends when you have a completed PCB design ready to be submitted to a board fab. There is a charge for the workshop and attendance is limited so if you’re interested in it you should sign up now. Our events page is a good collection of information on both events as well as directions to get to Nova Labs.
It will be fun to visit with [Bob] and to meet everyone who can make it to the Saturday evening meetup. So far [Mike Szczys], [Brian Benchoff], and [Sophi Kravitz] are all planning to be there. [Anool Mahidharia] will of course be there since he’s leading the workshop. The following weekend [Anool] and [Brian] will both be headed to Philadelphia for the 2015 Open Hardware Summit for which Hackaday is a proud sponsor. [Matt Berggren] and [Amber Cunningham] will both be at OSH as well, talking all things Tindie.
If you have a 3D printer, it is a good bet you’ve at least seen or heard of Tinkercad. There’s pros and cons to doing your design in a Web browser, but Tinkercad is very easy to use and great for making simple objects. However, there are other 3D object designers you can use in your browser, too. Tinkercad is just the one that everyone seems to know about.
I won’t talk much about Tinkercad, but if you haven’t tried it, it is well worth a look. It has a simple system of drawing things and holes. When you merge holes with things you can make lots of shapes. The alignment tools are good, and since Autodesk acquired them (part of its 123d app suite), it isn’t likely they will go under any time soon (which, as you may remember, almost happened).
If you are designing some great new secret invention you may shy away from cloud-based design programs. But if you are printing out key chains with your coworker’s cat’s name on it, do you really care? Most of these cloud-based programs will work from any computer so you can quickly do a design in a coffee shop and then go home and print it.
 Making a mini fridge into a playable gameboy