Yet Another DIY Camera Slider

Professional camera gear is expensive, which is probably why there is such a huge DIY field for camera equipment. Here’s another great DIY camera slider that you can build for cheap.

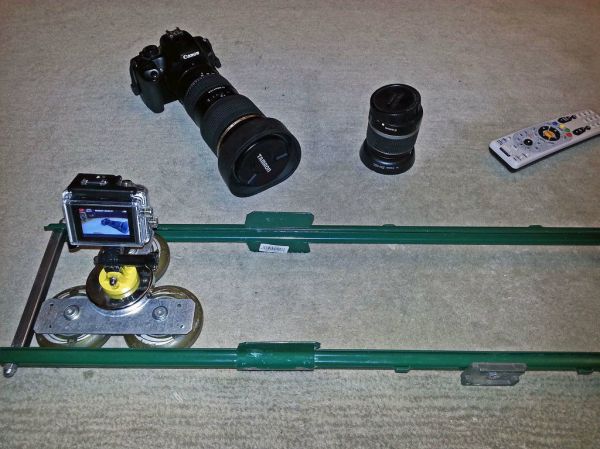
Similar to other rigs we’ve seen, the heart of this design makes use of skateboard wheels — they’re cheap, have good bearings, and are easy to mount. He’s created a dolly for them using a T-strap bracket, which is used for wood framing — the wheels mount directly to it without any modification.

What we think is unique about this build are the rails [Shootr] decided to use. They’re U-Post fence posts — strong, rigid, and probably one of the cheapest forms of processed metal you can buy. To hold them together, he’s using a threaded rod with two pieces of 1/2″ square steel tubing, bracing the fence posts. This wedges the dolly in between them with just enough slack to slide smoothly back and forth.

The other method of making a camera slider like this is using tubular rails, which also allows you to add a curve in your camera track. And if you’re looking for a precise, 2-axis camera dolly… you should check out this one!

Agnes Roboknit: A Robot So Creepy It Even Has A Facebook Profile

agnes-and-andy

[Andy Noyes] is a British artist-inventor who recently debuted his latest project, Agnes Roboknit, at the 2013 Maker Faire U.K. Agnes is a humanoid robot who knits, scares small children, and occasionally looks around as if wondering why her maker condemned her to such a boring existence.

[Andy] wanted her to look human from a distance, but he also wanted to show off her mechanical parts upon closer inspection. She’s almost completely hand-made—down to her homemade gears driven by DC motors and her latex skin cast from plaster casts of real people. He originally planned to have her knit with real needles, but after discovering how difficult it was, [Andy] opted for a knitting loom instead.

He named her after his grandmother, Agnes, although he had hoped to accompany the name with a clever acronym (A.G.N.E.S.) like other classic robots from the 80’s. Stick around after the break to see a fascinating close-up of her weaving away on her loom. The motions are surprisingly simple, but simultaneously mesmerizing.

Continue reading “Agnes Roboknit: A Robot So Creepy It Even Has A Facebook Profile”

DIY Foam Cutter Makes It Too Easy

Cutting foam is pretty tricky without a hot wire cutter. Don’t have one? Well, lucky for you, [Darcy Whyte] has a guide on how to make one. It takes just over an hour to build, and it costs next to nothing in supplies!

[Darcy] is using an old 9V power wart that he had lying around, but you can probably use any DC power supply. He designed the frame in SketchUp and cut it out with his CNC router, although a saw will work just as well for MDF. A piece of 40 gauge nickel chromium wire was strung taught between two 1/4-20 bolts, with one held back by a spring. The spring acts as a safeguard to prevent snapping the wire during overly aggressive cuts. This may be a simple build, but it does produce a handy tool.

[Darcy] demonstrates cutting foam with his creation in a video after the break. We think he could cut thin plastic with it as well—modify your 3D prints, anyone?—though he may need to crank up the voltage a bit.

Continue reading “DIY Foam Cutter Makes It Too Easy”

12V Ammo Power Box Keeps It Retro

IMG_5260

[Brandon Fiquett] does a lot of amateur radio communications and needed a rugged portable power supply that he could take with him on the road. He decided to make a 12V power supply out of an antique ammo can he found at an army surplus store.

The .50 cal ammo box wasn’t in the greatest condition when he picked it up, so he completely sanded it, re-painted it, and lubricated the rubber seal. Inside, he loaded it with four 7.1Ah sealed lead acid batteries, complete with 12V cigarette fused sockets, banana plug jacks, a 5V USB charger and an integrated 12V lead-acid battery charger. The lid also features an LED strip light, and everything is laid out very nicely inside of the box. It looks great, but [Brandon] has a long list of improvements to add, including a solar charge controller, volt and amp meters, and an LED power switch.

Ammo cans make solid project boxes. We’ve seen countless ammo can speaker setups, and even a more intricate ammo can PSU — though we prefer [Brandon’s] method since all the connections are under the lid, keeping it completely weather proof.

Repairing A Plane In Antarctica

One of our tipsters just sent us in an amazing story about repairing a plane in Antarctica — and flying it home!

On December 20, 2012 a Basler BT-67 Turbo 67 (DC-3T) — named Lidia — went down in Antarctica. Thankfully out of its 15 passengers there were no fatalities. For full details on the crash you can check out the accident description on the Aviation Safety Network.

Lidia was built back in the 1940’s, with its wings apparently put together by Rosie the Riveter herself in 1943. Its virgin flight was in 1944. Today, it is operate(d) as a tour plane, and before the accident it was conducting a tour of the Holtanna Glacier in Antarctica.

The plane sat in the snow for almost a year, before a team came back to repair it and bring it home. The expedition lasted two months, and they brought with them two new engines, a new cockpit, landing gear, and fuselage repair supplies. They’ve shared an incredible slideshow of photos that are available on Facebook, or you can stick around after the break to watch a video slideshow of the process.

Can you even begin to imagine repairing a car in Antarctica conditions — let alone a freaking airplane?

Continue reading “Repairing A Plane In Antarctica”

Bringing WiFi Into A Mobile Hackerspace

2013-11-23-00.04.14

[Philipp Protschka] has a pretty awesome mobile hackerspace (MHS) trailer. The only problem? How do you get WiFi when you’re inside what is basically a Faraday’s cage?

He didn’t think he’d have a problem, since he has a fairly powerful router (Netgear R7000 Nighthawk), not more than 20m from the trailer. But as soon as he shuts the door, he loses all connectivity — he can’t even see his SSID. Leaving the door open a crack results in a signal with a speed of about 54Mbits — not bad, but when it’s cold outside this really isn’t an option.

The solution? Install a WiFi repeater with an external antenna. He’s using a TP link station with two antennas — he’s removed one and hooked it up to a rugged outdoor antenna that gives the MHS a bit of an FBI van look — awesome. With the repeater in place he’s suddenly got access to over 24 SSID’s in the neighborhood from inside! It’ll also be extra handy when travelling because with the extra range it means he’ll be able to hook into local WiFi networks with ease.

Continue reading “Bringing WiFi Into A Mobile Hackerspace”

DIY Curved Display Makes Use Of Cool Thermochromic Properties

flexible screen

[Marin Davide] was on a mission. A mission to build his own curved display screen, using an Arduino, nichrome wire, and thermochromic liquid crystal ink.

The prototype he’s designed uses a sheet of plastic coated in thermochromic ink, curved on an MDF frame. This particular thermochromic ink turns bright blue when heated to around 27°C.

To display digits, he’s created tiny segments of the 7-segment display by wrapping the nichrome wire around pieces of cardboard, which then have been glued to the back of the display. Each of these is controlled separately from his Arduino Mega. He muses that you could also make a rudimentary dot matrix display with this — it would be interesting to see what kind of resolution you could obtain!

To see more photos check out the original DesignNews post linked above. We’re not sure why the bulk of the details are only available in this PDF. If we’re just missing a direct link to the original project page let us know in the comments and we’ll update the post.

Interested in more thermochromic black magic? How about these awesome temperature sensitive photos? Or what about a digital clock face, illuminated by heating resistors?