LED Bulb Reviews, Evaluations And Teardowns

LED Bulb Reviews

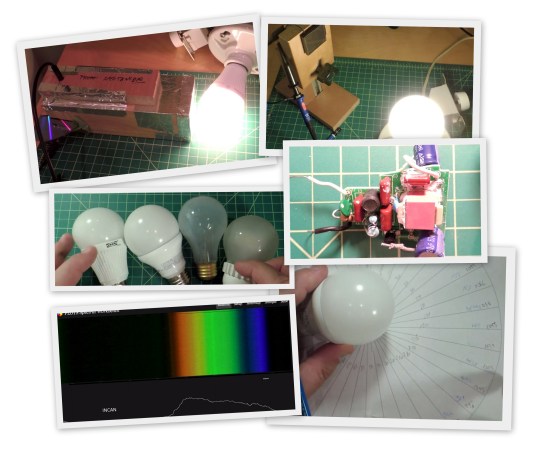
[ElectronUpdate] has posted many great reviews of commercial LED bulbs that one can purchase to replace standard E26 incandescent light bulbs. In his reviews he evaluates the light emitting performance and does a thorough and detailed teardown, evaluating and understanding the circuit technologies used. For the light emission evaluation he uses a light meter and some homemade graph paper to plot the lumens at different angles. Flicker is easily evaluated using a solar panel from a discarded solar path light connected to his oscilloscope. Any flicker will show up quite nicely and can be measured. Of course a kill-a-watt meter makes an appearance in most reviews to read watts and power factor.

Recently [ElectronUpdate] wanted to understand the meaning of CRI which is advertised on many of these commercial LED packages. CRI stands for color rendering index and deals with how colors appear when compared to a natural light source. After doing some researching he found that a CRI over 80 is probably good for LED lighting. The next dilemma was how to measure CRI without expensive scientific equipment. He found a website that we have featured before with free software and instructions on how to build a spectrometer. The web instructions include building a meter box from paper but he found it was much more reliable if built out of wood. We’ll let you follow [ElectronUpdate’s] recommended build if you like, but you’ll need a few items which he does detail.

After a short calibration procedure the final rig will measure power spectral line densities of your light source. [ElectronUpdate] is promising more details on how the colorful measurement data can be related to CRI ratings, but you can get a jump on the details at Full Spectrum Solutions. We also recommend you browse through all of [ElectronUpdate’s] LED bulb reviews on YouTube if the progressing performance and innards of LED bulbs fascinates you as much as it does us.

Spark-Up Your Halloween Party With This Double Helix Jacob’s Ladder

Double Helix Jacobs Ladder

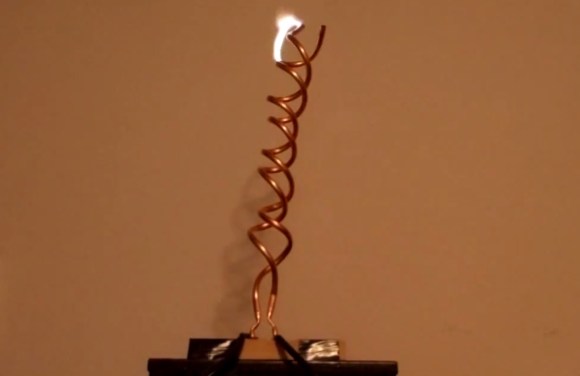
Dr. Frankenstein’s laboratory wouldn’t be complete without some electrical sparks. So for [Rick’s] final Halloween DIY hack this year he gives us just that, but with a twist. This time it’s a double helix Jacob’s ladder. The sparks are flying as they twist and turn their way up this unique design, powered by a standard neon sign transformer. If you can get your hands on a 15,000 V 30 mA transformer, you might have just enough time to build one for Halloween.

The build is quite simple. Other than the transformer, you will need a few feet of ¼ inch flexible copper tubing and a piece of ¾ inch PVC pipe. After twisting the copper tubing around the PVC pipe to form the double helix, [Rick] mounts the tubing to a block of wood and removes the PVC form. In his video, which you can watch after the break, [Rick] demonstrates a standard Jacob’s ladder, as well as his double helix design. The double helix version has a much nicer and slower traveling arc even stopping at times.

You don’t want to set this up anyplace someone might touch it as it can be quite deadly or cause burns. [Rick] mentions not to use wood to mount your ladder because the wood will burn as it did during his testing. And do not operate unattended. Otherwise, it adds some spark to your great Halloween fun.

Continue reading “Spark-Up Your Halloween Party With This Double Helix Jacob’s Ladder”

Fire Breathing Jack-O-Lantern Of Death

[Rick] is at it again, this week he has conjured up an even more dangerous Halloween hack. Thankfully [Rick] has included a warning of just how dangerous this hack can be, especially if children are around. Don’t do this hack unless you know what you’re doing and you can do it safely.

For [Rick]’s number four hack of the month he gives us the Fire Breathing Jack-O-Lantern of death! This isn’t a new idea but it is a very unique and simple implementation. We always love seeing the ingenuity of hackers to repurpose existing commercial products. In this case, [Rick] uses an automated air freshener which dispenses a flammable spray for the pumpkins breath if you dare get too close, but not so close as to get burned. The trigger distance is controlled by an Arduino and a Parallax Ping))) sensor so as to fire only when people are farther than 3 feet but closer than 5 feet. You can get a copy of the Arduino sketch from his blog posting.

A small candle is used to ignite the flammable spray, which shoots out 5 to 10 inches from the pumpkin’s mouth when triggered by the ultrasonic sensor. It couldn’t be simpler. The most challenging part was getting the large air freshener dispenser in the pumpkin with the flames coming out the mouth. A little extra whacking at the pumpkin fixed the fit, but planning for a larger pumpkin would be advised.

Theoretically the Arduino shouldn’t trigger and throw flames if people are too close, but when kids are running around they may come right into the target area unexpectedly. If this hack is used in the right place it would make for a great Halloween display item and could be used safely.

After the break you can watch [Rick’s] flame breathing Jack-o-Lantern build tutorial.

Continue reading “Fire Breathing Jack-O-Lantern Of Death”

5 Year Mission Continues After 45 Year Hiatus

There have been many iterations of the Star Trek franchise since the original Star Trek 5 year mission series aired in 1966 including a cartoon series in 73, a new television series in 87 and many movies on the big screen. Those series and movies inspired many youngsters to pursue a career in the fields of science, engineering, technology and cinema. Now the franchise is coming full circle with a fan based Kickstarter funded web series. Those inspired fans are attempting to complete the original 5 year mission “to boldly go where no man has gone before”, which ended after only three seasons on the air. The fan based and fan supported reincarnation is cleverly titled “Star Trek Continues” and has CBS’s consent.

The production company behind this effort, [Far From Home, LLC], is owned and operated by [Vic Mignogna], who also plays Kirk in this web series. They have already finished the first amazing 51 minute web-isode titled “Pilgrim of Eternity“. The film may seem campy, but it’s not. They are sticking to the original format and using the sets that were used in the sixties, rightfully so being this is the continuation of the mission. This new web series has some very interesting actors. One is the well-known Mythbuster [Grant Imahara], who plays the role of Mr. Sulu. The actor playing Mr. Scott is [Chris Doohan] the son of [James Doohan], who played Mr. Scott in the original Star Trek series.

There are more details and episode 1 after the break.

Continue reading “5 Year Mission Continues After 45 Year Hiatus”

Pseudo-Random Flickering Jack-O-Lantern LED Using ATtiny13

Pseudo_Random_Flicker_ATtiny13

It’s time to get those jack-o-lanterns twinkling for Halloween. If you don’t want to use candles or buy a jack-o-lantern light this Halloween you can do like [Johannes Bauer] and code your own pseudo-random flickering super bright LED. His wife wanted their pumpkin to be illuminated this year and he knew it would be easy to do with an Arduino, but that would be overkill for such a simple project. Plus, he doesn’t have an arduino. [Johannes] used very few components; 4 slightly depleted AA batteries, a super bright LED, 680 ohm resistor and a little custom code on an 8 pin ATtiny13. The circuit does work great for a pumpkin lantern but his video is more of a tutorial on coding linear congruential generator (LCG) for the 8 bit pseudo-random LED flickering.

The code is short and can be gleaned from the YouTube video. [Johannes] used avr-gcc to compile and has packaged his code and build scripts for download. The hex file can be flashed over to the chip using avrdude or AVR Studio. If you have any ATtiny13s lying around you should cobble this hack together just in time to emulate that real look of a pumpkin candle without the hassles and hazards of real flames.

If you want something with a lot more light that still has that candle like flicker then checkout “Flickering Pumpkin Lanterns” that used the signal from LED tea lights to power some 12 V lamps.

Follow along after the break to watch [Johannes Bauer’s] video.

Continue reading “Pseudo-Random Flickering Jack-O-Lantern LED Using ATtiny13”

DIY Pneumatic Skeleton And Air Horn Gag To Scare Those Trick-Or-Treaters

Horn_Skeleton_Gags

[Rick Osgood] has been busy making more scaring gags for Halloween. This week he’s sharing great ideas for an air horn and pneumatic jumping skeleton, both actuated by 24 V sprinkler valves. These two new gags can easily be activated using [Rick’s] cardboard floor plate switch and three 9 V batteries cleverly snapped together in series for a 27 V supply (we can’t resist dropping in this link to a 2196 V supply from 9 V batteries just for fun).

The air horn construction is quite unique using a latex balloon strategically located as a reed valve for the air to vibrate over as it rushes out making a very loud honking sound. [Rick] then connected his manual bicycle pump to an air supply so that when an air valve is actuated the bicycle pump handle with a skeleton wired to it pops up. It then lowers back down via a bleed hole in the air line. Both the air horn and pneumatic pop-up skeleton seem simple to construct and his tests show them functioning perfectly.

Being the air storage chambers are small the re-trigger setup seems too repetitive to be practical for a continuous stream of Trick-Or-Treaters. Perhaps one could hide an air compressor with a long feed line to supply the gags? Plus, using an air compressor would come in handy for other scary blasts of air. Of course you would want to lower the compressor’s output regulator to safe levels so you don’t risk blowing apart your pop-up skeleton rig or any pipes.

Follow along after the break to see how to build these two great gags and get some tips from Mr. Safety.

Continue reading “DIY Pneumatic Skeleton And Air Horn Gag To Scare Those Trick-Or-Treaters”