HC-SR04 Isn’t The Same As Parallax PING))) But It Can Pretend To Be!

“It’s only software!” A sentence that strikes terror in the heart of an embedded systems software developer. That sentence is often uttered when the software person finds a bug in the hardware and others assume it’s going to be easier for fix in software rather than spin a new hardware revision. No wonder software is always late.

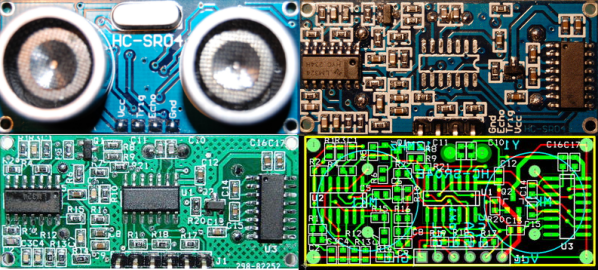
[Clint Stevenson] is his own hardware and software guy, as are most of us. He wanted to use the less expensive HC-SR04 ultrasonic rangefinder in a prototype. Longer term he wanted to have the choice of either a Parallax PING or MaxBotix ultrasonic sensor for their better performance outdoors. His hardware hack of the SR04 made this a software problem which he also managed to solve!

[Clint] was working with the Arduino library, based on the Parallax PING, which uses a single pin for trigger and echo. The HC-SR04 uses separate pins. Originally he modified the Arduino library to accept the two pin approach. But with his long term goal in mind, he also modified the HC-SR04 sensor by removing the on-board pull-up resistor and adding a new one on the connector side to combine the signals. That gave him an SR04 that worked with the single-pin based library.

We’ve seen Parallax PING projects for sensing water depth and to generate music. These could be hacked to use the HC-SR04 using [Clint’s] techniques.

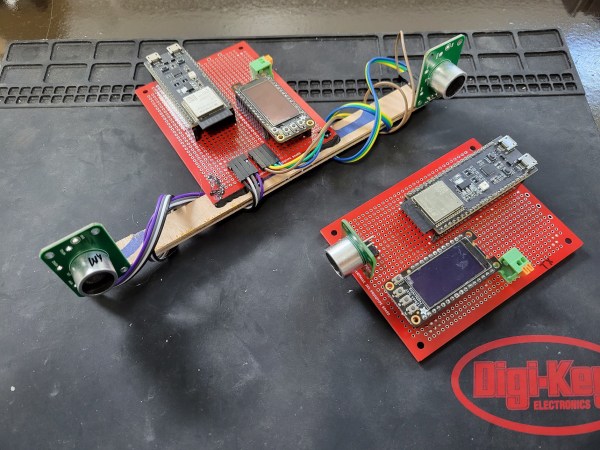
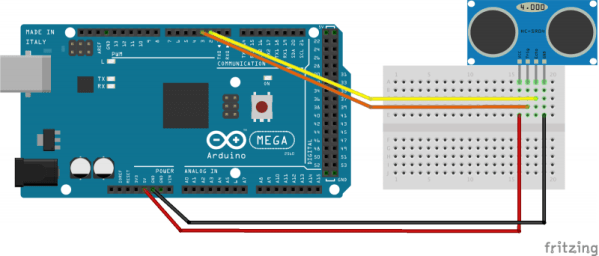
[Arduino and HC-SR04 photo from Blax Lab]

Good Vibrations: Giving The HC-SR04 A Brain Transplant

[Emil] got his hands on a dozen HC-SR04 ultrasonic sensors, but wasn’t too happy with their performance. Rather than give up, he reverse engineered the sensor and built an improved version. Hackers, Makers, and robotics enthusiasts have had easy access to standard sonar platforms since the early 1980’s, when Polaroid began selling their 6500 sonar modules. A number of companies have released sonar boards since then, notably The Parallax Ping))) module. The HC-SR04 appeared on the market a few years back as a low-cost alternative of the Ping.

[Emil] found that the HC-SR04 would work reliably on hard surfaces as far as 4 meters away from the sensor. However, he got a lot of bad data back when using soft sided targets, or when no target was present at all.  [Emil] reverse engineered the schematic of the HC-SR04 and found some interesting design decisions. A Max232 RS-232 converter chip is used for its +-12V +-10V charge pumps. The charge pumps are connected to create 24V 20V at the ultrasonic transmitter. A mask programmed microcontroller manages the entire unit, commanding the ultrasonic transmitter to send 40Khz pulses, and listening for returns on the receive side of the system. [Emil] believes the micro is running in polled mode, due to the fact that it sometimes misses pulses. Even worse, the micro runs on an unmarked 27MHz crystal which had quite a bit of drift.

[Emil] solved these problems by creating his own PCB with an ATtiny24 and a 12MHz crystal. He increased the pin count from 4 to 6, allowing the ATtiny to be programmed in circuit, as well as opening the door to I2C and SPI operation. To build the boards up, [Emil] first solders his micro and crystal. He then uses a hot air gun to move all the components from the HC-SR04 board to his own. The new boards are still being tested, but [Emil] has posted his PCB and BOM data. He’s also promised to post his AVR code when it is available.

UChaser Follows You Anywhere

If you’ve been making up for lost years of travel in 2023, you might have seen a fellow traveler in the airport terminal or train station walking with their luggage happily careening behind them. [Jesse R] and [Brian Lindahl] wanted more of that. They wanted an open-source, low-cost system that could be put in anything.

The basic principle is that they will have a transmitter that sends both a radio signal and an ultrasonic pulse. The receiver receives the radio signal and uses it as a reference for the two ultrasonic sensors. The time since the radio signal is compared between the two, and a distance and direction are established.

In practice, the radio is an ESP32-S3 using ESP-NOW (which we’ve seen relatively recently on another project), a protocol from Espressif that offers low latency 250 bytes payloads. The ultrasonic transceiver is based on Sparkfun’s HC-SR04. For prototyping purposes on the receiver, they just removed the transmitter to avoid populating the airwaves, as to listen, you had to transmit. The prototype was an electric wheelbarrow that would happily follow you around the yard wherever you go.

With the concept validated, they moved to a custom ultrasonic setup with a custom buffer amp and damp transistor, all centered around 20kHz. The simulations suggested they should have been better than the HC-SR04 from Sparkfun, but the 30-foot (9 meters) range went to 10 feet (3 meters). They ultimately returned to using Sparkfun’s circuit rather than the custom amp.

We’re looking forward to seeing the project continue. There are various challenges, such as variability in the speed of sound, echos and reflections, and ultrasonic line of sight. We love the peak behind the curtain that allows us to see what decisions get made and the data that informs those decisions. All the code and PCB design files are available on GitHub under an MIT and Creative Common license, respectively. This project was submitted as part of the 2o23 Hackaday Prize.

Video after the break.

Continue reading “UChaser Follows You Anywhere”

Hackaday Podcast 223: Smoking Smart Meter, 489 Megapixels, And Unshredding Documents

Elliot’s back from vacation, and Dan stepped into the virtual podcast studio with him to uncover all the hacks he missed while hiking in Italy. There was a lot to miss, what with a smart meter getting snuffed by a Flipper Zero — or was it? How about a half-gigapixel camera built out of an old scanner, or a sonar-aimed turret gun? We also looked at a couple of projects that did things the hard way, like a TV test pattern generator that was clearly a labor of love, and an all-transistor HP frequency counter. More plastic welding? Hey, a fix is a fix! Plus, we’ll dive into why all those Alexas are just gathering dust, and look at the really, REALLY hard problems involved in restoring shredded documents.

Check out the links below if you want to follow along, and as always, tell us what you think about this episode in the comments!

Download a long series of ones and zeroes that, when appropriately interpreted, sound like two people talking about nerdy stuff!

Continue reading “Hackaday Podcast 223: Smoking Smart Meter, 489 Megapixels, And Unshredding Documents”

Spooky, Scary Skeleton Is Pi Pico Powered

It’s the spookiest time of year once again, and hackers across the globe are cobbling together some spine-chilling projects. [Kevin] is amongst them, and has created a spooky, scary skeleton just in time for Halloween.

The project works in a relatively simple fashion: essentially, a Raspberry Pi Pico is charged with reading an HC-SR04 ultrasonic rangefinder. It’s all wrapped up in a 3D-printed skull-like housing. When the skeleton detects someone or something close in front, the Pi triggers a small servo hooked up to a 3D-printed gear. This interfaces with a pair of racks which drive the skull’s eyebrows up and down, and opens and shuts its jaw.

Of course, there are some major anatomical problems here. Skulls don’t have eyebrows; that’s just not possible. Eyebrows are hair attached to flesh and muscle; they simply don’t exist in the world of bone. However, it’s fair to say [Kevin]’s taking creative license for the sake of the holiday, and we can all support that.

This is a basic build, and a fun one. It would be an excellent way to learn some basic microcontroller skills, while also serving as a great little Halloween charm to scare guests going back to the fridge for another beverage.

We get a cavalcade of quality holiday hacks every year around this time. This year should be no exception – so get your spooktacular hacks into the tips line, post-haste! Video after the break.

Continue reading “Spooky, Scary Skeleton Is Pi Pico Powered”

2022 Sci-Fi Contest: A Hand-Following Robot, Powered By Arduino

If there’s one thing audiences love in sci-fi, it’s a cute robot companion that follows the heroes around. If you want one of your own, starting with this build from [mircemk] could be just the ticket.

The build relies on the classic Arduino Uno microcontroller, which talks to a HC-SR04 ultrasonic sensor module and two infrared sensors in order to track a human target and follow it around. Drive is thanks to four DC gear motors, driven by a L293D motor driver, with a two-cell lithium battery providing power for everything onboard.

The robot works in a simple manner, following a hand placed in front of the robot’s sensors. First, the robot checks for the presence of an object in front using the ultrasonic sensor. If something is detected, the twin infrared sensors mounted left and right are used to guide the robot, following the hand.

It’s not a sophisticated algorithm, and it won’t really let your robot follow you down a crowded street. However, it’s a great project to learn on for beginners and could serve as a great entry into more advanced projects using face tracking or other techniques. Video after the break. Continue reading “2022 Sci-Fi Contest: A Hand-Following Robot, Powered By Arduino”

Raspberry Pi Creates Melody

For those who are not into prog rock in the 70s or old radio shows from the 40s, the Theremin may be an unfamiliar musical instrument. As a purely electronic device, it’s well outside the realm of conventional musical instruments. Two radio antennas detect the position of the musician’s hands to make a unique sound traditionally associated with eeriness or science fiction.

Normally a set of filters and amplifiers are used to build this instrument but this build instead replaces almost everything with a Raspberry Pi Zero 2, and instead of radio antennas to detect the position of the musician’s hands a set of two HC-SR04 distance sensors are used instead. With the processing power available from the Pi, the modernized instrument is able to output MIDI as well which makes this instrument easily able to interface with programs like GarageBand or any other MIDI-capable software.

The project build is split into two videos, the second of which is linked below. The project code is also available on the project’s GitHub page, so anyone with the Pi and other equipment available can easily start experimenting with this esoteric and often overlooked musical instrument. It’s been around for over 100 years now, and its offshoots (including this build) are as varied as the sounds they can produce.

Continue reading “Raspberry Pi Creates Melody”