UChaser Follows You Anywhere

If you’ve been making up for lost years of travel in 2023, you might have seen a fellow traveler in the airport terminal or train station walking with their luggage happily careening behind them. [Jesse R] and [Brian Lindahl] wanted more of that. They wanted an open-source, low-cost system that could be put in anything.

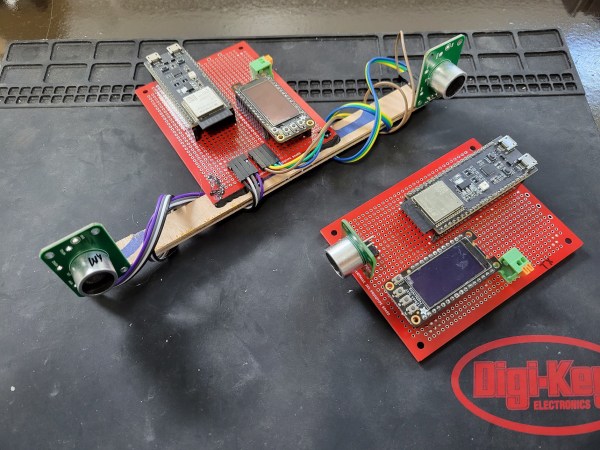
The basic principle is that they will have a transmitter that sends both a radio signal and an ultrasonic pulse. The receiver receives the radio signal and uses it as a reference for the two ultrasonic sensors. The time since the radio signal is compared between the two, and a distance and direction are established.

In practice, the radio is an ESP32-S3 using ESP-NOW (which we’ve seen relatively recently on another project), a protocol from Espressif that offers low latency 250 bytes payloads. The ultrasonic transceiver is based on Sparkfun’s HC-SR04. For prototyping purposes on the receiver, they just removed the transmitter to avoid populating the airwaves, as to listen, you had to transmit. The prototype was an electric wheelbarrow that would happily follow you around the yard wherever you go.

With the concept validated, they moved to a custom ultrasonic setup with a custom buffer amp and damp transistor, all centered around 20kHz. The simulations suggested they should have been better than the HC-SR04 from Sparkfun, but the 30-foot (9 meters) range went to 10 feet (3 meters). They ultimately returned to using Sparkfun’s circuit rather than the custom amp.

We’re looking forward to seeing the project continue. There are various challenges, such as variability in the speed of sound, echos and reflections, and ultrasonic line of sight. We love the peak behind the curtain that allows us to see what decisions get made and the data that informs those decisions. All the code and PCB design files are available on GitHub under an MIT and Creative Common license, respectively. This project was submitted as part of the 2o23 Hackaday Prize.

Video after the break.

Continue reading “UChaser Follows You Anywhere”

Facing The Coronavirus

Some of us are oblivious to how often we touch our faces. The current finding is we reach for our eyes, nose, or mouth every three to four minutes. Twenty times per hour is an awful lot of poking, picking, itching, and prodding when we’re supposed to keep our hands away from glands that can transmit and receive disease. To curb this habit and enter the 2020 Hackaday Prize, [Lloyd lobo] built a proof-of-concept device that sounds the alarm when you reach for your face.

We see an Arduino Uno connected to the classic HC-SR04 ultrasonic distance sensor, an LED, and we have to assume a USB battery pack. [Lloyd] recommends the smaller Nano, we might reach for the postage-stamp models and swap the ultrasonic module out for the much smaller laser time of flight sensor. At its soul, this is an intruder alarm. Instead of keeping siblings out of your room, you will be keeping your hands out of the area below the bill of the hat where the sensor is mounted. If you regularly lift a coffee cup to your lips, it might chastise you, and if you chew sunflower seeds, you might establish a tempo. *crunch* *chip* *beep* *crunch* *chip* *beep*

We have reviewed technology to improve our habits like a bracelet that keeps a tally, and maybe there is a book that will help shirk some suboptimal behaviors.

Continue reading “Facing The Coronavirus”

Maybe One Of The Most Adorable Obstacle Avoiding Robots You’ve Seen

We’re all pretty well-acquainted with the obstacle avoiding robot. These little inventions use a proximity sensor to detect an object in front of the robot, then circumvent the object accordingly. Brown Dog Gadgets’ little robot really caught our eye, mostly because it’s kind of cute.

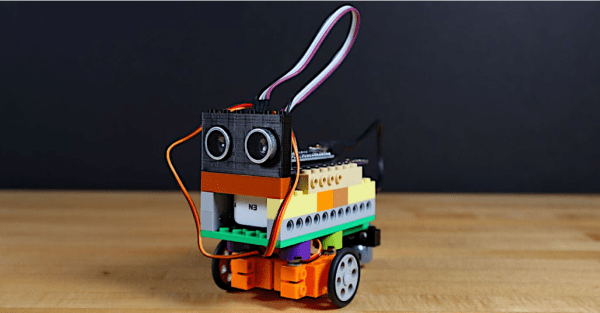
This little robot combines a few LEGO pieces, Arduino, and Brown Dog Gadgets’ own in-house invention, Crazy Circuits. The LEGO pieces make up the body of the robot, craftily enclosing a small portable battery pack used to power the bot. Brown Dog Gadgets uses another home-grown design, their robotics controller board, breaking out a few GPIO pins of an Arduino-compatible microcontroller into LEGO-compatible connections. This makes it easy to interface two of our favorite DIY STEM tools using a solderless connection.

Add a few LEGO wheels and a caster for pivoting and you’ve got a pretty simple, little robot. Fortunately, Brown Dog Gadgets was very thorough in their write-up, so head on over to their Instructable for all the details.

In the meantime, we’ve got a rich history of obstacle-avoiding robots here on Hackaday. Take a look around.

DIY Baby MIT Cheetah Robot

3D printers have become a staple in most makerspaces these days, enabling hackers to rapidly produce simple mechanical prototypes without the need for a dedicated machine shop. We’ve seen many creative 3D designs here on Hackaday and [jegatheesan.soundarapandian’s] Baby MIT Cheetah Robot is no exception. You’ve undoubtedly seen MIT’s cheetah robot. Well, [jegatheesan’s] hack takes a personal spin on the cheetah robot and his results are pretty cool.

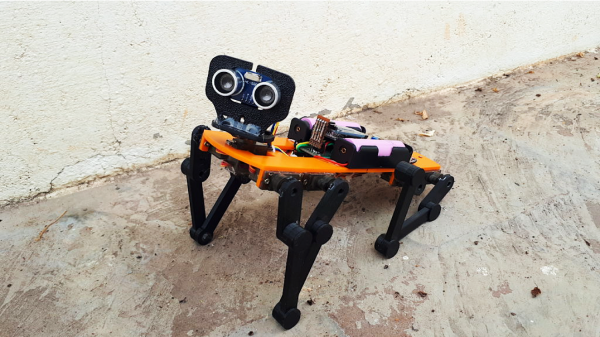
The body of the robot is 3D printed making it easy to customize the design and replace broken parts as you go. The legs are designed in a five-bar linkage with two servo motors controlling each of the four legs. An additional servo motor is used to rotate an HC-SR04, a popular ultrasonic distance sensor, used in the autonomous mode’s obstacle avoidance mechanism. The robot can also be controlled over Bluetooth using an app [jegatheesan] developed in MIT App Inventor.

Overall, the mechanics could use a bit of work — [jegatheesan’s] baby cheetah probably won’t outpace MIT’s robot any time soon — but it’s a cool hack and we’re looking forward to a version 3. Maybe the cheetah would make a cool companion bot?

Continue reading “DIY Baby MIT Cheetah Robot”

Low-cost Autonomous Rover Will Drive Your Projects

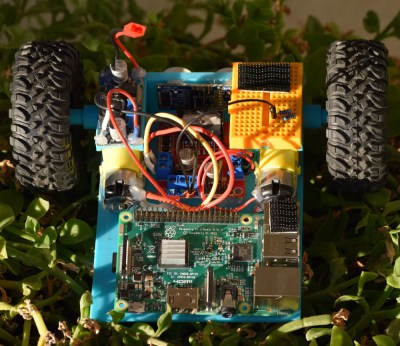
[Miguel] wanted to get more hands-on experience with Python, so he created a small robotic platform as a testbed. But as such things sometimes go, it turns out the robot he created is a worthy enough project in its own right. With a low total cost and highly flexible design, it might be exactly what you’re looking for. Who knows, it might even bootstrap that rover project that’s been wandering around the back of your mind.

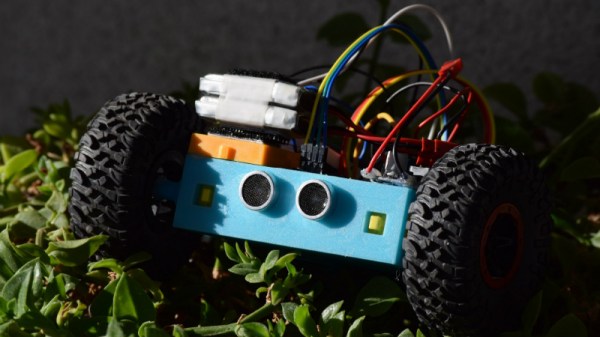
The robot makes use of an exceptionally simple 3D printed frame. No complicated suspension to worry about, no fasteners to hold together multiple printed parts. It’s just a single printed “L” shaped piece that has mounts for the motors and front sensor board. As designed it simply drags its tail around, which should work fine on smooth surfaces, but might need a bit of tweaking if you plan on taking your new robotic friend on an outdoor adventure.

There’s a big open area on the “tail” to mount a Raspberry Pi, but you could really put whatever board or microcontroller you wish here. In the nose is an HC-SR04 ultrasonic sensor, which [Miguel] is using to perform obstacle avoidance in his Python code. A dual H-Bridge motor driver controls the pair of gear motors in the front to provide propulsion and steering, and a buck converter steps down the 7.4V from the 2S LiPo battery to power the electronics. He’s even included a mini breadboard so you can add circuits or sensors as experimental payloads.

If you’re looking for a slightly more advanced 3D printed robotics platform, we’ve seen our fair share. From the nearly fully printed Watney to a tank that looks like it’s ready for front-line combat.

Dual Sensor Echo Locator Gives High Accuracy At Low Cost

Infrared certainly has its uses, but if you’re trying to locate objects, ultrasonic detection is far superior. It’s contact-less, undetectable to the human ear, and it isn’t affected by smoke, dust, ambient light, or Silly String.

If you have one ultrasonic sensor and a microcontroller, you can detect plenty of useful things, like the water level in a rain barrel or the distance traveled by a tablet along a rail. If you have two sensors and a microcontroller, you can pinpoint any object within a defined range using trigonometry.

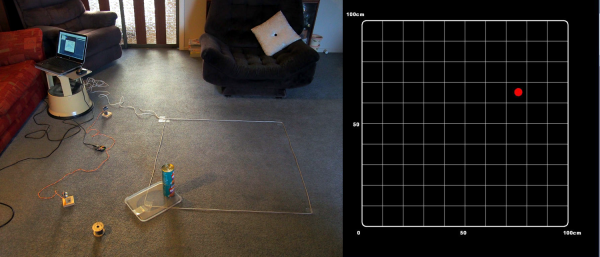
[lingib]’s dual sensor echo locator uses two HY-SRF05s, but the cheap and plentiful HC-SR04s will work, too. Both sensors are arranged for maximum beam overlap and wired up to an Arduino Uno. One sensor’s emitter is blocked with masking tape, so all it does is listen.

When the system registers the object, it shows up as a red dot on a grid inside a Processing sketch along with a bunch of details like the object’s coordinates, its distance from each sensor, and the area of the triangle formed by the two sensors and the object. [lingib] reports that the system is quite accurate and will work for much larger playgrounds than the 1 meter square in the demo after the break.

Don’t want to detect objects? Ultrasonic sensors are cheap enough to hack into other things, like this one-way data communications module.

Continue reading “Dual Sensor Echo Locator Gives High Accuracy At Low Cost”

Dead Simple Ultrasonic Data Communication

Some of the best hacks are the ones which seem perfectly obvious in hindsight; a solution to the problem that’s so elegant, you wonder how it never occurred to you before. Of course we also love the hacks that are so complex your eyes start to water, but it’s nice to have a balance. This one, sent in by [Eduardo Zola] is definitely in the former group.

In the video after the break, [Eduardo] demonstrates his extremely simple setup for using ultrasonic transducers for one-way data communication. Powered by a pair of Arduinos and using transducers salvaged from the extremely popular HC-SR04 module, there’s a good chance a lot of readers can recreate this one on their own bench with what they’ve got lying around. In this example he’s sending strings of text from one computer to another, but with a little imagination this can be used for all sorts of projects.

For the transmitter, the ultrasonic transducer is simply tied to one of the digital pins on the Arduino. The receiver is a bit more complex, requiring a LM386 amplifier and LM393 comparator to create a clean signal for the second Arduino to read.

But how does it work? Looking through the source code for the transmitter and receiver, we can see it’s about as basic as it gets. The transmitter Arduino breaks down a given string into individual characters, and then further converts the ASCII to eight binary bits. These bits are sent out as tones, and are picked up on the receiving end. Once the receiver has collected a decent chunk of tones, it works through them and turns the binary values back into ASCII characters which get dumped over serial. It’s slow, but it’s simple.

If you’re looking for something a bit more robust, check out this guide on using GNU Radio with ultrasonics.

Continue reading “Dead Simple Ultrasonic Data Communication”