Screenshot of "Frame of Preference"

An Emulated Stroll Down Macintosh Memory Lane

If you’re into Macs, you’ll always remember your first. Maybe it was the revolutionary classic of 1984 fame, perhaps it was the adorable G3 iMac in 1998, or even a shiny OS X machine in the 21st century. Whichever it is, you’ll find it emulated in [Marcin Wichary]’s essay “Frame of preference: A history of Mac settings, 1984–2004” — an exploration of the control panel and its history.

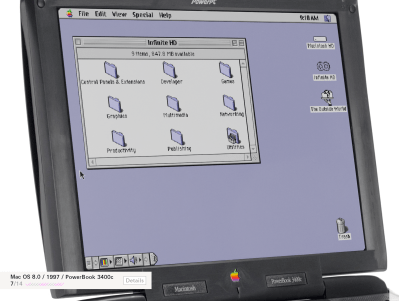
Image of PowerBook showing the MacOS 8.0 desktop.
That’s not a photograph, it’s an emulator. (At least on the page. Here, it’s a screenshot.)

[Marcin] is a UI designer as well as an engineer and tech historian, and his UI chops come out in full force, commenting and critiquing Curputino’s coercions. The writing is excellent, as you’d expect from the man who wrote the book on keyboards, and it provides a fascinating look at the world of retrocomputing through the eyes of a designer. That design-focused outlook is very apropos for Apple in particular. (And NeXT, of course, because you can’t tell the story of Apple without it.)

There are ten emulators on the page, provided by [Mihai Parparita] of Infinite Mac. It’s like a virtual museum with a particularly knowledgeable tour guide — and it’s a blast, getting to feel hands-on, the design changes being discussed. There’s a certain amount of gamification, with each system having suggested tasks and a completion score when you finish reading. There are even Easter eggs.

This is everything we wish the modern web was like: the passionate deep-dives of personal sites on the Old Web, but enhanced and enabled by modern technology. If you’re missing those vintage Mac days and don’t want to explore them in browser, you can 3D print your own full-size replica, or a doll-sized picoMac.


Pico-mac-nano Fits Working Macintosh On Barbie’s Desk

Have you ever looked in a doll house and said “I wish those dolls had a scale replica of a 1984 Macintosh 128K that could be operated by USB?” — well, us neither, but [Nick Gillard] gives us the option with his 63mm tall Pico-mac-nano project.

As you might imagine, this project got its start with the RP2040-based Pico Mac project by [Matt Evans], which we covered

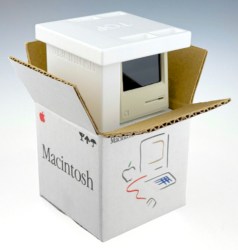
The collector’s edition will come with a lovely box, but what’s in it is still open source so you can make your own.

before. [Nick] saw that, built it, and was delighted by it enough to think that if the Mac could run on such tiny hardware, how small could build a fully-usable replica Mac? The answer was 63 mm tall– at 5.5:1, that’s technically under the 6:1 scale that Barbie operates on, but if we had such a dollhouse we’d absolutely put one of these in it. (You just know Barbie’s an Apple kind of girl.)

The size was driven by the screen, which is a 2″ TFT panel with 480 x 640 pixel native resolution. Here [Nick] cheats a tiny bit– rather than trying to rewrite the PicoMac to output 640 x 480 and rotate the screen, he keeps the screen in portrait mode and drives it at 480 x 342 px. Sure, it’s not a pixel-perfect output, but no LCD is going to be a perfect stand in for a CRT, and who is going to notice 32 pixels on a 2″ screen? Regardless, that set the height of the computer, which is built around the portrait display. A highly detailed, and to our eyes, accurate replica of the original Macintosh case was printed to fit the LCD, coming in at the aforementioned 63mm tall.

Unfortunately this means the floppy drive could not be used for micro SD access– there is an SD card reader on this unit, but it’s on the back, along with a USB-C port, which is roughly where the mouse and keyboard ports are supposed to be, which is a lovely detail. Also delightful is the choice of a CR2 lithium battery for power, which is a form factor that will look just a bit familiar if you’ve been inside one of these old Macs.

[Nick] has posted the 3D designs and modified pico mac firmware to a GitHub repository, but if you’re looking for a charming desk ornament and don’t have the time to build your own, he will also be selling these (both kits and fully assembled units) via 1bitrainbow, which is the most delightfully retro web store we’ve seen of late.

If Classic MacOS isn’t good enough for you, how about linux? You won’t enjoy it as much, but it will run on the RP2040.

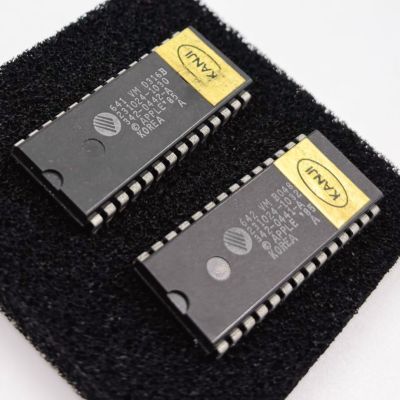
Mainboard with the two 128 kB EPROMs containing the special MacIntosh Plus ROM image. (Credit: Pierre Dandumont)

The Lost 256 KB Japanese ROM For The Macintosh Plus Has Been Found

The Apple Macintosh Plus was one of the most long-lived Apple computers and saw three revisions of its 128 kB-sized ROMs during its life time, at least officially. There’s a fourth ROM, sized 256 kB, that merges the Western ROMs with Japanese fonts. This would save a user of a Western MacIntosh Plus precious start-up time & RAM when starting software using these fonts. Unfortunately, this particular ROM existed mostly as a kind of myth, until [Pierre Dandumont] uncovered one (machine-translated, French original).

The two 128 kB EPROMs containing the special MacIntosh Plus ROM image. (Credit: Pierre Dandumont)

Since this particular ROM was rumored to exist somewhere in the Japanese market, [Pierre] went hunting for Japanese Macintosh Plus mainboards, hoping to find a board with this ROM. After finally getting lucky, the next task was to dump the two 128 kB EPROMs. An interesting sidenote here is that the MacIntosh Plus’ two ROM sockets use the typical programming voltage pin (Vpp) as an extra address line, enabling 256 kB of capacity across the two sockets.

This detail probably is why this special ROM wasn’t verified before, as people tried to dump them without using that extra address line, i.e. as a typical 27C512 64 kB EPROM instead of this proprietary pinout, which would have resulted in the same 64 kB dump as from a standard ROM. Thanks to [Doc TB]’s help and his UCA device it was possible to dump the whole image, with the images available for download.

Using this ROM image was the next interesting part, as [Pierre] initially didn’t have a system to test it with, and emulators assume the 128 kB ROM format. Fortunately these are all problems that can be solved, allowing the ROM images to be validated on real hardware as well as a modified MAME build. We were informed by [Pierre] that MAME releases will soon be getting support for this ROM as well.

The Macintosh Plus Sounds Great If You Do Exactly This With It

The Macintosh Plus is not exactly known as particularly relevant in the worlds of chiptune or electronic music more broadly. That’s not to say it can’t do anything that sounds cool, however. As [Action Retro] demonstrates,  it’s got some really impressive tricks up its sleeve if you know what you’re doing.

The video centers around “Music Mouse”, a piece of software created by Laurie Spiegel for the Macintosh Plus all the way back in 1986. Spiegel saw the Macintosh Plus as a potential instrument for musical expression, with the then-innovative mouse as the key human interface.

[Action Retro] shows off the software, which is able to create rather pleasing little melodies with little more than a swish and a swash across the mousepad. The software makes smart use of scales so you’re not forever dodging around dissonant notes, so it’s quite easy to play something beautiful. He then makes things more interesting by pairing the Macintosh Plus with his favorite guitar pedal—the Old Blood Noise Endeavors Sunlight. It’s a dynamic reverb that really opens up the sonic landscape when paired with the Mac Plus. If you’re looking for a weird avant-garde setup to take on stage at your next noise show, this has to be it.

We’re usually used to seeing Nintendo and Commodore products in the retro computer music space. The Mac makes a nice change. Video after the break.

Continue reading “The Macintosh Plus Sounds Great If You Do Exactly This With It”

Everything You Wanted To Know About Early Macintosh Floppies

Using a disk drive today is trivial. But back “in the day,” it was fairly complex both because the drives were simple and the CPUs were not powerful by today’s standards. [Thomas] has been working on a 68000 Mac emulator and found that low-level floppy information was scattered in different places. So he’s gathered it all for us in one place.

Low-level disk access has a lot of subtle details. For example, the Mac calibrates its speed control on boot. If your emulated drive just sets the correct speed and doesn’t respond to changes during calibration, the system will detect that as an error. Other details about spinning disks include the fact that inner tracks are shorter than outer track and may require denser recordings. Laying out sectors can also be tricky since you will lose performance if you, for example, read sector one and then miss sector two and have to wait for it to come back around. Disk sectors are often staggered for this reason.

Adding to the complexity is the controller — the IWM or Integrated Woz Machine — which has an odd scheme for memory mapping I/O. You should only access the odd bytes of the memory-mapped I/O. The details are all in the post.

In a way, we don’t miss these days, but in other ways, we do. It wasn’t that long ago that floppies were king. Now it is a race to preserve the data on them while you still can.

Designing A Macintosh-to-VGA Adapter With An LM1881

Old-school Macintosh-to-VGA adapter. Just solve for X, set the right DIP switches and you’re golden.

If you’re the happy owner of a vintage Apple system like a 1989 Macintosh IIci you may know the pain of keeping working monitors around. Unless it’s a genuine Apple-approved CRT with the proprietary DA-15-based video connector, you are going to need at least an adapter studded with DIP switches to connect it to other monitors. Yet as [Steve] recently found out, the Macintosh’s rather selective use of video synchronization signals causes quite a headache when you try to hook up a range of VGA-equipped LCD monitors. A possible solution? Extracting the sync signal using a Texas Instruments LM1881 video sync separator chip.

Much of this trouble comes from the way that these old Apple systems output the analog video signal, which goes far beyond the physical differences of the DA-15 versus the standard DE-15 D-subminiature connectors. Whereas the VGA standard defines the RGB signals along with a VSYNC and HSYNC signal, the Apple version can generate HSYNC, VSYC, but also CSYNC (composite sync). Which sync signal is generated depends on what value the system reads on the three sense pins on the DA-15 connector, as a kind of crude monitor ID.

Theoretically this should be easy to adapt to, you might think, but the curveball Apple throws here is that for the monitor ID that outputs both VSYNC and HSYNC you are limited to a fixed resolution of 640 x 870, which is not the desired 640 x 480. The obvious solution is then to target the one monitor configuration with this output resolution, and extract the CSYNC (and sync-on-green) signal which it outputs, so that it can be fudged into a more VGA-like sync signal. Incidentally, it seems that [Steve]’s older Dell 2001FP LCD monitor does support sync-on-green and CSYNC, whereas newer LCD monitors no longer list this as a feature, which is why now more than a passive adapter is needed.

Although still a work-in-progress, so far [Steve] has managed to get an image on a number of these newer LCDs by using the LM1881 to extract CSYNC and obtain a VSYNC signal this way, while using the CSYNC as a sloppy HSYNC alternative. Other ICs also can generate an HSYNC signal from CSYNC, but those cost a bit more than the ~USD$3 LM1881.

A New Analog And CRT Neck Board For The MacIntosh SE

Keeping a 35-year old system like the MacIntosh SE and its successor, the SE/30, up and running requires the occasional replacement parts. As an all-in-one system, the analog board that provides the power for not only the system but also the 9″ (23 cm) built-in CRT is a common failure location, whether it is due to damaged traces, broken parts or worse. For this purpose [Kay Koba] designed a replacement analog board, providing it with a BOM of replacement components. This also includes the neck board, which is the part that the CRT itself connects to.

As [Kay] notes in the project log, the design was inspired after building [Kai Robinson]’s Classic Reloaded logic board, which we covered previously. After a few revisions, [Kay] has now begun selling the PCBs for $42. The product page also links to BOMs for both the analog board and the neck board, with most of the parts simple through-hole parts. If the board’s fancy styling and LEDs compared to the original board isn’t your cup of tea, it does look like there exists interest in a more subdued version as well.