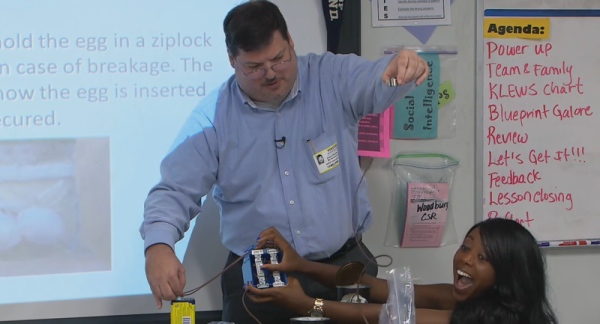
Kids And Hacking: Electromagnetic Eggs

One of my favorite things to do is visit with school kids who are interested in engineering or science. However, realistically, there is a limit to what you can do in a single class that might last 30 to 90 minutes. I recently had the chance to work with a former colleague, a schoolteacher, and The Teaching Channel to create an engineering unit for classroom use that lasts two weeks.

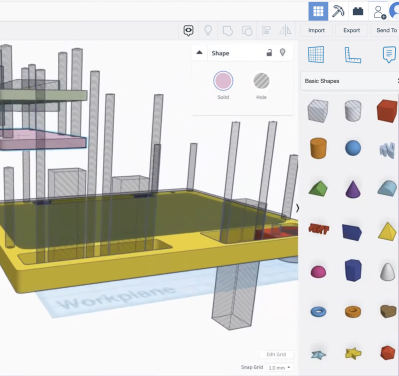
This new unit focuses on an egg drop. That’s not an original idea, but we did add an interesting twist: the project develops a “space capsule” to protect the egg, but also an electromagnetic drop system to test the capsules. The drop system allows for a consistent test with the egg capsule releasing cleanly from a fixed height. So in addition to the classic egg drop capsule, the kids have to build an electromagnet, a safe switching circuit, and a test structure. Better still, teams of kids can do different parts and integrate them into a final product, closely mimicking how real engineering projects work.

There are a few reasons for the complexity. First, given ten class sessions, you can do a lot more than you can in a single day. Second, I always think it is good if you can find exercises that will appeal to lots of different interests. In the past, I’ve used robots and 3D printers for that reason. Some students will be interested in the electronics, others in the mechanics, and still others will be interested in the programming. Some kids will engage in 3D modeling (robot simulation or 3D objects). The point is there is something for everyone.


Continue reading “Kids And Hacking: Electromagnetic Eggs”

Kids And Hacking: The One Hour Egg Drop

In the last Hacking and Kids post, I talked about an activity you can do with kids when you don’t have a lot of time or resources. The key idea was to have fun and learn a little bit about open and closed loop control. One of the things I usually briefly mention when I do that is the idea of a design trade: Why, for example, a robot might use wheels instead of legs, or treads instead of wheels.

Engineers and makers perform trades like this all the time. Suppose you are building a data logging system. You want precise samples, large storage capacity, and many channels. But you also want a low cost and low power drain. You might also want high reliability. All of these requirements will lead to different trades. A hard drive would provide a lot of space, but is more expensive, less reliable, larger, and more power hungry than, say, an SD card. So there isn’t a right choice. It depends on which of the factors are most important for this particular design. A data logger in a well-powered rack might be well served to have a terrabyte hard drive, while a battery powered logger in a matchbox that will be up on the side of a mountain might be better off with an SD card.

We can all relate to that example, but it is pretty boring to a kid. You probably can’t get them to design a data logger, anyway. But if I have about an hour and a little prep time, I have a different way to get the same point across. It is a modified version of the classic “egg drop”, but it is simple enough to do in an hour with very little preparation time.

Continue reading “Kids And Hacking: The One Hour Egg Drop”

Kids And Hacking: Blind Robotics

If you are a Hackaday reader, it is a good bet that when you were a kid there was some adult who infected you with the madness you have for science, engineering, tinkering, or whatever it is that brings you here. Maybe it was a parent or a teacher. For many of us, it was a local ham radio operator. But it was probably someone who had the passion for this kind of thing and you caught it.

Paying that debt forward can be very rewarding. Schools and youth organizations are always looking for people to share their passions with kids and at the right age and the right school, you could be that one push that moves a kid off a bad path.

Continue reading “Kids And Hacking: Blind Robotics”

Solar powered soap bubble blaster

Hacking A Solar Bubble Blaster With Grandkids

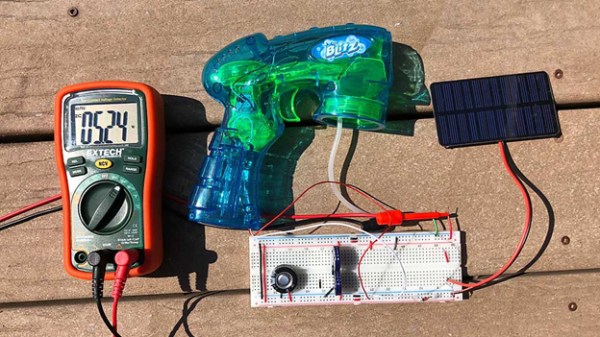
[Fmilburn] was having fun with his grandkids, playing around with a small Radio Shack solar panel, some supercapacitors and a Zener diode when the kids eventually moved on to blowing bubbles with their grandmother. To regain their interest he got an inexpensive battery powered, soap Bubble Blaster and converted it to run on the solar panel and supercapacitors instead.

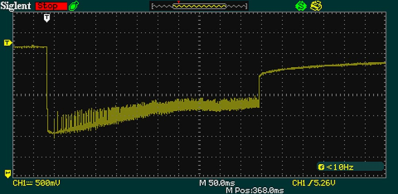
Supercapacitor power soap bubble blaster voltageHis write-up is a pretty fun read, walking through his process, including an oscilloscope measurement showing how the capacitors’ voltage drops from 5.26 V to 3.5 V when the trigger is pressed, and interestingly, slowly recovers until it’s released a second later, when it then rises back to 4.5 V. He’s even included how he worked out of the panel’s maximum power point (MPP), which is what he was doing when the kids were first lured away to blow soap bubbles. But we’re sure Hackaday readers aren’t as easily distracted.



The resulting Solar Powered Bubble Blaster works quite well. At a starting voltage of 5.23 V, it runs for 15 seconds and then takes only a minute to recharge. Charged batteries would have had a longer runtime but take longer to recharge, an important point when trying to keep kids interested. See it in action in the video below.

Want to instead fill your neighborhood with soap bubbles? Check out this 14,000 BPM (Bubbles Per Minute) 3D printed soap bubble machine. Or maybe something more relaxed is your speed.

Continue reading “Hacking A Solar Bubble Blaster With Grandkids”

Hacking Buttons Back Into The Car Stereo

To our younger readers, a car without an all-touchscreen “infotainment” system may look clunky and dated, but really, you kids don’t know what they’re missing. Buttons, knobs, and switches all offer a level of satisfying tactility and feedback that touchscreens totally lack. [Garage Tinkering] on YouTube agrees; he also doesn’t like the way his aftermarket Kenwood head unit looks in his 2004-vintage Nissan. That’s why he decided to take matters into his own hands, and hack the buttons back on.

Rather than source a vintage stereo head unit, or try and DIY one from scratch, [Garage Tinkering] has actually hidden the modern touchscreen unit behind a button panel. That button panel is actually salvaged from the stock stereo, so the looks fit the car. The stereo’s LCD gets replaced with a modern color unit, but otherwise it looks pretty stock at the end.

Adding buttons to the Kenwood is all possible thanks to steering-wheel controls. In order to make use of those, the touchscreen head unit came with a little black box that translated the button press into some kind of one-wire protocol that turned out to be an inverted and carrier-less version of the NEC protocol used in IR TV remotes. (That bit of detective work comes from [michaelb], who figured all this out for his Ford years ago, but [Garage Tinkering] is also sharing his code on GitHub.) Continue reading “Hacking Buttons Back Into The Car Stereo”

Kids Vs Computers: Chisanbop Remembered

If you are a certain age, you probably remember the ads and publicity around Chisanbop — the supposed ancient art of Korean finger math. Was it Korean? Sort of. Was it faster than a calculator? Sort of. [Chris Staecker] offers a great look at Chisanbop, not just how to do it, but also how it became such a significant cultural phenomenon. Take a look at the video below. Long, but worth it.

Technically, the idea is fairly simple. Your right-hand thumb is worth 5, and each finger is worth 1. So to identify 8, you hold down your thumb and the first three digits. The left hand has the same arrangement, but everything is worth ten times the right hand, so the thumb is 50, and each digit is worth 10.

With a little work, it is easy to count and add using this method. Subtraction is just the reverse. As you might expect, multiplication is just repeated addition. But the real story here isn’t how to do Chisanbop. It is more the story of how a Korean immigrant’s system went viral decades before the advent of social media.

You can argue that this is a shortcut that hurts math understanding. Or, you could argue the reverse. However, the truth is that this was around the time the calculator became widely available. Math education would shift from focusing on getting the right answer to understanding the underlying concepts. In a world where adding ten 6-digit numbers is easy with a $5 device, being able to do it with your fingers isn’t necessarily a valuable skill.

If you enjoy unconventional math methods, you may appreciate peasant multiplication.

Continue reading “Kids Vs Computers: Chisanbop Remembered”

Custom built Playstation handheld

The Phantom PSP: Crafting The Handheld Sony Never Sold

In the world of retro gaming, some legends never die – especially the ‘phantom’ PSP, Sony’s mythical handheld that never saw the light of day. While that elusive device remains a dream, hacker and gaming wizard [Kyle Brinkerhoff] built his own – and Macho Nacho made a video about it. His creation, which also goes by the name ‘Playstation Zero’, isn’t just another handheld emulator; it’s a powerful, custom-built system that revives the classics and plays them on a portable device that feels like the future.

Driven by a hunger for the ultimate gaming experience, [Kyle] set out to blend modern tech with retro gaming magic. He started with the Raspberry Pi, loading it up with emulation software for all the iconic systems—from NES and SNES to the Sega Genesis and Game Boy. But [Kyle] didn’t just slap on an off-the-shelf emulator; he dived into the code himself, optimizing and tweaking for lightning-fast responsiveness, so each game plays like it’s running on the original hardware. That’s hacking in true form: pushing the limits of software and hardware until they work exactly the way you want them to. Best of all: he published it all open source for others to use.

In the spirit of the Geneboy—a handheld Sega Genesis built by [Downing] and featured on Hackaday back in 2012—[Kyle]’s device pairs handheld emulation with the consoles all nineties kids wanted for Christmas. To capture the tactile thrill of vintage gaming, [Kyle] went a step further by designing and 3D-printing a custom controller layout that mimics the feel of the original systems. If watching someone neatly soldering a pcb sounds relaxing to you, don’t skip the middle part of his video. Although this little beast is packed with all bells and whistles you’d expect to see on a Raspberry Pi, it does lack one serious thing: battery life. But, [Kyle] is open about that, and hopes to improve on that in a future version.

If you want to see the full build, check out the video below. Or, immediately dive into [Kyle]’s Github, order the cute Takara shell, and get started!

Continue reading “The Phantom PSP: Crafting The Handheld Sony Never Sold”