Flexures Make Robotic Fingers Simpler To Print

Designing an anthropomorphic robotic hand seems to make a lot of sense — right up until the point that you realize just how complex the human hand is. What works well in bone and sinew often doesn’t translate well to servos and sensors, and even building a single mechanical finger can require dozens of parts.

Or, if you’re as clever about things as [Adrian Perez] is, only one part. His print-in-place robotic finger, adorably dubbed “Fingie,” is a huge step toward simplifying anthropomorphic manipulators. Fingie is printed in PLA and uses flexures for the three main joints of the finger, each of which consists of two separate and opposed coil springs. The flexures allow the phalanges to bend relative to each other in response to the motion of three separate tendons that extend through a channel on the palmar aspect of the finger, very much like the real thing.

The flexures eliminate the need for bearings at each joint and greatly decrease the complexity of the finger, but the model isn’t perfect. As [Adrian] points out, the off-center attachment for the tendons makes the finger tend to curl when the joints are in flexion, which isn’t how real fingers work. That should be a pretty easy fix, though. And while we appreciate the “one and done” nature of this print, we’d almost like to see the strap-like print-in-place tendons replaced with pieces of PLA filament added as a post-processing step, to make the finger more compact and perhaps easier to control.

Despite the shortcomings, and keeping in mind that this is clearly a proof of concept, we really like where [Adrian] is going with this, and we’re looking forward to seeing a hand with five Fingies, or four Fingies and a Thumbie. It stands to be vastly simpler than something like [Will Cogley]’s biomimetic hand, which while an absolute masterpiece of design, is pretty daunting for most of us to reproduce.

Continue reading “Flexures Make Robotic Fingers Simpler To Print”

Sharing 3D Printing With Kids

If you have a hobby, it is natural to want to share it with kids. If you are interested in 3D printing, you may even have kids who want to try their hand at printing without prompting. There are a number of “kid printers” aimed specifically at that market. Are they worthwhile? How old is old enough? [Everson Siqueirar] tries out a Kidoodle with this 6-year-old daughter, and the results are good, as you can see in the video below.

Impressively, his daughter [Sophie] was able to set up the printer with a little help. The build plate is very small and not heated. Apparently, a glue stick is necessary for bed adhesion. The printer has WiFi but also has a collection of models you can print without any internet connection.

Continue reading “Sharing 3D Printing With Kids”

Low-Cost Cryocooler Pumps Out Cheap DIY Liquid Nitrogen

A word of caution if you’re planning to try this cryocooler method for making liquid nitrogen: not only does it involve toxic and flammable gasses and pressures high enough to turn the works into a bomb, but you’re likely to deplete your rent account with money you’ll shell out for all the copper tubing and fittings. You’ve been warned.

In theory, making liquid nitrogen should be as easy as getting something cold enough that nitrogen in the air condenses. The “cold enough” part is the trick, and it’s where [Hyperspace Pirate]’s cryocooler expertise comes into play. His setup uses recycled compressors from cast-off air conditioners and relies on a mixed-gas Joule-Thomson cycle. He plays with several mixtures of propane, ethylene, methane, argon, and nitrogen, with the best results coming from argon and propane in a 70:30 percent ratio. A regenerative counterflow heat exchanger, where the cooled expanding gas flows over the incoming compressed gas to cool it, does most of the heavy lifting here, and is bolstered by a separate compressor that pre-cools the gas mixture to about -30°C before it enters the regenerative system.

There’s also a third compressor system that pre-cools the nitrogen process gas, which is currently supplied by a tank but will eventually be pulled right from thin air by a pressure swing adsorption system — basically an oxygen concentrator where you keep the nitrogen instead of the oxygen. There are a ton of complications in the finished system, including doodads like oil separators and needle valves to control the flow of liquid nitrogen, plus an Arduino to monitor and control the cycle. It works well enough to produce fun amounts of LN2 on the cheap — about a quarter of the cost of commercially made stuff — with the promise of efficiency gains to come.

It does need to be said that there’s ample room for peril here, especially containing high pressures within copper plumbing. Confidence in one’s brazing skills is a must here, as is proper hydro testing of components. That said, [Hyperspace Pirate] has done some interesting work here, not least of which is keeping expenses for the cryocooler to a minimum.

Continue reading “Low-Cost Cryocooler Pumps Out Cheap DIY Liquid Nitrogen”

Congratulations To The 2024 Business Card Challenge Winners!

When you ask a Hackaday crowd to design a business card, you should expect to be surprised by what you get. But still, we were surprised by the breadth of entries! Our judges wracked their brains to pick their top ten, and then we compared notes, and three projects rose to the top, but honestly the top ten could have all won. It was a tight field. But only three of the entries get to take home the $150 DigiKey gift certificates, so without further ado…

Continue reading “Congratulations To The 2024 Business Card Challenge Winners!”

Reverse-Engineering A Shahed-136 Drone Air Data Computer

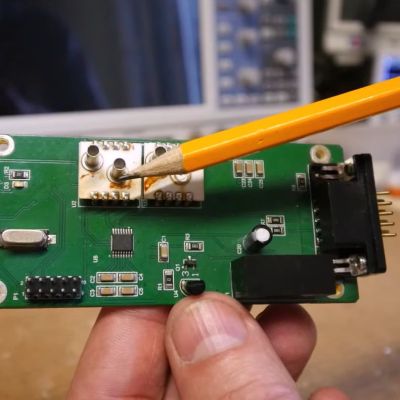
Top of the air data computer module, with pressure sensors, RS232 driver and DC-DC converter visible. (Credit: Le Labo de Michel, YouTube)

An air data computer (ADC) is a crucial part of an avionics package that can calculate the altitude, vertical speed, air speed and more from pressure (via pitot tubes) and temperature inputs. When your airplane is a one-way attack drone like Iran’s Shahed-136, you obviously need an ADC as well, but have to focus on making it both cheap and circumvent a myriad of sanctions. As [Michel] recently found out while reverse-engineering one of these ADCs. Courtesy of the Russo-Ukrainian war, hundreds of these Shahed drones are being destroyed every month, with some making it back down again intact enough for some parts to end up on EBay.

The overall design as captured in the schematic is rather straightforward, with the component choice probably being the most notable, as it uses an STM32G071 MCU and Analog Devices ADM3232 RS-232 driver, in addition to the two pressure sensors (by Silicon Microstructures Inc., now owned by TE). The DC-DC converter is a Mornsun URB24055-6WR3.

With the board in working condition, [Michel] hooks it up to a test setup to see the output on the serial interface when applying different pressures to the pressure sensor inputs. This results in a lot of ASCII data being output, all containing different values that were calculated by the firmware on the STM32 MCU. In the drone this data would then be used by the flight computer to make adjustments. Overall it’s a rather basic design that doesn’t seem to have a dedicated temperature sensor either, though [Michel] is still analyzing some details. A firmware dump would of course be rather fascinating as well.

Continue reading “Reverse-Engineering A Shahed-136 Drone Air Data Computer”

Illustrated Kristina with an IBM Model M keyboard floating between her hands.

Keebin’ With Kristina: The One With The 24-Hour Macro Pad

They say Rome wasn’t built in a day, but this great little music-controlling macro pad by [nibbler] actually was. Why? Because as Hackaday’s own [Donald Papp] reminded us, we all need a win sometimes, especially as projects drag on and on without any end in sight.

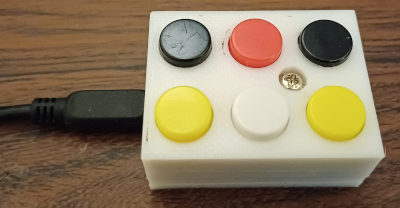
A small macro pad with six buttons.
Image by [nibbler] via Toxic Antidote
As [nibbler] points out, what really constitutes a win? Set the bar too low and it won’t feel like one at all. Too high, and you may become too discouraged to cross the finish line. With that in mind, [nibbler] set the bar differently, limiting themselves to what could be done in the one day per week they have to devote time to electronic matters.

One-day turnaround usually means using parts on hand and limiting oneself to already-learned skills and techniques. No problem for [nibbler], who, armed with an Arduino Leonardo Tiny and a some colorful push buttons, set about designing a suitable enclosure, and then putting it all together. Was this a win? [nibbler] says yes, and so do I.

Continue reading “Keebin’ With Kristina: The One With The 24-Hour Macro Pad”

Simple Version Of Pong Played On A Row Of LEDs

As far as video games go, Pong is already about as simple as it gets. But if even two dimensions is a bit more than you’re looking to tackle, [mircemk] shows how you can distill the core gameplay of this iconic title to its absolute minimum using an Arduino and a row of LEDs.

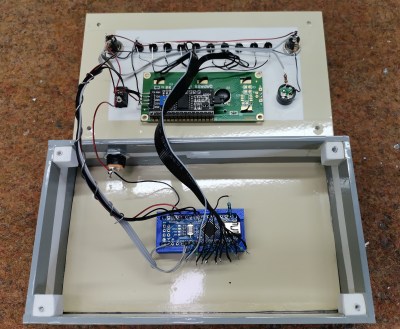
While [mircemk] brings their usual design aesthetic and flash to the project, this one could truly be done as a parts bin build. All you really need is a microcontroller with enough I/O pins (here, an Arduino Nano is used), a couple of buttons, and the aforementioned LEDs. A 16×2 LCD and a buzzer have been added to improve on the user interface a bit, but even that isn’t strictly required.

To play, each user holds their button and gets ready to hit it as soon as the LED closest to them lights up. Again, [mircemk] spruces this build up by offering both integrated buttons on the front panel of the game, as well as a pair of external “controllers” so you don’t have to crowd around the main unit. In this incarnation the score is shown on the LCD, but swapping that out for a pair of seven-segment LEDs could give the whole thing a bit more of a retro flair.

This isn’t the first time [mircemk] has tackled 1D Pong — if you can spring for addressable LEDs, you can pull the whole thing off with significantly less wiring.

Continue reading “Simple Version Of Pong Played On A Row Of LEDs”