Getting PCIe Working On The New Pi 5

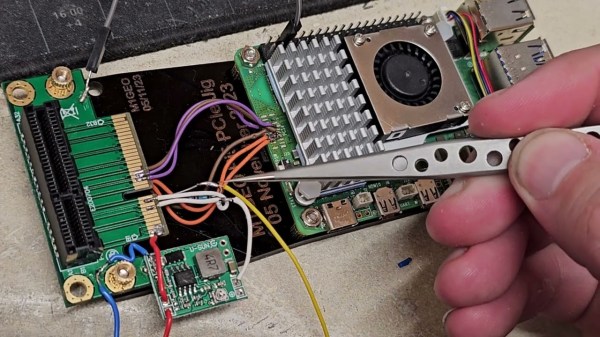
After the Pi 4 released, a discovery was quickly made that the internals of the popular single-board computer use PCIe to communicate with each other. This wasn’t an accessible PCIe bus normally available in things like desktop computers for expansion cards, though; this seemed to be done entirely internally. But a few attempts were made to break out the PCIe capabilities and connect peripherals to it anyway, with varying levels of success. The new Pi 5 seems to have taken that idea to its logical conclusion and included a PCIe connector, and [George] is showing us a way to interface with this bus.

The bus requires the port to be enabled, but once that’s done it’s ready to be used. First, though, some support circuitry needs to be worked out which is why [George] is reverse engineering the system to see what’s going on under the hood. There are a few handshakes that happen before it will work with any peripherals, but with that out of the way a PCIe card can be connected. [George] removed the connector to solder wires to the board directly in order to connect a proper PCIe port allowing a variety of cards to be connected, in this case a wireless networking card and an old Firewire card. This specific build only allows Gen 1 speeds, but the bus itself supports faster connections in theory with better wiring and support circuitry.

While it might not be the prettiest solution, as [George] admits, it does a great job of showing the inner workings of this communication protocol and its use in the new, more powerful Raspberry Pi 5. This makes a lot of things more accessible, such as high-speed PCIe HATs allowing for a wide range of expansion for these popular single-board computers, which wouldn’t have been possible before. If you’re still stuck with a Pi 4, though, don’t despair. You can still access the PCIe bus on these older models but it’ll take a little bit more work.

Thanks to [CJay] for the tip!

Continue reading “Getting PCIe Working On The New Pi 5”

An ESP32 Dev Board As A Framework Laptop Module

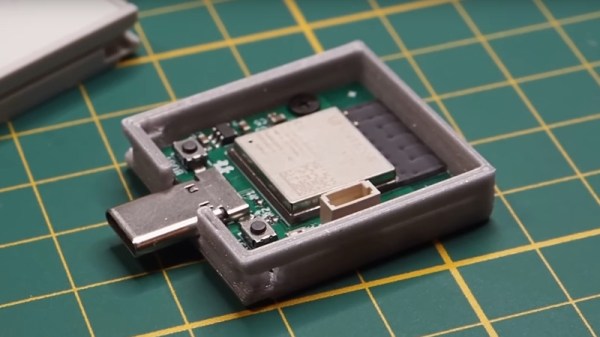
The Framework laptop will no doubt already have caught the eye of more than one Hackaday reader, as a machine designed for upgrade and expansion by its users. One of its key features is a system of expansion modules. The modules are USB-C devices in a form factor that slides into the expansion bays on the Framework Laptop. Framework encourages the development of new modules, which is something [Spacehuhn] has taken on with an ESP32-S3 development board.

The board itself is what you’d expect, the ESP is joined by a multicolor LED and one of those Stemma/Quiik connectors for expansion. The case is handily provided by Framework themselves, and all the files for the ESP32 module can be found in a GitHub repository. We’re guessing it will find application in experimenting with WiFi networks rather than as a standalone microcontroller. Either way, it shows the route for any Framework owners into making their own add-ons. Take a look, we’ve placed the video below the break.

As you might expect we’ve given a lot of coverage to the Framework laptop since its launch, in particular, our colleague [Arya Voronova] is a fan and has shown us many alternative uses for the parts.

Continue reading “An ESP32 Dev Board As A Framework Laptop Module”

A Tiny Forest Of Resistors Makes For Quick And Dirty Adaptive Optics

The term “adaptive optics” sounds like something that should be really complicated and really expensive. And in general, the ability to control the properties of optical elements is sufficiently difficult enough that it’s reserved for big-science stuff like billion-dollar space telescopes.

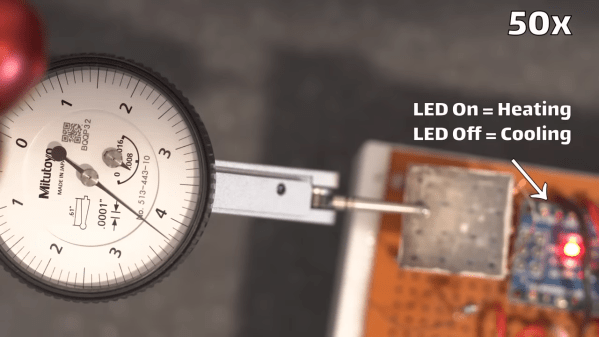
But that doesn’t mean there aren’t quick and dirty adaptive optics that are suitable for the budget-minded experimenter, like this thermally deformable mirror. As [Zachary Tong] explains, this project, which started quite some time ago, is dead simple — a 4 by 4 array of through-hole resistors stand on end, and these are attached to a glass coverslip that has been aluminized on one side. An Arduino and a couple of shift registers make it possible to individually address each of the 16 resistors in the array. Passing a current through a resistor heats it up a bit, leading to thermal expansion and a slight deflection of the mirror sitting on top of the array. Controlling which resistors heat up and by how much should lead to deformation of the mirror surface in a predictable way.

The video below shows some of [Zach]’s experiments with the setup. Unfortunately, he wasn’t able to fully demonstrate its potential — the low-quality mirror didn’t cooperate with his homebrew interferometer. He was, however, able to use a dial indicator to show deflection of the mirror in the 2- to 3-micron range by heating the array. That alone is pretty cool, especially given the dirt cheap nature of the build.

As for practical uses, don’t get too excited. As [Zach] points out, thermal systems like this will probably never be as fast as MEMS or piezoelectric actuators, and many use cases for adaptive optics really don’t react well to added heat. But changing the shape of a mirror with air pressure is another thing.

Continue reading “A Tiny Forest Of Resistors Makes For Quick And Dirty Adaptive Optics”

Pi Compute Module Is Love-child Of Raspberry And Arduino

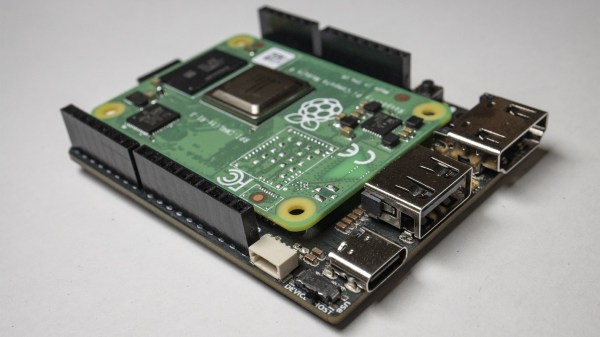
The Raspberry Pi compute module is a powerful piece of hardware, especially for the price. With it, you get more IO than a normal Pi, plus the ability to design hardware around it that’s specifically tailored to your needs rather than simply to general-purpose consumers. However, this comes at the cost of needing a way to interface with it since the compute module doesn’t have the normal IO pins or ports, but [Timon] has come up with a handy development board for this module called the Piunora which solves a lot of these prototyping issues.

The development board expands the compute module to the familiar Arduino-like form factor, complete with IO headers, USB ports, and HDMI output. It doesn’t stop there, though. It has an M.2 connector, some built-in LEDs, a camera connector, and a few other features. It also opens up some other possibilities that would be difficult or impossible with a standard Pi 4, such as the ability to run the Pi as a USB gadget rather than as a host device which simplifies certain types of development, which is [Timon]’s intended function.

As a development board, this project has a lot of potential for the niche uses of the compute module when compared to the standard Raspberry Pi. For embedded applications it’s much easier to deploy, with the increased development costs as a tradeoff. If you’re still unsure what to do with the compute module 4, we have some reading for you. And Timon’s previous project is a great springboard.

Retro Computer Trainer Gets A Raspberry Pi Refit

We know what you’re thinking: this is yet another one of those “Gut the retro gear for its cool old case and then fill it up with IoT junk” projects. Well, rest assured that extending and enhancing this 1970s computer trainer is very much an exercise in respecting the original design, and while there’s a Pi inside,  it doesn’t come close to spoiling the retro goodness.

Like many of a similar vintage as [Scott M. Baker], the Heathkit catalog was perhaps only leafed through marginally less than the annual Radio Shack catalog. One particularly desirable Heathkit item was the ET-3400 microcomputer learning system, which was basically a 6800-based computer surrounded by a breadboarding area for experimentation. [Scott] got a hold of one of these, but without the optional expansion accessory that would allow it to do interesting things such as running BASIC or even supporting a serial port. So [Scott] decided to roll his own expansion board.

The expansion card that [Scott] designed is not strictly a faithful reproduction, at least in terms of the original BOM. He turned to more modern — and more readily available — components, but still managed to provide the serial port, cassette interface, and RAM/ROM expansion of the original unit. The Raspberry Pi is an optional add-on, which just allows him to connect wirelessly if he wants. The card fits into a 3D-printed case that sits below the ET-3400 and maintains the original trainer’s look and feel. The longish video below shows the build and gives a tour of the ET-3400, both before and after the mods.

It looks as though trainers like these and other artifacts from the early days of the PC revolution are getting quite collectible. Makes us wish we hadn’t thrown some things out.

Continue reading “Retro Computer Trainer Gets A Raspberry Pi Refit”

Expansion Board Puts Spotify On The Amiga 500

No doubt some purists in the audience will call this one cheating, since this Amiga 500 from 1987 isn’t technically connecting to Spotify and playing the music by itself. But we also suspect those folks might be missing the point of a site called Hackaday. With all the hoops [Daniel Arvidsson] hopped through to make this happen, what else could it be if not a hack?

This one starts, like so many projects these days, with the Raspberry Pi. Don’t worry Amiga aficionados, this classic machine hasn’t been gutted and had its internals replaced with a diminutive Linux board. But thanks to an expansion card known as the A314, you could say it’s received a penguin infusion. This clever board allows an internally mounted Raspberry Pi to communicate with the Amiga 500 through shared memory, making all sorts of trickery possible.

In this case, the Raspberry Pi is actually the one connecting to the Spotify Connect service with raspotify and decoding the stream. But thanks to a few pipes and an ALSA plugin, the audio itself is actually pushed into the Amiga’s sound hardware. In the video after the break, the process is demonstrated with tunes that are befitting a computer of this vintage.

This process is similar to how one classic Apple fan got Spotify running on their Macintosh SE/30 with a similar respect for the vintage hardware. Of course if you actually want to gut your Amiga 500 and replace it with a Raspberry Pi, we’ve seen some pretty good conversions to get you started.

Continue reading “Expansion Board Puts Spotify On The Amiga 500”

Respectfully Modifying The Amiga 500

Modifying the Amiga 500 to speed up access to RAM in a memory expansion pack is a well documented procedure, with guides on the process written in the early 1990’s when the hardware was only a few years old. But as they were written for contemporary hardware, they make no concessions for how one should be treating a vintage computer that’s now over 30 years old. In 1993, cutting traces on the Amiga 500 motherboard was just a last ditch effort to eek a few more months of service life out of an outdated desktop computer. But in 2018, it’s kind of like when that old lady tried to “restore” a fresco of Jesus in Spain; it might be done with the best of intentions, but you still screwed the thing up good and proper.

Such things don’t fly over at [Inkoo Vintage Computing]. There you can find a guide that details the impressive lengths one can go to if they want to perform the classic modification without any irreversible changes to the motherboard. To avoid the cut traces and soldered bodge wires, this version of the modification makes use of a novel adapter that breaks out the necessary connections on the 8372A chip.

The adapter is simply a homemade PCB with both male and female plastic leaded chip carrier (PLCC) connectors. The few pins on the chip that needed rerouting are exposed as solder pads on the adapter for easy wiring. There are even a couple jumpers on the adapter to turn the modifications on and off.

Not surprisingly, the trickiest part of building this adapter was sourcing the antiquated PLCC connectors. Assuming you can even find them, you are then left with the challenging task of soldering them together. Judging by the pictures on the [Inkoo Vintage Computing] page, it’s no walk in the park.

Another similar arrangement is used in the expansion bay of the Amiga, where a pin is virtually “cut” in the connector. A tiny PCB is soldered to a 3×2 header to reroute the signals, and another jumper is used to enable and disable the pin. Luckily, the long pins on the Amiga memory expansion are forgiving enough that the little board can fit in between them without breaking electrical contact.

We’re no stranger to the Amiga 500 around these parts. We’ve covered how to get the 1987-vintage machine online in the 21st century, as well as employing a Raspberry Pi to emulate the original floppy drive. You can even make your own faux-Amiga with a 3D printed case, if you suffer from a sort of existential dread when working on a computer that’s older than you are.