How A Real 3D Display Works

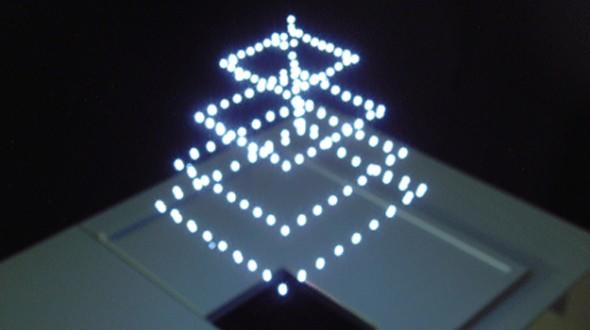
There’s a new display technique that’s making the blog rounds, and like anything that seems like its torn from [George Lucas]’ cutting room floor, it’s getting a lot of attention. It’s a device that can display voxels in midair, forming low-resolution three-dimensional patterns without any screen, any fog machine, or any reflective medium. It’s really the closest thing to the projectors in a holodeck we’ve seen yet, leading a few people to ask how it’s done.

This isn’t the first time we’ve seen something like this. A few years ago. a similar 3D display technology was demonstrated that used a green laser to display tens of thousands of voxels in a display medium. The same company used this technology to draw white voxels in air, without a smoke machine or anything else for the laser beam to reflect off of. We couldn’t grasp how this worked at the time, but with a little bit of research we can find the relevant documentation.

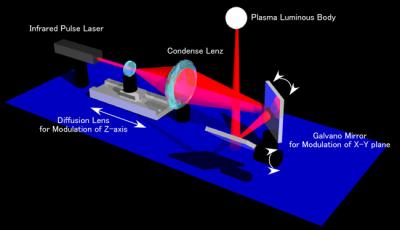
A system like this was first published in 2006, built upon earlier work that only displayed pixels on a 2D plane. The device worked by taking an infrared Nd:YAG laser, and focusing the beam to an extremely small point. At that point, the atmosphere heats up enough to turn into plasma and turns into a bright, if temporary, point of light. With the laser pulsing several hundred times a second, a picture can be built up with these small plasma bursts.

2-fig2

Moving a ball of plasma around in 2D space is rather easy; all you need are a few mirrors. To get a third dimension to projected 3D images, a lens mounted on a linear rail moves back and forth changing the focal length of the optics setup. It’s an extremely impressive optical setup, but simple enough to get the jist of.

Having a device that projects images with balls of plasma leads to another question: how safe is this thing? There’s no mention of how powerful the laser used in this device is, but in every picture of this projector, people are wearing goggles. In the videos – one is available below – there is something that is obviously missing once you notice it: sound. This projector is creating tiny balls of expanding air hundreds of times per second. We don’t know what it sounds like – or if you can hear it at all – but a constant buzz would limit its application as an advertising medium.

As with any state-of-the-art project where we kinda know how it works, there’s a good chance someone with experience in optics could put something like this together. A normal green laser pointer in a water medium would be much safer than an IR YAG laser, but other than that the door is wide open for a replication of this project.

Thanks [Sean] for sending this in.

Continue reading “How A Real 3D Display Works”

Hacklet 14 – Hacks Around The House

In this weeks Hacklet we’re looking at household hacks. Not necessarily globally connected home automation hacks, but task specific hacks that we want in our lives yesterday!

We’ve all had it happen, you’re burning the midnight oil on a project when you realize it’s garbage night. The mad dash to collect empty anti-static bags, last night’s Chinese food, and the rest of the trash before actually venturing outside in the dark.
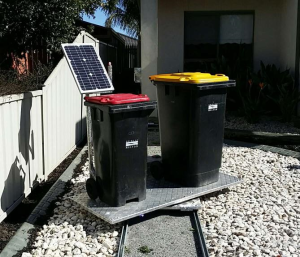
bins2[Mehmet-cileli] doesn’t have to deal with any of that, thanks to My Bins, his automated trash and recycling can moving system. Normally the bins are stationed near the house. Each garbage night, the system springs into action. The cans and their platform pivots 90 degrees. The entire system then rolls along a track to the curb. Once the cans have been collected, everything rolls back ready for more trash. We just hope [Mehmet’s] garbage men are nice enough to put the bins back on their platform!
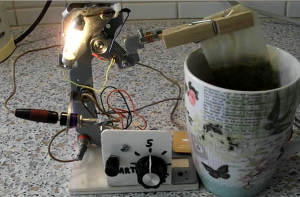
teatimeNext we have the perfect cup of tea. [Marcel] kept forgetting his tea while it was steeping. After ending up with ink a few times, he built this Automatic Tea Timer. A button starts the timer, and after a few minutes, the tea bag is automatically lifted and a light illuminates to let you know your tea is ready. [Marcel] used a Raspberry Pi Arduino 555 simple R-C timer circuit to create his delay. The lift arm is a discarded hard drive read arm. The light bulb limits current through the voice coils.
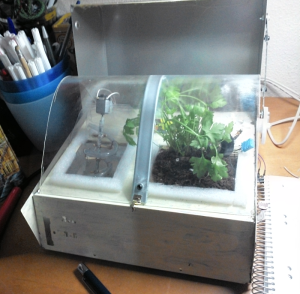
greenhouse1[Juan Sandu] always has veggies with his Smart Small Greenhouse. [Juan] has created a desktop sized greenhouse that gives plants what they crave. No, not Brawndo, we’re talking water, warmth, and light. An Arduino Uno uses sensors to monitor humidity, temperature, light, and moisture. Based upon one of two pre-set plant types, the system determines when to water, turn on lights, or even power up a fan to keep temperatures plant friendly.  [Juan] is still working on his greenhouse, but his code is already up on Github.
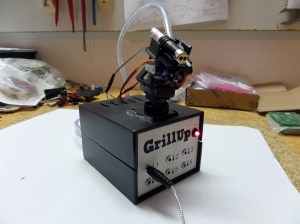
 

grillupNext up is [nerwal] with his entry in The Hackaday Prize, GrillUp. GrillUp is a remote grill temperature monitoring system with a cooling spray. Up to 6 food grade thermometers provide GrillUp with its temperature data. If things are getting a bit too hot, Grillup cools the situation down by spraying water, beer, or your favorite marinade. The system is controlled over Bluetooth Low Energy from an android smart phone. A laser pointer helps to aim the water spray. Once the cooling zones are set up, the system runs automatically. It even has a sprinkler mode, where it sprays everything down.
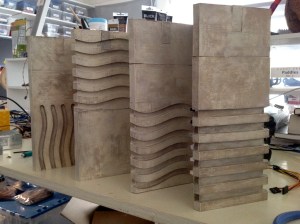
led-lightsEvery hacker’s house needs some Sci-fi mood lights, right? [spetku and maehem] round out this weeks Hacklet with their Fifth Element Stone Mood Lighting. Originally an entry in the Hackaday Sci-fi contest, these mood lights are based on the elemental stones in everyone’s favorite Bruce Willis movie. The lights are 3D printed in sections which stack over foamboard cores. The actual light comes from a trio of RGB LEDs. LED control is from the same brain board which controls the team’s Robot Army. The lights are designed to open up just like the ones in the movie, though fire, earth, wind, and water are not required. The servos [spetku and maehem] selected weren’t quite up to the task, but they mention this will be remedied in a future revision.

That’s a wrap for this week’s Hacklet. As always, see you next week. Same hack time, same hack channel, bringing you the best of Hackaday.io!

Hackaday Links: May 18, 2014

hackaday-links-chain

Think the original Pong is cool? How about point to point Pong? [v8ltd] did it in three months, soldering all the leads directly to the chip pins. No sockets required. It’s insane, awesome, a masterpiece of craftsmanship, and surprising it works.

[Jeremy Cook] is building a servo-powered light graffiti thing and needed a laser diode. How do you control a laser pointer with a microcontroller? Here’s how. They’re finicky little buggers, but if you get the three-pack from Amazon like [Jeremy] did, you get three chances to get it right.

NFC tags in everything! [Becky] at Adafruit is putting them in everything. Inside 3D printed rings, glued onto rings, and something really clever: glued to your thumbnail with nail polish. Now you can unlock your phone with your thumb instead of your index finger.

Photographs capture still frames, but wouldn’t it be great if a camera could capture moving images? No, we’re not talking about video because this is the Internet where every possible emotion, reaction, and situation can be expressed with an animated GIF. Meet OTTO, the camera that captures animated GIFs! It’s powered by the Raspberry Pi compute module, so that’s interesting.

[Nate] was getting tired of end mills rolling around his bench. That’s a bad thing. He came up with a solution, though: Mill a piece of plywood into a tray to hold end mills.

The Da Vinci printer, a printer that only costs $500 because they’re banking on the Gillette model, has been cracked wide open by resetting the DRM, getting rid of the proprietary host software, and unbricking the device. Now there’s a concerted effort to develop custom firmware for the Da Vinci printer. It’s extraordinarily bare bones right now, but the pins on the microcontroller are mapped, and RepRap firmwares are extremely modular.

Stop Motion Water Droplets

logo

The folks at Physalia studio were asked by a company called IdN to produce a little bit of video with a logo. After tossing a few ideas around, they hit upon the concept of projecting the IdN logo inside a falling water droplet. CGI would never get this idea right, so the finished product is the result of stop-motion animation created inside several thousand falling drops of water.

Taking a picture of a falling water droplet was relatively easy; a small drip, a laser pointer and photodiode, and a flash trigger were all that was needed to freeze a drop of water in time. The impressive part of the build is a motion control system for the camera. This system moves the camera along the vertical axis very slowly, capturing one water droplet at a time.

Behind the droplet is a an animation that’s seemingly inspired by a Rorschach test, ending on the IdN logo. The frames for these animations were printed out and placed inside the test chamber/studio upside down to account for the optical effects of a sphere of water.

The end result is a product of over 20,000 pictures taken, all edited down into a single 30-second shot. An amazing amount of work for such a short video but as you can see in the videos below, it’s well worth the effort.

Continue reading “Stop Motion Water Droplets”

Hackaday Links: February 23, 2014

hackaday-links-chain

You can pick up a tiny laser pointer on the cheap if you know where to look. But when it comes time to replace the multiple button cells that power it be prepared to clean our your wallet. [KB3WZZ] got around that with the cap from a ball-point pen. He drilled holes in the end plug of the pointer, and used wire and a plastic pen cap as a battery adapter. He’s powering it from USB, but now that you have wires exiting the case you can use any source you wish.

[Gerben] tipped us off about the trinket clone he built himself. It’s a tiny sliver of a PCB which he etched, populated with through-hole parts only, and finished off with some finger nail varnish to prevent shorting and corrosion. The solder-covered edge connector for USB was left unvarnished of course.

If you live in a college town you are probably quite used to seeing futon pads and frames on the curb waiting for the garbage collector. A little bit of ingenuity, and some added lumber, will turn a futon frame into a respectable shelving unit. [Thanks Martin]

Complicated bench equipment + good lighting + a great camera = an awesome teardown. This time around it’s the guts of a Keithly 2002 8.5 digit mulitimeter laid bare. [Thanks David]

Here’s a PCB laminator hack that is definitely worth a look. The original unit was acquired on eBay for about $25 and had a thermostat whose performance wasn’t optimal. A bit of alteration for the thickness of the substrate, and you’ll never hand iron a toner transfer board again! [Thanks William]

Last summer we heard about Scout, an ocean-going drone trying to cross the Atlantic. We just checked the live tracking and the craft is still at sea. But a much smaller 5ft vessel made it from New Jersey to Guernsey (an island between the UK and France) after traveling for about 14 months. [Thanks Rob]

If You Own A Camera You Need To Try Light Graffiti

Do you have a camera that’s capable of controlling how long of an exposure it takes?  With this and any small light source, you can make a really awesome illuminated image like the one featured above.  Combine this with the hacking skills that you’ve hopefully learned from reading Hackaday, and the visual possibilities are endless.

Let’s look at the background of this entertaining light hacking technique, and how you can make images like this yourself!

Continue reading “If You Own A Camera You Need To Try Light Graffiti”

Use Your Smartphone As A Microscope For Less Than $10

FY4TBHSHMMFBB4V.LARGE[Yoshinok] recently posted an Instructable on doing a $10 smartphone-to-microscope conversion. The hack isn’t so much a conversion as just a handy jig, but it’s still interesting. The basic idea is to set up a platform for the slides, and to mount the smartphone directly above. The trick, and the reason this can be called a microscope, is that [Yoshinok] embeds the lens from a cheap laser pointer into the smartphone holder. He is able to get 40x optical magnification with the lens, and even though it sacrifices quality, he uses the built-in digital zoom to get up to 175x magnification.

By itself, you could use this with a light source to magnify 3D objects. [Yoshinok] demonstrates this with a dime. But since the slide holder is made of clear acrylic, he mounted a cheap LED flashlight in the base to serve as through-sample lighting. Using this setup, he was able to observe the process of plasmolysis.

If you have kids, this is certainly a project to do with them, but we can’t help but think it will be useful for non-parents alike. This sort of magnification is good enough for simple lab experiments, and given that most Hack-a-Day readers have these parts lying around, we figure the cost is closer to $0. If you give it a try, let us know your results in the comments!

Continue reading “Use Your Smartphone As A Microscope For Less Than $10”