DVD Optics Power This Scanning Laser Microscope

We’ve all likely seen the amazing images possible with a scanning electron microscope. An SEM can yield remarkably detailed 3D images of the tiniest structures, and they can be invaluable tools for research. But blasting high-energy cathode rays onto metal-coated samples in the vacuum chamber of a bulky and expensive instrument isn’t the only way to make useful images, as this home-brew laser scanning microscope demonstrates.

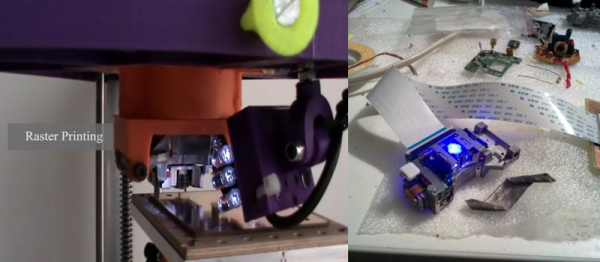
This one comes to us by way of [GaudiLabs], a Swiss outfit devoted to open-source lab equipment that enables citizen science; we saw their pocket-sized thermal cycler for PCR a while back. The basic scheme here is known as confocal laser scanning fluorescence microscopy, where a laser at one wavelength excites fluorescent tags bound to structures in a sample. Light emitted by the tags is collected, and a 3D image is built up from multiple scans of the sample at different focal planes.

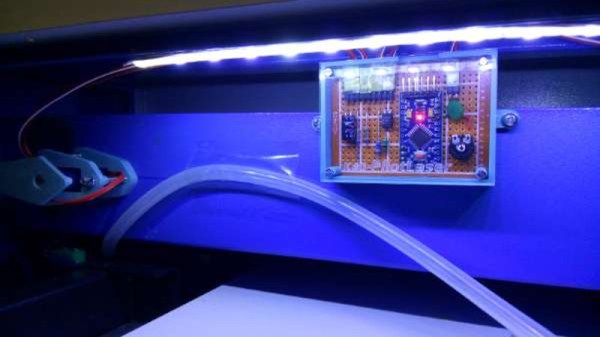
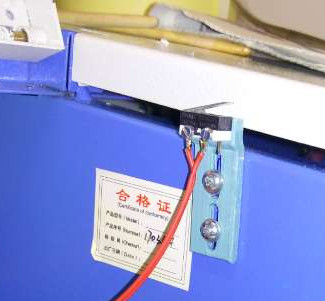
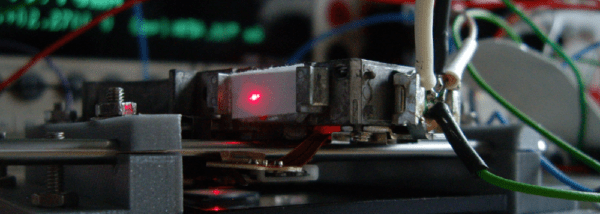
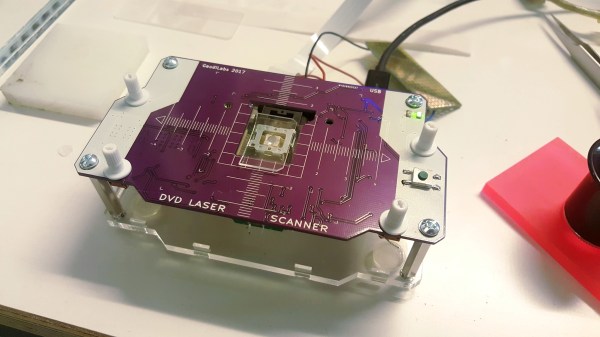
Like many DIY projects, this microscope is built from old DVD parts, specifically the pickup heads. The precision optics in these commonly available assemblies, which are good enough to read pits as small as 150 nm on a Blu-Ray DVD, are well-suited for resolving similarly sized microstructures. One DVD pickup is used to scan the laser in the X-axis, while the other head is modified to carry the sample and move it in the Y-axis. The pickup head coils and laser are driven by an Arduino carried on a custom PCB along with the DVD heads. Complete build files are posted on GitHub for anyone interested in recreating this work.

We love tips like this that dig back a bit and find things we missed the first go-around. And the equipment [GaudiLabs] lists really has potential for the budding biohacker, which we also like.

Thanks for the tip on this one, [Bill].

Hacking A Cheap Laser Rangefinder

When a new piece of technology comes out, the price is generally so high that it keeps away everyone but the die hard early adopters. But with time the prices inch down enough that more people are willing to buy, which then drives the prices down even more, until eventually the economies of scale really kick in and the thing is so cheap that it’s almost an impulse buy. Linux SBCs, Blu-ray lasers, 3D printers; you name it and the hacker community has probably benefited from the fact that it’s not just the hacker community that’s interested anymore.

Which is exactly what’s started to happen with laser rangefinders. Once almost exclusively a military technology, you can now pick a basic “laser tape measure” for less than $40 USD from the normal overseas suppliers. Unfortunately, as [iliasam] found, they aren’t particularly well suited other tasks. For one there’s no official way of getting the data out of the thing, but the other problem is that the sample rate is less than one per second. Believing the hardware itself was promising enough, he set out to reverse engineer and replace the firmware running on one of these cheap laser rangefinders (Google Translate from Russian).

His blog post is an absolute wealth of information on how these devices operate, and a must read for anyone interested in reverse engineering. But the short version is that he figured out a way to reprogram the STM32F100C8T6 microcontroller used in the device, and develop his own firmware that addresses the usability concerns of this otherwise very promising gadget.

With some minor hoop jumping, the laser tape measure PCB can be hooked up to an ST-Link programmer, and the firmware provided by [iliasam] can be used to enable an easy to use serial interface. Perfect for pairing with an Arduino or Raspberry Pi to get fast and accurate range data without breaking the bank.

It probably won’t surprise you to see this isn’t the first time [iliasam] has gotten down and dirty with a laser rangefinder. This extremely impressive build from last year allowed for incredibly accurate 3D scans of his room, and before that he created his own rangefinder from scratch.

Continue reading “Hacking A Cheap Laser Rangefinder”

Laser Cutter Alignment Mod Skips Beam Combiner

A lot of the DIY laser engravers and cutters we cover here on Hackaday are made with laser diodes salvaged from Blu-ray drives and projectors, which are visible lasers in the 400 – 450nm range (appearing as violet or blue). Unfortunately there is an upper limit in terms of power on visible diode lasers, most builds max out at 5W or so. If you need more power than that, you’ll likely find yourself looking at gas laser cutters like the K40. While the K40 is a great starting point if you’re looking to get into “real” lasers, it’s a very different beast from the homebrew builds using visible lasers.

With a gas laser the beam itself is invisible, making it much more difficult to align or do test runs. One solution is to add a visible laser to the K40 which can be used to verify alignment, but making sure it’s traveling down the same path as the primary laser usually requires an expensive beam combiner. Looking to avoid this cost, [gafu] wanted to see if it was possible to simply move the visible laser into the path of the primary beam mechanically.

An adjustable microswitch detects when the lid has been opened.

In the setup that [gafu] has come up with, a cheap laser module (the type from a handheld laser pointer) is moved into the path of the primary laser on an arm that’s actuated by a simple hobby servo. To prevent the primary and visible lasers from firing at the same time, an Arduino is used to control the servo given the current state of the K40’s lid. If the lid of the K40 is open, the primary laser is shutoff and the visible laser is rotated into position so the operator can see where the primary laser’s beam would be hitting. Once the lid is closed, the visible laser rotates out of the way and the primary is powered back up.

Running the cutting or engraving job with the lid of the K40 machine open now let’s [gafu] watch a “dry run” of the entire operation with the visible laser before finally committing to blasting the target with the full power beam.

We’ve covered many hacks and modifications for everyone’s favorite entry-level CO2 laser cutter. From replacing the controller to making it bigger, K40 owners certainly seem like a creative bunch.

Hackaday Prize Entry: Microscopy With Blu-ray

Confocal microscopy is an imaging technique that provides higher resolution micrographs than that of traditional optical microscopy. Confocal microscopes attain this higher resolution from an image sensor behind a pinhole. By eliminating out of focus light, and by scanning the specimen back and forth under the microscope, a very high resolution image may be produced. This technique has applications ranging from life sciences to semiconductor work. For this year’s Hackaday Prize, [andreas.betz] is building a confocal microscope using little more than a Blu-ray drive read head.

[andreas]’ build uses a standard Playstation 3 Blu-ray drive mechanism. The read head for this mechanism is well documented, but [andreas] still has to drive the laser and the voice coils for this machine to do anything. With the Blu-ray drive working, only the optics remained.

Just this last week, [andreas] imaged the die of a transistor with a resolution of about 680nm. An inductor was also imaged, showing a track separation of about 10um. This is approaching the limits of optical microscopy, and the apparatus is simple enough for anyone to replicate.

As a feat of technical ingenuity, this is a great project. It’s one of the best we’ve seen for the Citizen Science portion of the Hackaday Prize, and can’t wait to see what other images [andreas] can make with this machine.

The HackadayPrize2016 is Sponsored by:

Take The Long Road To A Precise Laser PCB Exposer

According to [diyouware], inside of every HD-DVD player is a gem of laser engineering with the designation of PHR-803T, and it’s just begging to be converted into a PCB exposer. Following along similar hacks which tore the laser diode out of Blu-ray players to expose PCBs, they wanted to use the whole PHR-803T unit without disassembling it, and to try to enable all of its unique features.

They envisioned something simple like a scanner for their machine. Just place the PCB on top of a glass sheet, close the lid, and click print. Unfortunately, moving the laser itself just caused too much vibration. So they switched to an inverted delta robot and named it TwinTeeth. In this design, the laser would stay still and the PCB would move.

What follows next is a seriously impressive journey in reverse engineering and design. The PHR-803T had no data sheet, but a ton of features. For example, it can autofocus, and has three different laser diodes. So many interesting problems were found and solved. For example, the halo from the laser caused the surrounding photoresist to cure. They solved it by adding a glass plate with a UV filtering film on it. Only the most focused point of the laser could punch through.

Another adventure was the autofocus. They wanted to autofocus on all four corners of the board. The PHR-803T was designed to read HD-DVDs so can focus a beam to far below 0.01 mm. They got autofocus working with the UV laser, but couldn’t use it on the PCB without curing the photoresist. So they put a piece of aluminum foil at a known level to start. Then they realized they could use the red or infrared diodes to focus instead. Now they can level the PCB in software, and focus the diode without curing the photoresist.

In the end they have an inverted-delta mini PCB factory. It can produce boards around the size of an Arduino shield with a resolution of 600 DPI. Their machine also has attachments for drilling and solder paste dispensing. Check out the video of it in action.
Continue reading “Take The Long Road To A Precise Laser PCB Exposer”

Blu-ray CNC Looks Great For Branding And Engraving

[Nav] got the bug for a tiny little laser cutter. He pulled off the build, and has just finished the second rendition which makes some nice improvements. He’s was hoping for a laser cutter, but we think this really shines when it comes to branding objects like the scrap wood seen above.

This joins a long line of optical drive parts builds. For instance, we saw this plotter that used the lens sleds from some CD-ROM drives. You may think that [Nav] doesn’t need to worry about the Z axis since this is a laser but you’d be wrong. The focal point of the light needs to hit at the right place to cut efficiently, and this is often the trouble with laser cutters. As material is burned away the laser becomes less efficient if you don’t adjust the lens for vertical position. That’s why we think it’s best as an engraver, but the original build writeup for his cutter does show some success cutting letters in dark paper.

Check out a clip of this design being burnt into the wood after the break.

Continue reading “Blu-ray CNC Looks Great For Branding And Engraving”

RGB Laser Projector Is A Jaw-dropping Build

We can think of no better way to describe this laser projector project than Epic. [C4r0] is a student at Gdansk University of Technology and he’s been working on this projector for at least a couple of years. It uses several different laser diodes pulled out of DVD burners, Blu-Ray drives, and entertainment equipment (the green diode is from a disco laser).

In order to direct the beams he built a series of brackets that hold dichroic filters which reflect some wavelengths of light while allowing others to pass straight through. Each diode also needs a driver, most of which he built from scratch. And once the hardware has been designed and tested, what does one do with it? If you’re [C4r0] you build it into a money case with professional-looking results.

Don’t miss the video demo after the break. And make sure you have a rag ready to wipe up the drool before you look at his forum post linked above.

Continue reading “RGB Laser Projector Is A Jaw-dropping Build”