Supersonic air travel is great if you want to get somewhere quickly. Indeed, the Concorde could rush you from New York to London in less than three and a half hours, over twice as fast as a conventional modern airliner. Despite the speed, though, supersonic passenger service has never really been sustainable thanks to the noise involved. Disruption from sonic booms has meant that supersonic travel over land is near-universally banned. This strictly limits the available routes for supersonic passenger jets, and thus their economic viability.
Solving this problem has been a hot research topic for some time. Now, it appears there might be a way forward for supersonic air travel over land, using a neat quirk of Earth’s atmosphere.
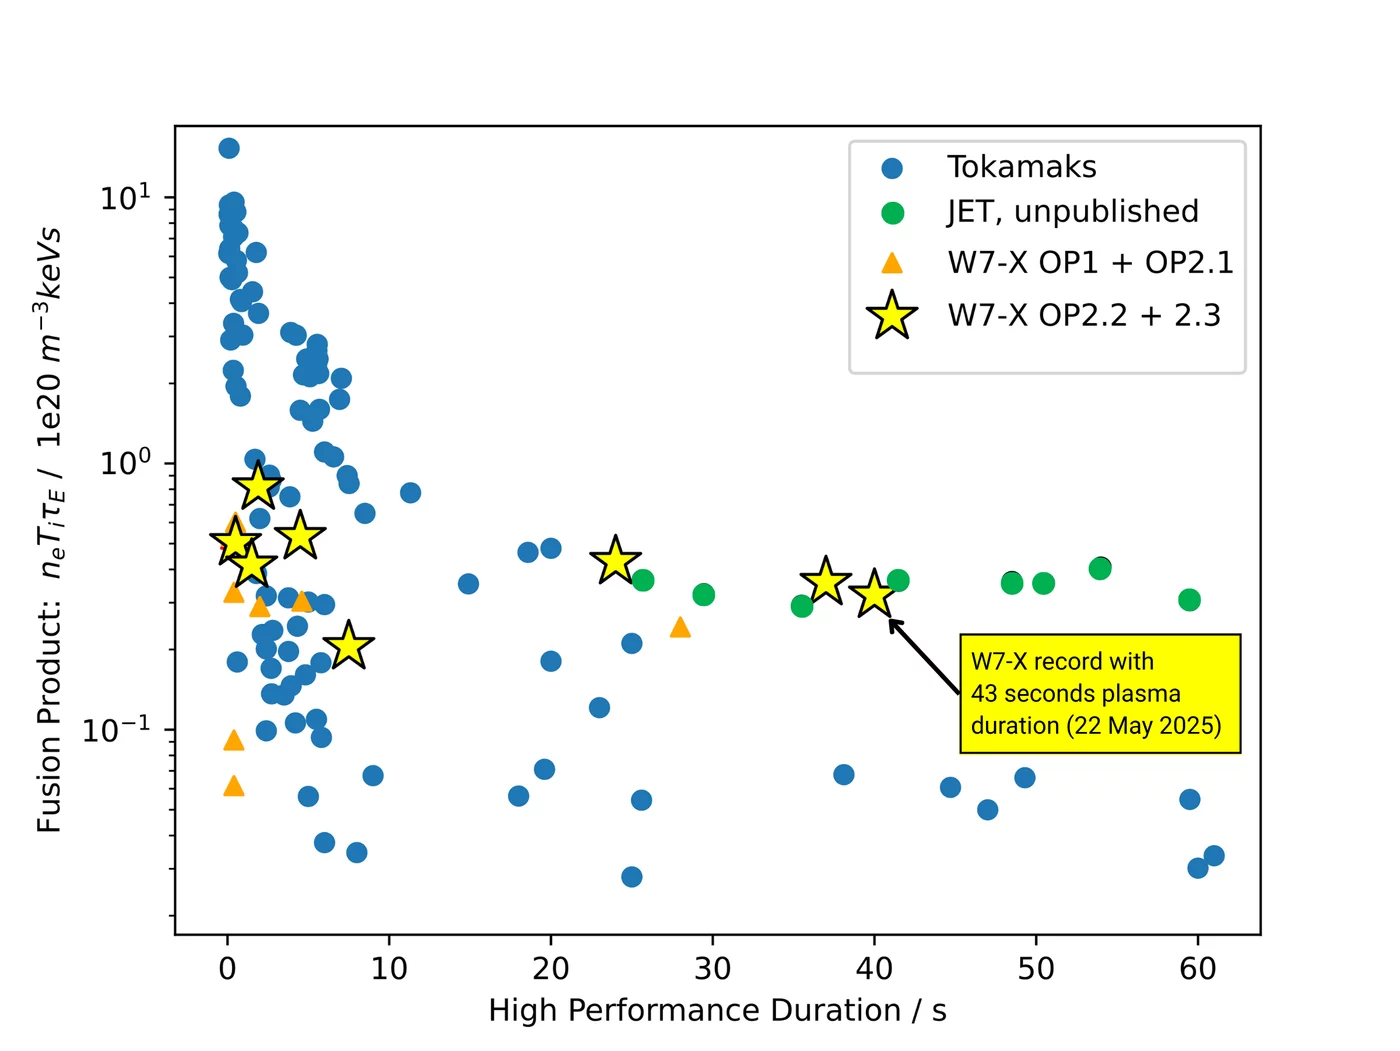
Fusion product against duration, showing the Lawson criterion progress. (Credit: Dinklage et al., 2024, MPI for Plasma Physics)
In nuclear fusion, the triple product – also known as the Lawson criterion – defines the point at which a nuclear fusion reaction produces more power than is needed to sustain the fusion reaction. Recently the German Wendelstein 7-X stellarator managed to hit new records here during its most recent OP 2.3 experimental campaign, courtesy of a frozen hydrogen pellet injector developed by the US Department of Energy’s Oak Ridge National Laboratory. With this injector the stellarator was able to sustain plasma for over 43 seconds as microwaves heated the freshly injected pellets.
Although the W7-X team was informed later that the recently decommissioned UK-based JET tokamak had achieved a similar triple product during its last – so far unpublished – runs, it’s of note that the JET tokamak had triple the plasma volume. Having a larger plasma volume makes such an achievement significantly easier due to inherently less heat loss, which arguably makes the W7-X achievement more noteworthy.
The triple product is also just one of the many ways to measure progress in commercial nuclear fusion, with fusion reactors dealing with considerations like low- and high-confinement mode, plasma instabilities like ELMs and the Greenwald Density Limit, as we previously covered. Here stellarators also seem to have a leg up on tokamaks, with the proposed SQuID stellarator design conceivably leap-frogging the latter based on all the lessons learned from W7-X.
Top image: Inside the vacuum vessel of Wendelstein 7-X. (Credit: Jan Hosan, MPI for Plasma Physics)
Unlike a real metronome that has to rely on worldly imperfections to potentially vary the lengths of its ticks, the metronoalmost leaves nothing to chance: it’s driven by a common hobby servo wired directly to a NodeMCU ESP-12E, carefully programmed so that the sweep will never take exactly one second.
This is the distribution. The gap is around the value we explicitly asked for.
The mathematics required to aggressively subvert our contest are actually kind of interesting: start with a gaussian distribution, such as you can expect from a random number generator. Then subtract a second, narrower distribution centered on one (the value we, the judges want to see) to create a notch function. This disribution can be flipped into a mapping function, but rather than compute this on the MCU, it looks like [Mike] has written a lookup table to map values from his random number generator. The output values range from 0.5 to 1.5, but never, ever, ever 1.0.
The whole thing goes into a cardboard box, because you can’t hit last place with a masterfully-crafted enclosure. On the other hand, he did print out and glue on some fake woodgrain that looks as good as some 1970s objects we’ve owned, so there might be room for (un)improvement there.
While we can’t think of a better subversion of this contest’s goals, there’s still time to come up with something that misses the point even more dramatically if you want to compete with [Mike] for last place: the contest deadline is 9:00 AM Pacific time on August 19th.
Or, you know, if you wanted to actually try and win. Whatever ticks your tock.
There’s something ominous about robots taking over jobs that humans are suited to do. Maybe you don’t want a job turning a wrench or pushing a broom, but someone does. But then there are the jobs no one wants to do or physically can’t do. Robots fighting fires, disarming bombs, or cleaning up nuclear reactors is something most people will support. But can you climb through a water pipe from the inside? No? There are robots that are available from several commercial companies and others from university researchers from multiple continents.
If you think about it, it makes sense. For years, companies that deal with pipes would shoot large slugs, or “pigs”, through the pipeline to scrape them clean. Eventually, they festooned some pigs with sensors, and thus was born the smart pig. But now that it is possible to make tiny robots, why not send them inside the pipe to inspect and repair?
There are a lot of benefits to writing for Hackaday, but hands down one of the best is getting paid to fall down fascinating rabbit holes. These often — but not always — delightful journeys generally start with chance comments by readers, conversations with fellow writers, or just the random largesse of The Algorithm. Once steered in the right direction, a few mouse clicks are all it takes for the properly prepared mind to lose a few hours chasing down an interesting tale.
I’d like to say that’s exactly how this article came to be, but to be honest, I have no idea where I first heard about the prison camp lathe. I only know that I had a link to a PDF of an article written in 1949, and that was enough to get me going. It was probably a thread I shouldn’t have tugged on, but I’m glad I did because it unraveled into a story not only of mechanical engineering chops winning the day under difficult circumstances, but also of how ingenuity and determination can come together to make the unbearable a little less trying, and how social engineering is an important a skill if you want to survive the unsurvivable.
[Jackson Studner] wrote in to let us know about his ESP32-based media server: Jcorp Nomad.
This project uses a ESP32-S3 to create a WiFi hotspot you can connect to from your devices. The hotspot is a captive portal which directs the user to a web-interface comprised of static HTML assets which are in situ with the various media on an attached SD card formatted with a FAT32 file system. The static HTML assets are generated by the media.py Python 3 script when the ESP32 boots.
This project exists because the typicalRaspberryPimediaserver costs more than an ESP32 does. The ESP32 is smaller too, and demands less power.
According to [Jackson] this ESP32-based solution can support at least four concurrent viewers. The captive portal is implemented with DNS and HTTP services from the ESP32. The firmware is an Arduino project that integrates a bunch of libraries to provide the necessary services. The Jcorp Nomad media template supports Books (in pdf files), Music (in mp3 files), and Movies and Shows (in mp4 files). Also there is a convention for including JPEG files which can represent media in the user-interface.
And the icing on the cake? The project files include STL files so you can 3D print an enclosure. All in all, a very nice hack.
Magnetic core memory works by storing data inside the magnetic flux of a ferrite ‘core’. Magnetize it in one direction, you have a 1; the other is a 0. Sensing is current-based, and erases the existing value, requiring a read-rewrite circuit. You want the gory details? Check out [Han]’s writeup; he explains it better than we can, complete with how to wire the ferrites and oscilloscope traces to explain why you want to wiring them that way. It may be the most complete design brief to be written about magnetic core memory to be written this decade.
This little memory pack [Han] built with this information is rock-solid: it ran for 24 hours straight, undergoing multiple continuous memory tests — a total of several gigabytes of information, with zero errors. That was always the strength of ferrite memory, though, along with the fact you can lose power and keep your data. In in the retrocomputer world, 512 bits doesn’t seem like much, but it’s enough to play with. We’ve even featured smaller magnetic core modules, likethe Core 64.(No prize if you guess how many bits that is.) One could be excused for considering them toys; in the old days,you’d have had cabinets full of these sorts of hand-wound memory cards.