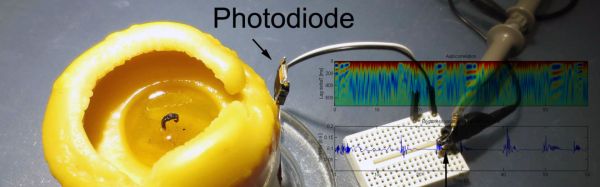
Nixie Tube Speedometer In Motorcycle Handlebars

The handlebars of this Honda CL175 ended up being perfect for holding two Nixie tubes which serve as the speedometer. There are two circular cavities on the front fork tree which are the same size as the Nixies. Wrapping the tubes in a bit of rubber before the installation has them looking like they are factory installed!

This isn’t a retrofit, he’s added the entire system himself. It starts with a hall effect sensor and magnets on the rear wheel and swing arm. Right now the result is 4 MPH resolution but he plans to add more magnets to improve upon that. For now, the driver and speedometer circuitry are hosted on protoboard but we found a reddit thread where [Johnathan] talks about creating a more compact PCB. If your own bike lacks the fork tree openings for this (or you need help with the drivers) check out this other Nixie build for a slick-looking enclosure idea.

The link at the top is a garage demo, but last night he also uploaded a rolling test to show the speedometer in action. Check out both videos after the break.

Continue reading “Nixie Tube Speedometer In Motorcycle Handlebars”

Panopticlick: You Are A Beautiful And Unique Snowflake

We all like to think we’re unique, but when it comes to remaining anonymous online that’s probably not such a good idea. By now, it’s common knowledge that advertising firms, three-letter agencies, and who-knows-who-else want to know what websites you’re visiting and how often. Persistent tracking cookies, third-party cookies, and “like” buttons keep tabs on you at all times.

For whatever reason, you might want to browse anonymously and try to plug some of the obvious sources of identity leakage. The EFF and their Panopticlick project have bad news for you.

The idea behind Panopticlick is simple: to try to figure out how identifiable you are even if you’re not accepting cookies, or if you’ve disabled Flash, or if you’re using “secure” browsers. To create a fingerprint of your browser, Panopticlick takes all the other little bits of identifying information that your browser gives up, and tries to piece them together.

For a full treatment of the project, see this paper (PDF). The takeaway from the project is that the information your browser gives up to servers can, without any cookies, specifically identify you.

fooFor instance, a server can query which plugins your browser supports, and if you’ve installed anything a tiny bit out of the ordinary, you’re fingerprinted. Your browser’s User Agent strings are often over-specific and tell which browser sub-sub-sub version you’re running on which OS platform. If you’re running Flash, it can report back which fonts you’ve got installed on your system. Any of these can be easily as rare as one-in-a-million. Combining them together (unless they’re all highly correlated) can fingerprint you uniquely.

You can’t necessarily win. If you disable Flash, the remote site doesn’t get your font list, but since only one in five browsers runs with Flash disabled, you’re still giving up two bits of information. If you run a “privacy-enhancing” niche browser, your chances of leaving a unique fingerprint go through the roof unless you’re also forging the User Agent strings.

I ran the Panopticlick experiment twice, once with a Firefox browser and once with an obscure browser that I actually use most of the time (dwb). Firefox runs a Flash blocker standard, so they didn’t get my font list. But still, the combination of browser plugins and a relatively new Firefox on Linux alone made me unique.

It was even worse for the obscure browser test. Only one in 1.4 million hits use dwb, so that alone was bad news. I also use a 4:3 aspect-ratio monitor, with 1280×1024 pixels at 24-bit color depth, which is apparently a one-in-twenty-four occurrence. Who knew?

fooFinally, I tried out the Tor browser, which not only routes your traffic through the Tor network, but also removes a lot of the specific data about your session. It fared much better, making me not uniquely identifiable: instead only one in a thousand. (Apparently a lot of people trying out the Panopticlick site ran Tor browser.)

If you’re interested in online anonymity, using something like Tor to obscure your IP address and disabling cookies is a good start. But Panopticlick points out that it may not be enough. You can never use too many layers of tinfoil when making your hat.

Try it out, and let us know in the comments how you fare.

Combining Musical Hatred With Target Practice

Not everyone can agree on what good music is, but in some cases you’ll find that just about everyone can agree on what is awful. That’s what the people over at Neo-Pangea discovered when they were listening to Internet radio. When one of those terrible songs hits their collective eardrums, the group’s rage increases and they just need to skip the track.

This is how Engineers act if the song is super-awful

Rather than use a web app or simple push button to do the trick, they turned the “skip” button into a NERF target. They call their creation the Boom Box Blaster and made a fantastic demo film video about it which is found after the break.

Inspired by a painting in the office, the target takes the form of a small hot air balloon. The target obviously needed some kind of sensor that can detect when it is hit by a NERF dart. The group tried several different sensor types, but eventually settled on a medium vibration sensor. This sensor is connected to an Arduino, which then communicates with a Raspberry Pi over a Serial connection. The Pi uses a Python script to monitor the Arduino’s vibration sensor. The system also includes some orange LEDs to simulate flames and a servo attached to the string which suspends the balloon from the ceiling. Whenever a hit is registered, the flames light up and the balloon raises into the air to indicate that the shot was on target.

Continue reading “Combining Musical Hatred With Target Practice”

Finally, a brake for your long board

Long Board Takes A Brake

Long boards are awesome. They feel like your surfing on concrete — amazing for hilly areas where you can coast around forever. The weird thing is, none of them come with brakes standard… Even though when you’re going down a hill you can easily hit 30-40mph! [Marius] decided to fix this, so he built his own 3D printed brake system for his Onda long board.

He designed the system in 3Ds Max and 3D printed the parts in PLA using his Printrbot Metal Simple (check out our review here). It uses an off the shelf bicycle brake pad, and brake cable as well as a few elastic bands. Currently only one wheel brakes, but it seems to be enough to slow you down — though he might mirror the system on the other side to obtain more braking power.

The long board he’s using does have slightly larger wheels than normal, but the system could be modified to use on a more standard sized long board.  Stick around after the break to see it in action.

Continue reading “Long Board Takes A Brake”

Hackaday Prize Entry: A Better Bench Power Supply

Back in February, [The Big One] started building the bench power supply to rule them all. His previous power supply was just an ATX computer power supply. It worked, but that didn’t give him fancy stuff like different channels of individually adjustable voltages. Since then, we’ve spun up the 2015 Hackaday Prize, and [The Big One] has changed his DIY power supply into a Hackaday Prize entry that competes well against $1000 mid-range commercial units.

The single most expensive component in this power supply are a pair of isolated switched power supplies rated for 15V and 7A. This is a change from [The Big One]’s original plan to use a big ‘ol transformer; a switched mode supply is smaller, lighter, costs about the same, and is much better suited to the modular nature of the project.

The final design for this power supply has some interesting features: up to six channels are possible, voltage and current can go all the way down to zero, and everything can be controlled over USB. Those are amazing features that won’t be found in any $100 cheapo bench power supply, and [The Big One]’s amazing documentation for this project makes it a perfect entry for The Hackaday Prize.

The 2015 Hackaday Prize is sponsored by:

Muse Headset Teardown

Muse EEG Headset Teardown

[Lady Ada] over at Adafruit just did a delightful tear down of the Muse EEG headset.

The Muse headset is a rather expensive consumer-grade EEG headset that promises better meditation with the ability to track your brainwaves in order to go into a deeper trance. We’re not much for meditating here at Hackaday, but the EEG sensors really do work. It’s pretty cool to see the insides of this without forking out $300 ourselves for one we might break.

Like most EEG headsets, they weren’t really designed to be worn while sleeping. Two bulky pods over the ears hold the battery and charging circuit on one side, and the brains on the other. The neat part about it is a little adjustable metal piece which allows for adjustment on the strap while maintaining all the electrical connections. A flexible circuit houses forehead electrodes which go along the length of the band.

In the past we’ve seen work done on the Lucid Scribe project, using a modified Neurosky Mindwave EEG (at $99 it’s much cheaper to hack). The idea is to be able to monitor your sleep cycles accordingly, and then give audible cues to the dreamer in order to “wake up” inside the dream. Think of the Inception music.

Unfortunately it doesn’t look like the Muse will be any better for lucid dreaming. If you were able to decouple the electrodes from the rest of the headset,  then it might just work.

Continue reading “Muse EEG Headset Teardown”

Android-based Reflow Brings Solder Profiles To Your Lab

[Andy Brown] is a prolific hacker and ends up building a lot of hardware. About a year back, he built a reflow oven controller. The board he designed used a large number of surface mount parts. This made it seem like a chicken or egg first problem. So he designed a new, easy to build, Android based reflow controller. The new version uses just one, easy to solder surface mount part. By putting in a cheap bluetooth module on the controller, he was able to write an app which could control the oven using any bluetooth enabled Android phone or tablet.

The single PCB is divided into the high voltage, mains powered section separated from the low power control electronics with cutout slots to take care of creepage issues. A BTA312-600B triac is used to switch the oven (load) on and off. The triac is controlled by a MOC3020M optically isolated triac driver, which in turn is driven by a micro controller via a transistor. The beefy 12Amp T0220 package triac is expected to get hot when switching the 1300W load, and [Andy] works through the math to show how he arrived at the heat sink selection. To ensure safety, he uses an isolated, fully encased step down transformer to provide power to the low voltage, control section. One of his requirements was to detect the zero cross over of the mains waveform. Using this signal allows him to turn on the triac for specific angle which can be varied by the micro controller depending on how much current the load requires. The rectified, but unfiltered ac signal is fed to the base of a transistor, which switches every time its base-emitter voltage threshold is reached.

For temperature measurement, [Andy] was using a type-k thermocouple and a Maxim MAX31855 thermocouple to digital converter. This part caused him quite some grief due to a bad production batch, and he found that out via the eevblog forum – eventually sorted out by ordering a replacement. Bluetooth functions are handled by the popular, and cheap, HC-06 module, which allows easy, automatic pairing. He prototyped the code on an ATmega328P, and then transferred it to an ATmega8 after optimising and whittling it down to under 7.5kb using the gcc optimiser. In order to make the board stand-alone, he also added a header for a cheap, Nokia 5110 display and a rotary encoder selector with switch. This allows local control without requiring an Android device.

Gerbers (zip file) for the board are available from his blog, and the ATmega code and Android app from his Github repo. The BoM list on his blog makes it easy to order out all the parts. In the hour long video after the break, [Andy] walks you through solder tip selection, tips for soldering SMD parts, the whole assembly process for the board and a demo. He then wraps it up by connecting the board to his oven, and showing it in action. He still needs to polish his PID tuning and algorithm, so add in your tips in the comments below.

Continue reading “Android-based Reflow Brings Solder Profiles To Your Lab”