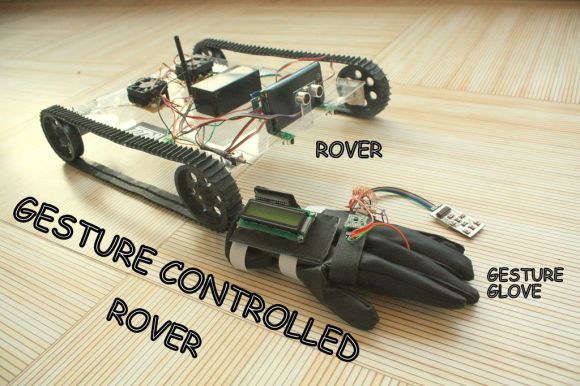
Hackaday Links: May 18, 2014

hackaday-links-chain

Think the original Pong is cool? How about point to point Pong? [v8ltd] did it in three months, soldering all the leads directly to the chip pins. No sockets required. It’s insane, awesome, a masterpiece of craftsmanship, and surprising it works.

[Jeremy Cook] is building a servo-powered light graffiti thing and needed a laser diode. How do you control a laser pointer with a microcontroller? Here’s how. They’re finicky little buggers, but if you get the three-pack from Amazon like [Jeremy] did, you get three chances to get it right.

NFC tags in everything! [Becky] at Adafruit is putting them in everything. Inside 3D printed rings, glued onto rings, and something really clever: glued to your thumbnail with nail polish. Now you can unlock your phone with your thumb instead of your index finger.

Photographs capture still frames, but wouldn’t it be great if a camera could capture moving images? No, we’re not talking about video because this is the Internet where every possible emotion, reaction, and situation can be expressed with an animated GIF. Meet OTTO, the camera that captures animated GIFs! It’s powered by the Raspberry Pi compute module, so that’s interesting.

[Nate] was getting tired of end mills rolling around his bench. That’s a bad thing. He came up with a solution, though: Mill a piece of plywood into a tray to hold end mills.

The Da Vinci printer, a printer that only costs $500 because they’re banking on the Gillette model, has been cracked wide open by resetting the DRM, getting rid of the proprietary host software, and unbricking the device. Now there’s a concerted effort to develop custom firmware for the Da Vinci printer. It’s extraordinarily bare bones right now, but the pins on the microcontroller are mapped, and RepRap firmwares are extremely modular.

NYC Resistor Gets A PDP-11/34

PDP-11/34 NYCR

[Trammel Hudson] and NYC Resistor have gotten their hands on some old computing iron in the form of a PDP-11/34.  The PDP-11 is a 16 bit minicomputer made by Digital Equipment Corporation (DEC). Various incarnations of the PDP-11 were sold from the 1970’s all the way into the 1990’s. NYC Resistor’s model is has a label dating it to 1983.

The PDP was found in an old storage unit in the Bronx. Moving several racks of equipment across the city is no small feat, but NYC Resistor members have it done it so many times they’ve got it down to a science.

Once power is applied, a stock PDP won’t actually do anything until the boot loader is keyed in from the CPU front panel. Thankfully this particular PDP-11 had its boot instructions printed on a label on the CPU. NYCR’s machine also includes an M9312 “bootstrap / Unibus terminator” board, which allows the machine to boot at the push of a button.

The team connected the racks, terminals, and drives. Carefully following the instructions, they actually got their PDP to boot up! Their next step is to start reading in some of the old tapes that came with the machine. We’re all waiting with bated breath to see what “digitized monkey brains” contains. Once the machine is fully functional, we hope they get it on the internet and load up The Hackaday Retro Edition.

Continue reading “NYC Resistor Gets A PDP-11/34”

Firmware For Cheap Bluetooth Modules

Ibluetoothf you’ve ever built anything with a microcontroller, some sort of sensor, and a connection to the outside world, you’re probably wondering how those places in China can pump out cheap electronics for a mere percentage of what it costs you to pull a DIY. It’s not just volume – it’s engineering; if something has Bluetooth, you find a Bluetooth module with a built-in microcontroller so you can write firmware to it.

The BC417 is the System on Chip found in the very popular BlueCore4-Ext Bluetooth module featuring 8Mbits of Flash (75% of which is used for Bluetooth related stuff), somewhere around 12 kB of RAM, with everything run in a virtual machine. [pfalcon] wrote an extremely experimental firmware for this device that allows anyone to create a wireless sensor node for peanuts. These devices are almost as cheap as a bare ATMega, so the possibilities are interesting, to say the least.

At this point, the hardest part of putting custom firmware on these devices is programming them. For that, [Elastic Sheep] comes to the rescue with a parallel port to SPI interface. There’s also a firmware dumper and some breakout boards available. These modules are pretty cheap, and the pitch isn’t too bad, so you might be able to etch your own boards should you want to experiment a little.

Thanks [Peter] for sending this in.

Hacking An Old Parallel Port Webcam To Work With A Gameduino 2

connecting parallel port web camera to gameduino 2

[Andrew] couldn’t pass up a 20ish year old parallel port based webcam he saw on the shelf at a thrift store. It’s a Connectix QuickCam and was the first webcam that did not require a separate video input card to interface with your computer. Due to this feature, the webcam was extremely popular, so popular that Logitech ended up buying Connectix and marketing the camera for themselves.

It’s tough to find a newer computer that still has a parallel port, but using an old computer wasn’t [Andrew]’s plan anyways. After thinking about it, he decided to try to get the camera’s image to display on a Gameduino 2.

The hardware list is fairly minimal. The cam’s parallel connector is plugged straight into STM32 Nucleo development board by way of several jumpers. The Gameduino 2 is connected to the dev board and a USB to PS/2 adapter was made to power the camera.

Continue reading “Hacking An Old Parallel Port Webcam To Work With A Gameduino 2”

Hyperspectral Imaging With A DSLR

It’s a relatively simple task to find evidence of helium by just looking at the sun; all you need is a prism, diffraction grating, and a web cam. DIY spectrometers have been around for ages, but most of them only produce a spectrum, not a full image complete with spectral data. Now it’s possible to take an image of an object, complete with that objects spectra using a DSLR, some lenses, a PVC pipe, and the same diffraction grating from your DIY interferometer.

The idea behind a hyperspectral imager is to gather the spectral data of each pixel of an image. The spectral data is then assembled into a 3D data cube, with two dimensions dedicated to the image, and the third dimension used to represent wavelength. There are a surprising number of applications for this technique, ranging from agriculture and medicine to some extremely creepy surveillance systems.

The authors of this paper (freakin’ huge PDF) used a piece of PVC pipe, three camera lenses, a diffraction grating, and a small paper aperture to construct their hyperspectral imager. Images are captured using a standard, multi exposure HDR method, assembling the raw data from the camera into a hyperspectral image with MATLAB.

There’s a ton of awesome info in the PDF, covering how the authors calibrated their system for different lighting conditions, interpreted the RGGB Bayer sensor in the camera, and a few examples of what kind of image can be constructed with this kind of data. That’s a recommended read, right there.

Thanks [Yannick] for the tip.

A Raspi Ambilight With HDMI Input

With the Raspberry Pi now most famously known as a $30 media PC, it only makes sense that the best uses for the GPIO pins on the Pi are used for an Ambilight. [Great Scott Labs] put up a great video on using the Pi as a uniquely configurable Ambilight with Hyperion and just about any video input imaginable.

This isn’t the first Ambilight clone [Great Scott] has put together, but for the first version the Ambilight functioned only under Raspbian and not any random HDMI input. The new version solves this by using an HDMI splitter box, feeding into an HDMI to composite converter, and finally into a USB composite capture dongle attached to the Raspi.

With the software in the instructions, the Raspi effectively mirrors the video coming from the video capture dongle. The Pi is running Hyperion to control a strip of WS2801 RGB LEDs, making the back of any TV glowey and blinkey.

Since [Great Scott] is using a component video signal as an input, the adapters necessary to have any device work with this Ambilight are readily available. We’d honestly like to see this build working with the old Commodore disk access screen border going nuts, so be sure to send that in if you ever get that working.

Continue reading “A Raspi Ambilight With HDMI Input”

A Ring Of Colored Pencils

Colored Pencil Ring

[Peter] proved he has equal parts prowess, patience, and perseverance with this colored pencil ring (imgur link). The ring is made from a cross-section of several colored pencils. The idea seems simple. The build process IS simple. As always though, the devil is in the details.

[Peter] started with a cheap pack of colored pencils. They have to be hexagonal pencils, as round ones won’t work well for this build. [Peter] used two nails to align the  pencils, and medium thickness Cyanoacrylate glue to bond them together. Cyanoacrylate (aka super glue) is a very strong but inflexible bond. We’re curious if a different adhesive might have worked better for this task.

Once the block of glued pencils was dry, [Peter] drilled a hole approximately his ring size. He used a band saw to cut a rough ring blank around the hole, then headed to the wood lathe. He mounted the ring with a jam chuck, which is a piece of wood turned to an interference fit with the workpiece. The problem was that the jam chuck cracked the ring as it was being installed. [Peter] was able to glue the ring back together, and turn it down on his lathe.

Click past the break for more on [Peter’s] ring.

Continue reading “A Ring Of Colored Pencils”