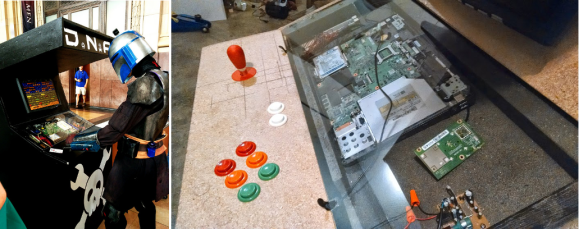
You Are Fined 1 Credit For A Violation Of The Verbal Morality Statute

demolition-man-verbal-morality-monitor

Some citizens can control their language and others cannot. What is a civilized society to do? In a dystopian future you can count on electronic monitoring. But wait, the future is now… or it will be in a few weeks. [Tdicola] is building the verbal morality monitor from Demolition Man as his entry in Hackaday’s ongoing Sci-Fi Contest.

Currently the project is in the early planning phase, but holy cow this is a fantastic idea! For those that didn’t see the glorious 1993 feature film, the young [Stallone] pictured above is accepting a ticket (as in: he must pay for his violation) from the tattle-tale wall-mounted computer. Everything about this device is completely feasible using today’s tech. It needs voice recognition and a list of naughty words, a way to play a pre-recorded message, and a printer to spit out the tickets. The build log for the project outlines all of this, as well as possible cost and sources for each.

We’ve been wondering who it was that injected an Artificial Intelligence into our project hosting system. We see both [tdicola] and [colabot] are on the team for this build. The names are too conveniently similar to be a coincidence, don’t you think?

KamerMaker Begins Printing A House

kamermaker-wordpress182-1024x723-634930_610x431

The KamerMaker is the world’s largest portable 3D printing pavilion built out of a shipping container — it has started printing an entire house out of plastic.

We first shared the KamerMaker (literally “Room Maker” in Dutch) a few years ago when it was first designed and built as a collaboration project between Utilimaker and Architectburo DUS. Their intention was the ability to print 1:1 architectural designs, and now it has begun its biggest project yet — an entire house along the canal in Amsterdam.

So far the KamerMaker has printed one corner of the Canal House, which features part of a staircase. It weighs about 400lbs and took a week to print. To increase the strength of these 3D printed parts, the company uses a honeycomb infill and before assembly will fill the gaps inside the piece with a type of foam that becomes as hard as concrete.

The project is estimated to take three years for completion, and until then you can visit it at Tolhuisweg 7, 1031 CL in North Amsterdam, where it is open to the public for a small fee of €2.50 — this is a tourist city after all! When completed it will be a design museum, although the team at DUS hope it will be only the first of many 3D printed buildings.

To learn more about the project, stick around for the following video.

Continue reading “KamerMaker Begins Printing A House”

Heated Build Chambers Don’t Have To Be That Complex

800px-HBC_open_door_view

Looking to improve the quality of your 3D prints? Worried about peeling, warping, and de-laminating layers? All you need is to do is make a heated build chamber!

The heated build chamber is one of the patents that the big 3D printer company owns (we won’t point any fingers), and that’s why you don’t see it as a feature on any of the “consumer” grade 3D printers. But that won’t stop people from making their own!

[Repkid] just finished a wiki page on this topic, and it’s a great way to build a heated chamber — if you have the space for it! He’s built a large wooden enclosure for his RepRap out of MDF sheets. Double-ply cardboard is used as thin insulation, although we imagine if you’re building something this large you might as well use some commercial insulation.

The chamber is heated by a blow dryer which is mounted off the back of the box, and the heat is controlled by changing the speed setting of the dryer. A laser cut vent allows for further adjustment. If you want to get really fancy, it would be very easy to install a thermostat PID controller that could regulate the temperature more accurately. To prevent overheating the electronics, all the control boards are also outside of the box.

Continue reading “Heated Build Chambers Don’t Have To Be That Complex”

Meet Lynx, A (costly) Offline Password Keeper

Maybe because he didn’t want to wait for the Mooltipass to be produced, [davidhend] built himself his own offline password keeper, named Lynx.

It is based around an Arduino Pro 328, a 2.8″ TFT touch screen, an RFID card reader, an FTDI basic breakout and finally a li-ion battery. Lynx is therefore self-powered and uses an RFID card to later read the XOR-encrypted passwords located in a SD card. A USB serial connection is used to send the passwords to the computer, which also charges the battery. The current BoM cost is around $220 but we’re quite sure it can be made for much cheaper when not using pre-made boards. Looking at the official GitHub repository tells us that the XOR key is stored inside the microcontroller and that Lynx checks the RFID card code to allow encryption/decryption.

On a side note, we recently published a FAQ on the official Mooltipass GitHub. You’re welcome to let us know what questions we may have forgotten.

Multimeters Without A Country: Fluke’s Broad Trademark Bans Yellow Multimeter Imports

Check out this SparkFun Digital Multimeter. Does it make your blood boil to see them ripping off Fluke by using the color yellow? From SparkFun’s side of the story that’s exactly what’s happened here. They have a shipment of 2000 of these things stuck in customs. The trademark being infringed upon can be found in their article. Fluke owns the trademark on multimeters with a dark face and yellow border. Great. This seems like a wonderful idea, right up there with Apple owning tablets that are shaped like a piece of paper.

Okay, so if you’re not crying big fat tears for Fluke being taken advantage of in this way let’s talk about more immediate issues than fixing trademark, patent, copyright, and all of the other screw-the-little-guy type of laws (not that SparkFun is necessarily the little guy but you know what we mean). The DMMs sitting in a warehouse are costing SparkFun $150 per day. We believe they have no option of choosing a warehouse with a lower cost as we must be talking a pallet or two, right? The only two options they do have are shipping them back to China where they were manufactured, or having them destroyed. The former will cost more in re-import tariffs than the cost of the product, and the latter comes with a $150/hour disposal fee and no metric on which to judge how long it would actually take. We hate seeing this kind of waste, but sure enough 2000 DMMs are headed for the shredder in a couple of days.

We know you already have your flaming sword in hand, but simmer down for just a second. Fluke makes great products, ask anyone. And companies the world over defend their trademarks. Hopefully there will soon be a positive response from Fluke on this one. If you would like to politely encourage them to do the right thing we found Fluke’s Facebook page URL in the SparkFun comments thread. Both are worth browsing.

[Thanks Chris via Reddit]

Ask Hackaday: Auto Bed Leveling And High Temperature Force Sensitive Resistors

FSR

[Johann] over on the RepRap wiki has an ingenious solution for making sure a borosilicate glass bed is completely level before printing anything on his Kossel printer: take three force sensitive resistors, put them under the build platform, and wire them in parallel, and connect them to a thermistor input on an electronics board. The calibration is simply a bit of code in the Marlin firmware that touches the nozzle to the bed until the thermistor input maxes out. When it does, the firmware knows the print head has zeroed out and can calculate the precise position and tilt of the bed.

Great, huh? A solution to bed leveling that doesn’t require a Z-probe, uses minimal (and cheap) hardware, and can be retrofitted into just about any existing printer. There’s a problem, though: these force sensitive resistors are only good to 70° C, making the whole setup unusable for anything with a heated bed. Your challenge: figure out a way to use this trick with a heated bed.

The force sensitive resistors used – here’s a link provided by [Johann] – have a maximum operating temperature of 70° C, while the bed temperature when printing with ABS is around 130° C. The FSRs are sensitive to temperature, as well, making this a very interesting problem.

Anyone with any ideas is welcome to comment here, on the RepRap forums, the IRC, or anywhere else. One idea includes putting an FSR in the x carriage, but we’re thinking some sort of specialized heat sink underneath the bed and on top of the FSRs would be a better solution.

Video of the auto bed leveling trick in action below.

Continue reading “Ask Hackaday: Auto Bed Leveling And High Temperature Force Sensitive Resistors”

Massive LED Display Makes Use Of Reused Soda Bottles

BcbiT1IIEAAUXFK

What better way to make a giant LED display than out of old empties and bottle crates? This is the Mate Light (pronounced Mah-Tay).

We were first introduced to the ever popular Club-Mate soda at one of the first hackerspaces we visited during our Hackerspacing in Europe Tour. It’s a soft drink produced in Germany, which seems to be the exclusive non-alcoholic drink of choice for almost all hackerspaces in Western Europe. The spaces in the Netherlands and Belgium would even make road trips to Germany just to load up a van with the drink to bring back home. Personally we didn’t really understand what was so special about it, but maybe we just didn’t drink enough!

Anyway, this impressive display makes use of 640 empties arranged in 4 rows of 8 crates for a decent 16 x 40 resolution. Each bottle is wrapped in aluminum foil and contains one RGB LED with a WS2801 driver. Each row of crates is connected to a TI Stellaris Launchpad, which has four hardware SPI interfaces — conveniently the number of rows of crates used! From there, an ancient ThinkPad T22 laptop runs the control program over USB to the microcontroller board. Their first software implementation used a Python script which was painfully slow — they’re now putting the finishing touches on using a C script instead.

Stick around to see the display in all of its awesomeness.

Continue reading “Massive LED Display Makes Use Of Reused Soda Bottles”