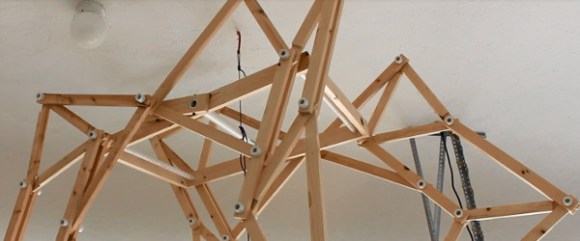
Atmel Announces SmartConnect WiFi Modules

Atmel SmartConnect

This week we talked with Atmel about their new WiFi solutions targeting Internet of Things applications. Back in 2012, Atmel acquired Ozmo, a company focused on point-to-point WiFi solutions using WiFi Direct. These devices are known as SmartDirect, and have been available for some time.

Atmel has just announced a new product line: SmartConnect. This moves beyond the point-to-point nature of WiFi Direct, and enables connections to standard access points. The SmartConnect series is designed for embedding in low cost devices that need to connect to a network.

The first devices in the SmartConnect line will be modules based on two chips: an Atmel SAMD21 Cortex-M0+ microcontroller and an Ozmo 3000 WiFi System on Chip. There’s also an on-board antenna and RF shielding can. It’s a drop in WiFi module, which is certified by the FCC. You can hook up your microcontroller to this device over SPI, and have a fully certified design that supports WiFi.

There’s two ways to use the module. The first is as an add-on, which is similar to existing modules. A host microcontroller communicates with the module over SPI and utilizes its command set. The second method uses the module as a standalone device, with application code running on the internal SAMD21 microcontroller. Atmel has said that the standalone option will only be available on a case to case basis, but we’re hoping this opens up to everyone. If the Arduino toolchain could target this microcontroller, it could be a great development platform for cheap WiFi devices.

SmartConnect Architectures
The Add-On and Standalone Architectures

At first glance, this module looks very similar to other WiFi modules, including the CC3000 which we’ve discussed in the past. However there are some notable differences. One major feature is the built in support for TLS and HTTPS, which makes it easier to build devices with secure connections. This is critical when deploying devices that are connected over the internet.

Atmel is claiming improvements in power management as well. The module can run straight from a battery at 1.8 V to 3.3 V without external regulation, and has a deep sleep current of 5 nA. Obviously the operating power will be much higher, but this will greatly assist devices that sporadically connect to the internet. They also hinted at the pricing, saying the modules will come close to halving the current price of similar WiFi solutions. SmartConnect is targeting a launch date of June 15, so we hope to learn more this summer.

We’re always excited to see better connectivity solutions. If Atmel comes through with a device allowing for cheaper and more secure WiFi modules, it will be a great part for building Internet of Things devices. With a projected 50 billion IoT devices by 2020, we expect to see a lot of progress in this space from silicon companies trying to grab market share.

Stop Motion Water Droplets

logo

The folks at Physalia studio were asked by a company called IdN to produce a little bit of video with a logo. After tossing a few ideas around, they hit upon the concept of projecting the IdN logo inside a falling water droplet. CGI would never get this idea right, so the finished product is the result of stop-motion animation created inside several thousand falling drops of water.

Taking a picture of a falling water droplet was relatively easy; a small drip, a laser pointer and photodiode, and a flash trigger were all that was needed to freeze a drop of water in time. The impressive part of the build is a motion control system for the camera. This system moves the camera along the vertical axis very slowly, capturing one water droplet at a time.

Behind the droplet is a an animation that’s seemingly inspired by a Rorschach test, ending on the IdN logo. The frames for these animations were printed out and placed inside the test chamber/studio upside down to account for the optical effects of a sphere of water.

The end result is a product of over 20,000 pictures taken, all edited down into a single 30-second shot. An amazing amount of work for such a short video but as you can see in the videos below, it’s well worth the effort.

Continue reading “Stop Motion Water Droplets”

The Credit Card Sized GameBoy

Think you’ve seen every possible type of Arduino based hand held video game? [Kevin] managed to coax something new out of the theme with a very clever credit card sized console that uses some very interesting construction techniques.

The inspiration for this project began when [Kevin] dropped an SMD resistor into a drill hole on a PCB. This resistor fell right through the hole, giving him the idea creating a PCB with milled cutouts made to fit SMD components. With a little experimentation, [Kevin] found he could fit a TQFP32 ATMega328p  – the same microcontroller in the Arduino – in a custom square cutout. The rest of the components including a CR2016 battery and OLED display use the same trick.

The rest of the design involved taking Adafruit and Sparkfun breakout boards, and modifying the individual circuits until something broke. Then, off to Eagle to create a PCB.

[Kevin]’s experiment in extremely unusual PCB design worked, resulting in a credit-card sized “Game Boy” that’s only 1.6 millimeters thick. The controls are capacitive touch sensors and he already has an easter egg hidden in the code; enter the Konami code and the Hackaday logo pops up to the tune of [Rick Astley]’s magnum opus.

Now [Kevin] is in a bit of a bind. He’d like to take this prototype and turn it into a crowd sourced campaign. In our opinion, this “Game Boy in a wallet” would probably do well on a site like Tindie, but any sort of large scale manufacturing is going to be a rather large pain. If you have any wishes, advice, of complaints for [Kevin] he’s got a few links at the bottom of his project page.

Design Your Own Processor With Verilog

Intel-sandy

Designing a computer from scratch is one of the holy grails of hardware design. For programmable logic, designing your own processor is a huge accomplishment. That’s exactly what [zhemao] has done. He created EZ8, an 8 bit processor is written in Verilog. EZ8 has a 3 stage pipeline, which makes design very interesting. Instruction set pipelines have been used in processors for many years. They speed up operation by allowing the processor to execute more than one instruction in parallel. The idea is similar to washing, drying and folding laundry. Most people pipeline their laundry. One load is in the washer, another in the dryer, and a third is being folded. Pipelines aren’t a free lunch though – there are hazards. If one instruction requires the result of an instruction which is still being executed in parallel, there’s a problem. In our laundry analogy this would be like having one sock on the folding table while its mate is still in the dryer. The folding operation must wait for the drying operation to complete before the socks can be paired. This is exactly how assemblers handle the situation – they insert NOPs between known hazard instructions.

[zhemao] didn’t just give us a processor and no support though. He also included an assembler written in OCaml, and an emulator written in C. Several test assembly programs are also up on [zhemao’s] github repo  to verify operation. [zhemao] has tested his processor with Altera Cyclone 5 series FPGAs, but it should be possible to port it to other FPGA manufacturers. If you want more information, [zhemao] also has a discussion going on in the ECE subreddit.

[Thanks for the tip LongHornEngineer!]

[Image courtesy of intel]

The Catweazle Mini: A Super Small ARM Based Embedded Platform

Catweazle

There has been a recent trend in miniaturizing embedded platforms. [Jan] wrote in to tell us about his very tiny ARM based embedded platform, the Catweazle Mini. Who knew that an ARM based system could be so simple and so small?!?

With the success of the Trinket and Femtoduino (miniature Arduino compatible boards) and many other KickStarter campaigns, it is only natural for there to be a mini platform based on the ARM architecture. Built around the NXP LPC810 ARM Cortex M0+ MCU at 30MHz (which only costs slightly more than $1, by the way), this small embedded platform packs some pretty impressive processing power. The board contains a simple linear regulator, and can be programmed via UART. [Jan’s] development environment of choice is the mbed compiler, which is free and requires no installation. If you need some help getting started Adafruit has a nice guide for the LPC810.

Do you need some more processing power for your next wearable project? Be sure to use the Catweazle Mini.

Smart Thermostats For An Old Club House

20140220_210220

[Michael] is a Scout Leader in the Netherlands, where they have a great clubhouse—a “Landhuis.” The only problem? It’s old, and it’s not an efficient place to heat!

The building currently has two furnaces to cope with its many nooks and crannies, with individual thermostats in each of the five rooms. If a thermostat was activated in one of the rooms, it would control a valve in the furnace responsible for that room. Depending on which valve the furnace is attached to, a furnace would start. As you can imagine, this is an extremely inefficient system if you are heating two different rooms (and using two different furnaces!) It’s all on or off with no in-between.

As true scouts, they try to adhere to the simple principle of “why buy it when you can build it?” Commercial systems are expensive, and besides, they needed a project to work on! They’ve designed a smart(er) system using an Arduino Mega 2560 with five DS18B20 temperature sensors set up in each room, and even threw together a nice enclosure for it! They’ve included the source code on GitHub (in Dutch), so if you’re interested in setting up something similar you can check it out.

[Michael] will be around in the comments section, so if you have any feedback or questions, let him know!

PCB Antenna Reference Designs

Have you ever built a wireless project and weren’t sure how to make one of those awesome (and cheap!) PCB antennas? “What low-cost solutions does our Antenna Board #referencedesign contain?” said Texas Instruments (TI) recently via Twitter.  This older reference design contains some comprehensive designs for sub-1 GHz and 2.4 GHz antennas.

While TI’s documentation can be difficult to navigate, there are many hidden gems, and this is one of them. While TI created these designs for use with their wireless products, they will work on any device which utilizes the same wireless base frequency. For example, you could use any of the 2.4 GHz antennas with any Bluetooth, WiFi (2.4 GHz), or Bluetooth Low Energy chips. Simply open up their Antenna Selection Quick Guide document and navigate to the specific design for whichever antenna you would like to build.

For a more detailed overview of what goes into designing and testing a PCB antenna, check out this hack which we featured back in 2010. With the internet of things coming into its own, wireless projects will become more and more prolific, making PCB antennas more important than ever.