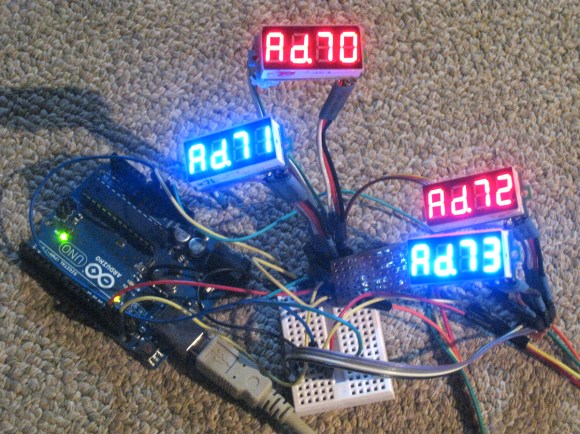
NESPo: Another 3D Printed Portable NES

portableNESSide2

Grab your favorite cartridge and violently blow into the end, because [Dave Nunez] is sending us on a nostalgia trip with his 3D printed portable NES. He takes the typical route of chopping up a Nintendo on a chip (NOAC) retro machine rather than sacrifice a real NES, and opts for a NiMH battery over lithium (which isn’t a bad idea; they can burst into flames if you charge them incorrectly). The battery life is, however, tolerable: 2.5 to 3 hours.

All the components are packed into a custom-made 3D printed PLA enclosure, which [Dave] kindly shares on thingiverse. He also decided to 3D print each of the buttons and their bezels/housings, which he then topped off by cutting acrylic sheets that seal up the front and back. As a final touch, [Dave] slips in some custom art under the acrylic and mounts a printed LED nameplate in the corner.

We’ve seen [Dave’s] work at Hackaday before, when he built a one-size-fits-all-consoles arcade controller.

On Not Getting Metal Fume Fever With Galvanized Conduit

galv

You can find galvanized steel pipes at Home Depots and construction sites all around the world. These relatively thin-walled steel pipes would make for great structural members if it weren’t for the fact they were covered in a protective layer of zinc. This layer of galvanization lends itself to crappy welds and some terrible fumes, but badass, TV personality, and hacker extraordinaire [Hackett] shows us how to strip the galvanization off these pipes with chemicals available at any hardware store.

Since the galvanization on these pipes covers the inside and the outside, grinding the small layer of zinc off these pipes is difficult at best. To be sure he gets all the zinc off this pipe, [Hackett] decided to chemically strip the pipes with a cup full of muriatic acid.

The process is simple enough – fill a cup with acid, dunk the ends of the pipes, and clean everything up with baking soda. A great way to turn scrap pipe into a usable material, make a cool paper mache volcano, and avoid ‘ol galvie flu

Continue reading “On Not Getting Metal Fume Fever With Galvanized Conduit”

[Lou] Puts Invisible Fence Inside And Outside His Home

invisible-fence-inside-and-out

Leave it to [Lou Wozniak] to go beyond ordinary when installing invisible fencing. Invisible fence is an electronic system that contains your dog by triggering a shock collar. The install requires a loop of wire to generate a field detected by the collar.

[Lou] starts off by buying a do it yourself kit. He has previous experience with this (check out his battery hack for the collars) and found that the cheap solid core wire didn’t hold up to animals and shovel accidents. He headed down to the hardware store and came back with a spool of stranded wire with extra thick insulation which should hold up much better.

The image above shows the model he built to plan for the installation. He’s not just making a single area in the yard. Look closely and you’ll see he’s going to use it to keep the dogs out of the dining room as well. This loop will be installed just below the floor from the basement.

With planning behind him he doesn’t fail to innovate with the installation technique. He recommends an angle grinder with a diamond blade to cut the slot for the wire in your yard. The one caveat being that you need to wait until the yard is super dry or it will muck up the blade. Dry dirt creates a lot of dust, but he uses a leaf blower or floor fan to blow it away from him as it works. To help minimize the amount of shocks the dogs receive while learning their new area he placed some white rope above the wire run as a visual cue.

Continue reading “[Lou] Puts Invisible Fence Inside And Outside His Home”

Bode Plots On An Oscilloscope

bode

Bode plots – or frequency response graphs – are found in just about every piece of literature for high-end audio equipment. It’s a simple idea, graphing frequency over amplitude, but making one of these graphs at home usually means using a soundcard, an Excel spreadsheet and a multimeter, or some other inelegant solution. Following a neat tutorial from [Dave Jones], [Andrew] came up with a very simple way to make a Bode plot in real-time with an oscilloscope, a microcontroller, and a few off-the-shelf parts.

The basic idea behind [Dave Jones]’ impromptu Bode plotter is to configure a frequency generator to output a sine wave that ramps up over a period of time. Feed this sine wave through a filter, and you have amplitude on the vertical axis of your ‘scope and frequency on the horizontal axis. Boom, there’s your Bode plot.

[Andrew] did [Dave] one better by creating a small circuit with an Arduino and an AD9850 sine wave generator. Properly programmed, the AD9850 can ramp up the frequency of a sine wave with the Arduino outputting sync pulses every decade or octave of frequency, depending if you want a linear or log Bode plot.

It’s a nifty little tool, and when it comes to building test equipment from stuff that just happens to by lying around, we’ve got to give it up for [Andrew] for his really cool implementation.


Compact Fluorescent Grow Light

compact-fluorescent-grow-light

Spring is on the way for our friends down under. With that in mind [x2Jiggy] built this compact fluorescent grow lamp to help start the seeds for his garden. He used materials that are easy to find, and multiple bulbs means that you can mix and match their color warmth in order to get the wavelengths of light best for plant growth.

He started by building the box out of MDF. It is lined mostly with a reflector meant to go in your car’s windshield when you leave it in a hot parking lot. He sealed the seams of the reflector using what he calls flashing tape. This is the rubbery type of stuff used as soft flashing around windows.

The bulb sockets came from an old string of party lights. Wiring is run through plastic junction boxes which keeps the setup code-compliant. Each of the CFLs draw 20 Watts for a total consumption of 160 Watts. Combine this with a DIY hydroponic tent and you’ll be eating fresh greens year round.

Continue reading “Compact Fluorescent Grow Light”

Rescuing An SD Card With An Arduino

A few days ago, one of [Severin]’s SD cards died on him, Instead of trashing the card, he decided to investigate what was actually wrong with the card and ended up recovering most of the data using an Arduino and an immense amount of cleverness.

SD cards can be accessed with two modes. The first is the SDIO mode, which is what cameras, laptops, and other card readers use. The second mode is SPI mode. SPI is slower, but much, much simpler. It turned out the SDIO mode on [Severin]’s card was broken, but accessing it with an Arduino and SPI mode worked. There was finally hope to get files off this damaged card.

[Severin] used a few sketches to dump the data on the SD card to his computer. The first looked at the file system and grabbed a list of files contained on the card. The second iterated over the file system and output all the files in hex over the serial port. With a bit of Python, [Severin] was able to reconstruct a few files that were previously lost forever.

Even though the SD card was completely inaccessible with a normal card reader, [Severin] was able to get a few files off the card. All the sketches and Python scripts are available on the Githubs, ready to recover files from your broken SD cards.

Hackaday Links: August 18, 2013

hackaday-links-chain

Let’s start off with some lock picking. Can you be prosecuted if it was your bird that broke into something? Here’s video of a Cockatoo breaking into a puzzle box as part of an Oxford University study. [Thanks Ferdinand via Endandit]

[Augybendogy] needed a vacuum pump. He headed off to his local TechShop and machined a fitting for his air compressor. It uses the Venturi Effect to generate a vacuum.

Build your own Arduino cluster using this shield designed by [Bertus Kruger]. Each shield has its own ATmega328. Many can be stacked on top of an Arduino board, using I2C for communications.

[Bunnie Huang] has been publishing articles a few articles on Medium called “Exit Reviews”. As a treasured piece of personal electronics is retired he pulls it apart to see what kind of abuse it stood up to over its life. We found his recent article on his Galaxy S II quite interesting. There’s chips in the glass, scuffs on the bezel, cracks on the case, and pervasive gunk on the internals.

We’d love to see how this this paper airplane folder and launcher is put together. If you know of a post that shares more details please let us know.

Squeezing the most out of a tiny microcontroller was a challenge. But [Jacques] reports that he managed to get a PIC 10F322 to play a game of Pong (translated). It even generates an NTSC composite video signal! Watch the demo video here.