Wielding things like two-handed swords in VR can be awkward. There’s no sense of grasping a solid object. The controllers (and therefore one’s hands) feel floaty and disconnected from one another, because they are. [Astro VR Gaming] aims to fix this with a DIY attachment they are calling the ARC VR Sword Attachment.
The ARC is a 3D-printed attachment that allows a player to connect two controllers together. They can just as easily be popped apart, which is good because two separate controllers is what one wants most of the time. But for those moments when hefting a spear or swinging a two-handed sword is called for? Stick them together and go wild.
The original design (the first link up above) uses magnets, but an alternate version uses tapered inserts instead, and provides a storage stand. Want to know if the ARC is something you’d like to make for yourself? Watch it in action in the video embedded just under the page break.
VR is an emerging technology with loads of space for experimentation and DIY problem solving. We wish more companies would follow Valve’s example of hacker-friendly hardware design, but even just providing CAD models of your hardware to make attachments easier to design would be a big step forward, and something every hacker would welcome.
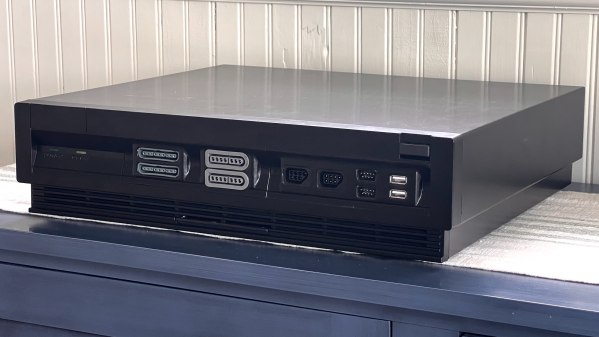
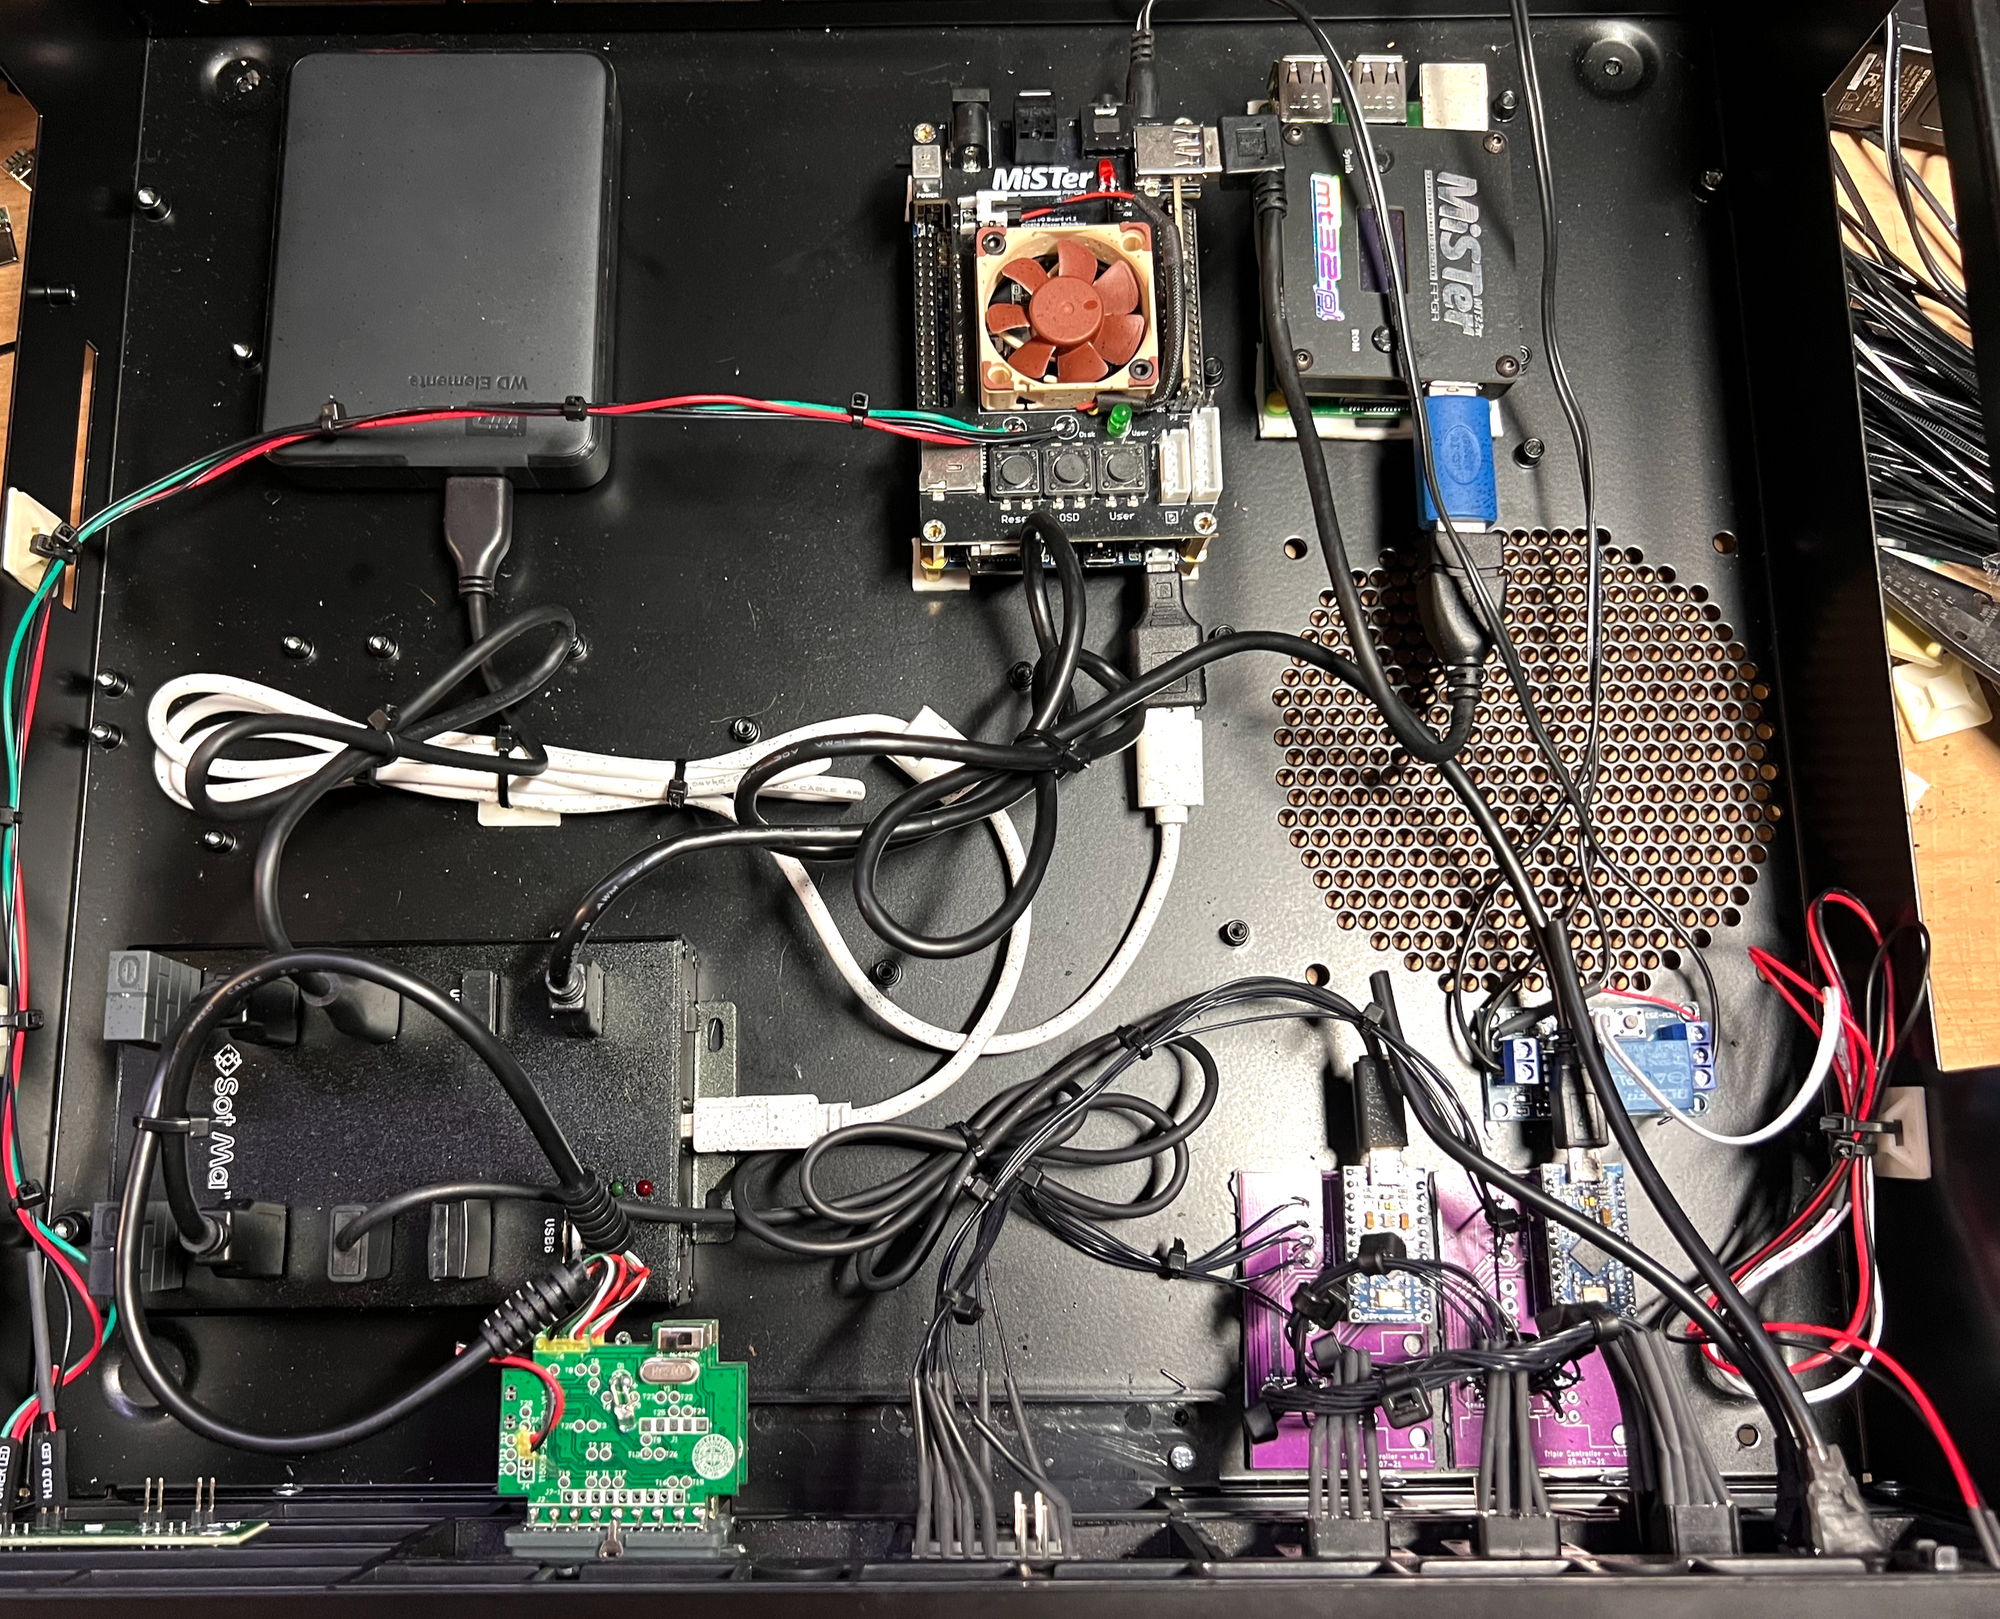
Some careful measuring and a little extra effort can be all that separates what looks like a hack job from a slick end product, and that is apparent in [Eric Sorensen]’s classy retrogaming rig, complete with ports for original console controllers.
Neatly housing these components in a case makes all the difference.
[Eric] likes his vintage gaming, and was terrifically pleased with MiSTer, an open-source project that recreates various classic computers, game consoles and arcade machines using modern FPGA-based hardware. Of course, what makes retro gaming even better is using a platform’s genuine original controllers, which just takes a little extra hardware and wiring.
But [Eric] found that all the required accessories and peripherals started to look awfully cluttered. He solved this issue by packing everything carefully into a specialty PC case called the Checkmate A1500 Plus, which gives off a strong 80s design vibe. As a bonus, the front panels are all removable and that’s where [Eric] decided to house the custom controller ports.
First [Eric] carefully measured each controller connector to create CAD models, then designed matching front panels to house the connectors and 3D printed them. Once that was done, post-processing the panels was a long process of apply Bondo, sand, paint, and repeat as needed. The results looks fantastic, and this project is a prime example of how aesthetics and finish can matter.
The story goes that Atari was developing a premium model of their popular home video game console, the Atari 2600, for the 1981 fiscal year. Internally known as the Stella RC, this model revision promised touch sensitive game selection toggles, LED indicators, and onboard storage for the controllers. The focus of the project, however, was the “RC” in Stella RC which stood for remote control. Atari engineers wanted to free players from the constraints of the wires that fettered them to their televisions.
Problem with the prototypes was that the RF transmitters in the controllers were powerful enough to send a signal over a 1000 ft. radius, and they interfered with a number of the remote garage door openers on the market. Not to mention that if there were another Stella RC console on the same channel in an apartment building, or simply across the street, you could be playing somebody else’s Pitfall run. The mounting tower of challenges to making a product that the FCC would stamp their approval on were too great. So Atari decided to abandon the pioneering Stella RC project. Physical proof of the first wireless game controllers would have been eliminated at that point if it were created by any other company… but prototypes mysteriously left the office in some peculiar ways.
“Atari had abandoned the project at the time…[an Atari engineer] thought it would be a great idea to give his girlfriend’s son a videogame system to play with…I can’t [comment] about the relationship itself or what happened after 1981, but that’s how this system left Atari…and why it still exists today.”
– Joe Cody, Atari2600.com
Atari did eventually get around to releasing some wireless RF 2600 joysticks that the FCC would approve. A couple years after abandoning the Stella RC project they released the Atari 2600 Remote Control Joysticks at a $69.95 MSRP (roughly $180 adjusted for inflation). The gigantic price tag mixed with the video game market “dropping off the cliff” in 1983 saw few ever getting to know the bliss of wire-free video game action. It was obvious that RF game controllers were simply ahead of their time, but there had to be cheaper alternatives on the horizon.
Out of Sight, Out of Control with IR Schemes
Nintendo AVS console deck and IR controller on display.
Video games were a dirty word in America in 1985. While games themselves were still happening on the microcomputer platforms, the home console business was virtually non-existent. Over in Japan, Nintendo was raking in money hand over fist selling video games on their Famicom console. They sought to replicate that success in North America by introducing a revised model of the Famicom, but it had to impress the tech journos that would be attending its reveal at the Consumer Electronics Show (CES).
The prototype system was called the Nintendo Advanced Video System (AVS). It would feature a keyboard, a cassette tape drive, and most importantly two wireless controllers. The controllers used infrared (IR) communication and the receiver was built-into the console deck itself. Each controller featured a square metallic directional pad and four action buttons that gave the impression of brushed aluminum. The advancement in video game controller technology was too good to be true though, because the entire system received a makeover before releasing as the Nintendo Entertainment System (NES) that Christmas. The NES lacked the keyboard, the tape drive, and the IR controllers and its change in materials hardly captured the high-end flash of the AVS. The removal of IR meant the device was cheaper to manufacture. A decision that ultimately helped the NES to become a breakout success that in turn brought back dedicated video game consoles single-handedly.
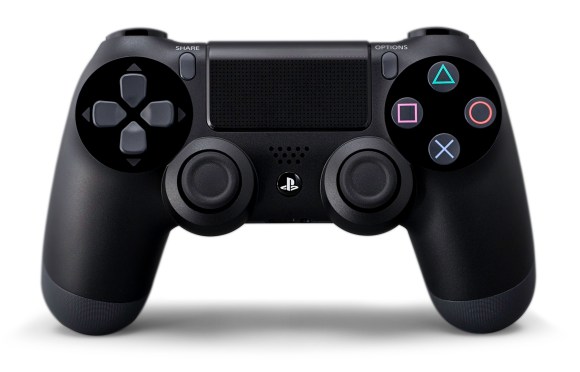
Looking to interface your Arduino with the PS4 controller? [Kristian] has updated his USB host library with support for the controller. The library makes it easy to read most of the inputs from the controller. Currently the buttons and joysticks work, and support for the light sensor, rumble, and touchpad is on the way.
To get this working, you will need the USB Host Shield for the Arduino and a Bluetooth dongle. Once you have the hardware setup, you can use the library to pair with the controller. When connected, simple function calls will let you read the state of the device.
While this does require some additional hardware to connect, all of the code is open source. If you’re looking to experiment with the PS4 controller yourself, [Kristian]’s work could be a helpful starting point. Of course, all of the source is available on Github, and the example sketch shows how easy it is to roll the PS4 controller into your own Arduino project.
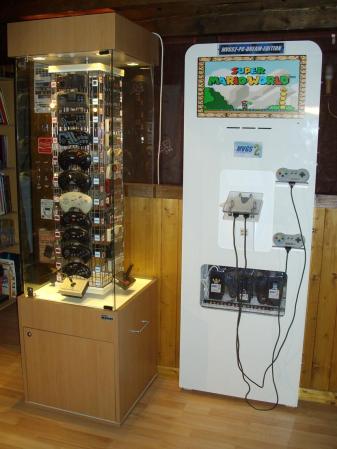
This gaming cabinet lets two players select games from a wide array of consoles and play them using the original controllers. [Patrice] built it around his Multi Video Games System 2, which converts each of the 75 controllers to a common format. Players pick controllers from the display case, plug in an HD-15 connector, and choose the game they want to play. The cabinet contains a PC that runs a variety of emulators, and uses HyperSpin as a menu system.
Using adapters, the converted controllers can also be used on other game systems, tablets, or smartphones. [Patrice] claims that they’ll work across 110 different game systems. A full list of the controllers and systems is shown here.
This cabinet is definitely one of the most comprehensive video game installations we’ve seen, and the display case of controllers looks fantastic. Check out a video of the system and some controller porn after the break.
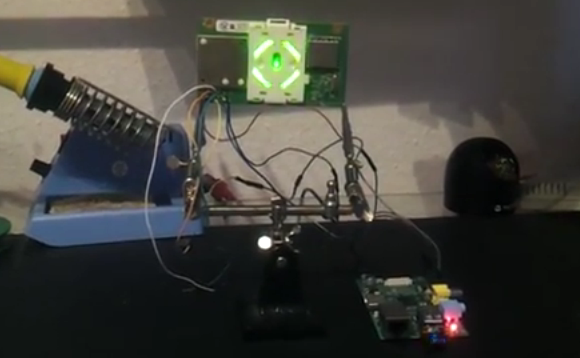
If you want to mess around with your Xbox 360 controllers on a computer Microsoft would be happy to sell you a USB dongle to do so. But [Tino] went a different route. The board that drives the Xbox 360’s status light ring also includes the RF module that wirelessly connects the controllers. He wired this up to his Raspberry Pi using the GPIO header.
The module connects via an internal cable and is treated much like a USB device by the Xbox motherboard. The problem is that it won’t actually handle the 5V rail found on a USB connector; it wants 3.3V. But this is no problem for the RPi’s pin header. Once a few connections have been made the lights are controlled via SPI I2C and [Tino] posted some example code up on Github to work with the RF module. He plans to post a follow-up that interfaces the module with a simple microcontroller rather than an RPi board. If you can’t wait for that we’re sure you can figure out the details you need by digging through his example code.
Using our hands to manipulate game controllers is something most of us take for granted. However for quadriplegics, whose arms and legs are completely paralyzed, gaming becomes a nearly impossible task. One man has spent the last 30 years of his life trying to help quadriplegics once again “pick up” the controller and enjoy a few rounds of their favorite video games.
Retired aerospace engineer [Ken Yankelevitz] has been using his skills to create game controllers that can be easily used by disabled gamers, offering them for sale at cost. Starting with Atari joysticks in 1981, he has been perfecting his craft over the years, creating some 800 mouth-operated game controllers. As the systems and their controllers became more complex, so did [Ken’s] designs. His new Xbox and Playstation controllers use all manner of components, including sip-puff tubes and lip-activated buttons in order to allow users to access every single controller function.
Even as he approaches his 70th birthday, he is busy making controllers, though at a slower pace than he has in the past. He has said that he will continue making them for as long as he can, but at some point he will have to close up shop. This has disabled gamers worried that they may no longer have someone to turn to for custom controllers, though we hope someone steps in to fill the gap whenever that day comes.
Be sure to check out his site to take a look at his designs, what he has done for the disabled community is amazing.

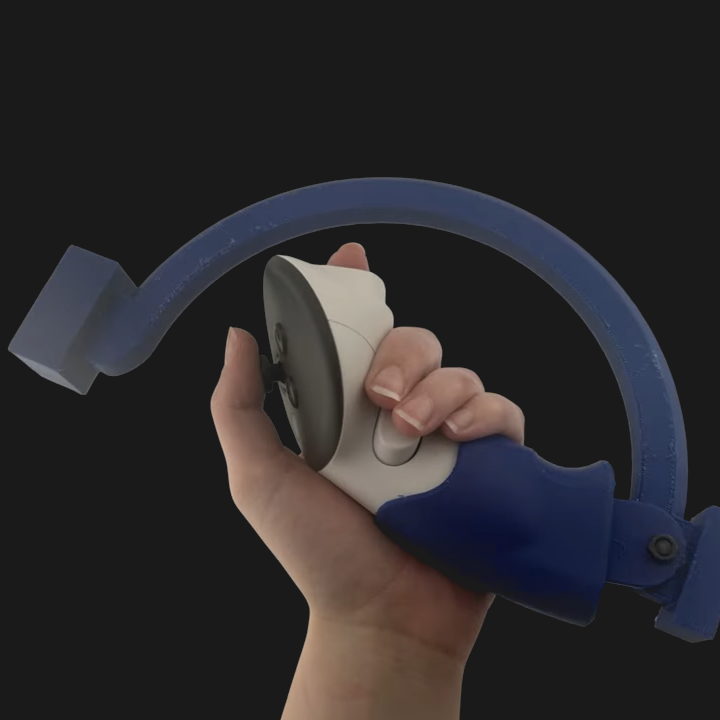 The ARC is a 3D-printed attachment that allows a player to connect two controllers together. They can just as easily be popped apart, which is good because two separate controllers is what one wants most of the time. But for those moments when hefting a spear or swinging a two-handed sword is called for? Stick them together and go wild.