Programming The ATtiny10 With An Arduino

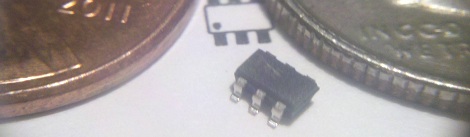
The ATtiny10 – along with its younger siblings that go by the names ATtiny 4, 5, and 9 – are the smallest microcontrollers Atmel makes. With only 32 bytes of RAM and 1 kB of Flash, there’s still whole lot you can do with this tiny six-pin chip. [feynman17] figured out a way to program this chip using an Arduino, allowing him to throw just about anything at this absurdly small microcontroller.

The ATtiny10 doesn’t use the familiar ISP programming header found on other Atmel-based boards. Instead, it uses the exceedingly odd Tiny Programming Interface to write bits to the Flash on the chip. [feynman17] realized he could use the Arduino SPI library to communicate with this chip and built a small programming shield with just a few resistors and a 8-pin DIP socket to mount an ATtiny10 breakout board.

After writing a sketch to upload a .hex file from the Arduino serial console, [feynman] had a programmed ATtiny10, ready to be dropped into whatever astonishingly small project he had in mind.

As for what you can do with this small microcontroller, chiptunes are always an option, as is making a very, very small Simon clone. It may not be a powerhouse, but there’s still a lot you can do with this very inexpensive microcontroller.


Hackaday Links August 23, 2012

PS3 Controller Cell Phone Mount

PS3-controller-cellphone

Although the details of this build are quite scarce, not much is needed considering all that this cell phone/PS3 controller “mount” is made of is 3 binder clips and a few rubber bands. A very ingenious solution.

Overengineered Throwie

ping-pong-ball-throwie

On the other end of the spectrum, I’ve spent way too much time overengineering the throwie (eventually it ended up using a ping-pong ball). Be sure to watch the first video at 0:32 for an impressive horizontal placement, or check out the baloon throwies at the end of the post for even more fun!

Chinese Noodle Slicing Robot

robot-slicer

This robot may be appropriately engineered in function, but the form of this noodle-slicer has a distinctly Asian style. We think it may have been designed as a prop for a Godzilla movie originally.

2D Glasses

2D-glasses

3D glasses may have been all the rage in 2009, but it’s 2012 so you may want to get your hands on a pair of 2D glasses. These instructions will tell you how to make glasses to convert a 3D film into 2D if the third dimension annoys you or makes you dizzy. Thx [Brian] and [Victor]!

test-box

As seen in this post from the Bacteria forum, the test box originally featured at [HAD] has now been updated to include variable regulators, volt meters and an LED tester.  Check it out on it’s source, [Downing’s Basement]. Thx [Mike]!

Help Us Decide If This Huge Reprap Array Is The Largest Fleet To Date

30-repraps

Take a minute to think about what your dream job might be.

Done imagining you are a ridiculously wealthy bachelor?  Good.

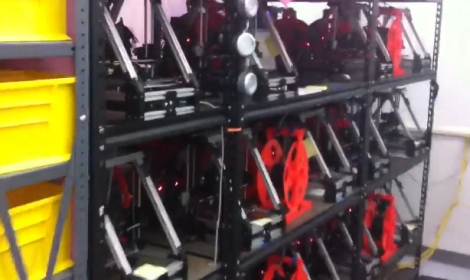
Back here in the real world, [Caleb Cover] has come into what might be one of the coolest hacking-related jobs we’ve seen in awhile. He recently snagged a gig working for Aleph Objects as the fleet master for a large array of 3D printers. His duties include the care and feeding of 30 MiniMax-style repraps, a job description we sure wouldn’t mind having.

Aside from merely gloating about his newfound employment, [Caleb] wrote in asking if we knew of a reprap setup larger than the one he is responsible for. We couldn’t come up with one, but perhaps you can.

Right now, [Caleb] says that he’s working on seeing how well the machines can produce parts to replicate themselves, which will certainly make this the largest collective set of production 3D printers sooner or later.

While you hunt down other large reprap setups at your monotonous desk job, check out the video below to hear the symphony of 3D printing that greets [Caleb] at the door each day.

Think you might have seen a 3D printing setup more massive than this one?  Pics Vids or it didn’t happen.  Seriously, we want to see em!

Continue reading “Help Us Decide If This Huge Reprap Array Is The Largest Fleet To Date”

Controlling A Quadcopter With A Homebrew Remote

When [Matt] started building his multirotor helicopter, he was far too involved with building his craft than worrying about small details like how to actually control his helicopter. Everything worked out in the end, though, thanks to his homebrew RC setup built out of a USB joystick and a few XBees.

After a few initial revisions and a lot of chatting on a multirotor IRC room, [Matt] stumbled across the idea of using pulse-position modulation for his radio control setup.

After a few more revisions, [Matt] settled on using an Arduino Pro Mini for his flight computer, paired with a WiFly module. By putting his multicopter into Ad-hoc mode, he can connect to the copter with his laptop via WiFi and send commands without the need for a second XBee.

Now, whenever [Matt] wants to fly his multicopter, he plugs the WiFly module into his MultiWii board, connects his laptop to the copter, and runs a small Python script. It may not be easier than buying a nice Futaba transmitter, but [Matt] can easily expand his setup as the capabilities of his copter fleet grows.

Video of [Matt]’s copter in flight after the break.

Continue reading “Controlling A Quadcopter With A Homebrew Remote”

Network Time Clock For A Home Media Center

[Derek] wanted a clock for his media center. A simple wish, but he had a few requirements: he didn’t need an alarm, wanted it to automatically set its time after a power outage, needed a big display, and also wanted it to look good. After shopping around [Derek] couldn’t find a clock that would fit his requirements so he decided to build one.

[Derek]’s project is called the SNTP clock. As you might expect, it gets its name from the protocol used to automatically synchronize the clock in your computer with other network time servers. The clock itself is built around an ATMega168 gathering time data from the Internet with the help of a Lantronics XPort. One inch seven segment LEDs serve as the display for the clock, and everything, from the time offset from UTC, the brightness of the display, and whether the clock displays 12 or 24-hour time is controlled by an infrared Apple remote.

A bare PCB or bundle of wires would look out of place in [Derek]’s media shelf, so he used a metal picture frame and smoked acrylic to dress up his clock. Now he’s got a beautiful and elegant clock that fits right in to his media servers and receiver.

Cloning A Water-based Light Wall Project

A few weeks ago, we featured this water-based LED graffiti art installation that allows anyone to paint in light using only a bottle of water. When one of [Chris]’ friends saw the video of this build, he immediately asked him how it worked. One thing led to another, and now [Chris] and a few other members at the BUILDS hackerspace at Boston University are building their own water LED installation.

The basic premise of this build is allowing water to serve as a conductor between the anode and cathode of a LED. Without spraying or painting water on the circuit [Chris] whipped up, there is an infinite resistance between the two pins of the LED and current cannot flow. After applying water to the anode and cathode pads, a small amount of current is conducted through the water and the LED lights up.

Right now, [Chris] is working on a test board with different sizes of pads and spacing to get the best water graffiti LED effect for his future build. The plan is to build a single one-meter panel out of one hundred 10 cm x 10 cm boards connected together with jumpers.

All of [Chris]’ work is up on GitHub, and even though [Chris] hasn’t begun designing the production boards, it’s more than enough to get you started if you’d like your own water LED painting panel.

No Secret Knocks Required At [Steve’s] House – Your Subway Pass Will Do

rfid-door-lock

[Steve] is often host to all sorts of guests, and he was looking for an easy way to let his friends come and go as they please. After discovering that his front door came equipped with an electronic strike, he decided that an RFID reader would be a great means of controlling who was let in, and when.

Giving all your friends RFID cards and actually expecting that they carry them is a bit of a stretch, but lucky for [Steve] he lives near Boston, so the MBTA has him covered. Just about everyone in town has an RFID subway pass, which pretty much guarantees that [Steve’s] cohorts will be carrying one when they swing by.

He crafted a stylish set of wooden boxes to contain both the RFID reader and the Arduino that controls the system, matching them to the Victorian styling of his home. A single button can control the setup, allowing him to add and remove cards from access lists without much fuss. For more granular control however, [Steve] can always tweak settings from the Arduino serial console.

The card system is both stylish and useful – a combination that’s hard to beat.