Introducing Hack A Day: The Retro Edition

Hack a Day hasn’t change its format since 2004. Even though MAKE has gone Web 2.0 with buttons using mouseover, and Instructables has fancy drop-down menus, Hack a Day has been a constant black background, green text child of the web circa 2004. A while ago, we decided it was time for an update to our layout. Today we’re pleased to announce an open beta test for our upcoming update – Hack a Day: the retro edition.

In case you’re wondering, yes, this is a joke, and no, we’re not going all Web 0.1a on you.

The retro edition is a little side project to our upcoming update where we’ll be rolling out a new template for Hack a Day. We’re going to fix a lot of the problems with the current template – searching, and an admittedly terrible commenting system design – and generally ‘cleaning up’ the design. We already have the store up and running, so progress on the update is slowly being made.

As far as the retro edition goes, we’re keeping that. We’ve had a few nerd-offs trying to load Hack a Day on the oldest computer possible, so a version of Hack a Day built for computers from 1983 seemed like a worthwhile goal. Think of it as a challenge: if you can send in a picture of your Commodore PET loading up the retro edition, we’ll add you to the retro successes page.

There’s a bit more we’d like to do with the retro edition, namely guides to getting your old computers up on the Internet. As a little bonus (and in keeping with the retro theme), we’re putting up a few classic Hack a Day posts from the days of yore.

So, there you go. We’ve tested the retro edition on a Mac PowerBook 170 and a Quadra 700, but feel free to dig out your old hardware and give this a spin.

EDIT: As far as the ‘retro competition’ goes, [Jaromir] wrote in and brought up an interesting point: Loading that .GIF logo would be really hard on computers with kilobytes of ram, so I’m changing that to a .BMP. Just so we’re all clear, there are no official rules, you’re competing against yourself, and if you can get a picture of an old computer loading this site, you’re going to be listed on the ‘successes’ page.
Bending Laser Cut Wood Without Steam Or Forms

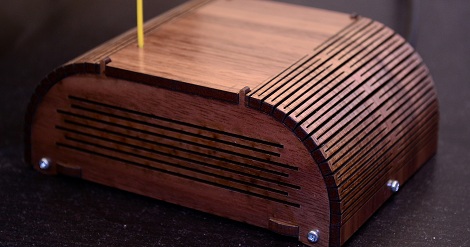
If you want to pretty up your project boxes, we can’t imagine anything better than [Shaun]’s walnut plywood, laser-cut, kerf bent Arduino case. Instead of the slot-and-tab construction of traditional laser-cut enclosures, [Shaun] used a technique to bend plywood without steaming, heating, and eventually scorching his somewhat expensive plywood.

This isn’t the first time we’ve seen this accordian style laser-cut kerf bend. By alternating laser cuts along the desired radius, the plywood can be bent by hand. The technique is called kerf bending and is perfect for putting an organic touch on the usual 90° angle project boxes we see.

[Shaun] has an Instructable for the smaller boxes that are part of his Arduino powered wireless sensor network. This Instructable goes over the pattern of laser cuts required to get a nice, smooth kerf bend, and also shows off how beautiful a laser-cut project box can be when cut out of aromatic cedar.

Building A Foundry In Your Backyard

[th3BadWolf] has been wanting to build a foundry for some time now. Done right, it’s a very neat tool; it’s fairly easy to do aluminum castings, and if you’re clever enough a foundry can lead to building large machine tools such as a lathe or a mill. Anything worth doing is worth overdoing, so [BadWolf] is designing his foundry to melt 150 pounds of aluminum every 45 minutes.

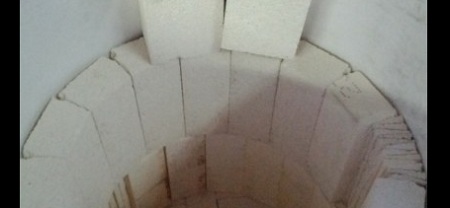
The build began with a humble oil barrel. [th3BadWolf] cut the top off of the barrel and began lining the inside of the barrel with a ceramic blanket and refractory bricks. To hold this somewhat precarious assemblage of blanket and brick together, [BadWolf] is holding everything together with 3000° F cement.

The body of the furnace is nearly complete, but [BadWolf] still has to drill a few holes for the burner system. He’s going to start each burn with Propane, then move over to engine oil when the furnace gets hot enough. Truly an awesome project, and we can’t wait to see the results.

How Do Atomic Clocks Work?

[Bill Hammack] aka [Engineerguy] is back again with another fantastic informational video. This time around he’s describing exactly how an atomic clock does what it does. He starts off with a great analogy of jello jiggling when poked. He explains how this is similar to the quartz crystal inside the clock oscillating due to the electrical “poke” we give it.  He goes on to explain how GPS satellites rely on this accuracy when determining physical locations on the ground.

As usual, [Bill] does a fantastic job of delivering the information quickly and packed full of detail, while still keeping it simple enough that even those unfamiliar with the technology can follow along.

Continue reading “How Do Atomic Clocks Work?”

A Simple RF Signal Strength Meter

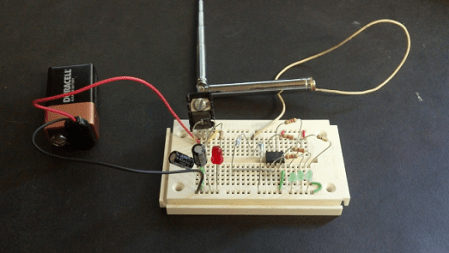
rf_metr_breadboard

[Scott] wrote in to us with his simple, but well done RF signal strength meter. As he points out in his post, sometimes an Arduino is overkill, so a Picaxe 08M was used instead. Apparently this was a refresh of a high school project that he did. Certainly many of us would have liked to go to that high school!

An interesting part of this project is how he used a laser cutter to produce his PCB traces. This was done by applying black paint to the copper on his board and cutting everywhere he didn’t want copper traces. The results were quite good, and should work well when this project is finalized in an enclosure

Check out the video after the break to see this circuit in action. He explains the build in it, but if you just want to see the signal strength lights come on, fast forward to around 2:25. Continue reading “A Simple RF Signal Strength Meter”

Swumanoid: A Swimming Humanoid Robot

If you just happen to find yourself at the Fifth International Symposium on Aero Aqua Bio-Mechanisms this August in Taipei, you might get a chance to see this half sized swimming humanoid. Swumanoid was created by researchers at the Tokyo Institute of Technology by doing a 3d scan of a human, then simplifying the shapes and breaking them up to 3d printable parts. Waterproof motors are needed… since it is a swimming bot. The articulation is pretty incredible, the Sumanoid can do the crawl, like you see in the video below as well as breaststroke, backstroke, butterfly, and even doggy paddle.

Continue reading “Swumanoid: A Swimming Humanoid Robot”

Calculating With 3D Printed Gears

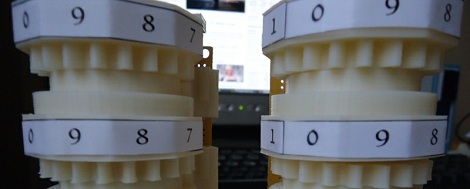
Here’s a 3D printed electromechanical computer built by [Chris Fenton] over at NYCResistor. It uses plastic registers printed on a Makerbot, a bunch of pogo pins, and business-card sized punch cards capable of storing 32 bits of instructions and data.

In case you’re wondering, this isn’t the first time we’ve seen [Chris]’  FIBIAC. Since the last update, [Chris] managed to get a program that walks through the first three digits of the Fibonacci sequence. There’s really no limit to what the FIBIAC can theoretically do, but with only three registers he’s limited to calculating the first three digits of pi.

With more registers, [Chris]’ computer could be expanded, but each register takes about 8 hours to print. We’re sure [Chris] would gladly accept any donations of additional 3D-printed registers, so if you’d like to make a few of these gear registers you can get the files on Thingiverse.

As a proof of concept, [Chris]’ FIBIAC is amazing, but it doesn’t live up to its intended design. The punch card format [Chris] created is capable of storing 8 registers, and the registers themselves can be expanded far beyond their current 3-digit width. Still, it’s an incredible build and has the bonus of being easily expandable thanks to a very clever design.

Continue reading “Calculating With 3D Printed Gears”