Electric Mountain Board With Glove Control

Last summer, we saw [Andres Guzman]’s electric mountain board tearing around the University of Illinois campus. He’s back again, only this time the board isn’t controlled with a PlayStation controller. [Andres] built a wireless glove to control his mountain board.

An Arduino and power supply is mounted to the glove. A 2.4GHz transceiver serves as the comm link between the glove and board. The speed control is handled by this flex sensor from Sparkfun. With the flex sensor held between the middle and ring fingers, all [Andres] needs to do to apply power is slightly bend his fingers.

There’s also a number of safety features built into the board. To enable power to the boards motor, there’s a dead man switch on the glove underneath the thumb. If [Andres] were to take a nasty spill, he would release the switch and the board would come to a stop. [Andres] also made sure the board would shut down if the wireless link was interrupted. The build seems pretty safe, even if he is tearing around his campus in the video below.

Continue reading “Electric Mountain Board With Glove Control” →

Animated X-mas Sign

Sure, it may be two and a half months until Christmas. That doesn’t mean we can’t start building a few Christmas decorations. Last year, [RB] over at Embedded Lab made an animated Christmas sign using a simple microcontroller setup. This year, [RB] is adding a blinking LED border and doing the entire project with 74xx ICs.

The letters for this year’s sign were recycled from last years’. This time, however, two strings of 12 LEDs are used for the blinking border. The blinking circuitry uses a 74hc14 Schmitt trigger to provide the clock. A pair of 74hc595 shift registers turn each letter on one at a time. The speed is controlled with a small trim pot.

Using ICs to drive a series of lights in a pattern isn’t a new thing – you’d be hard pressed to not find a similar setup in the blinking panels of sci-fi shows of the 60s and 70s. Of course this sign doesn’t compare with what can be done with a microprocessor a lot of patience, it’s still a very nice build. Check out the video after the break to see the X-mas sign in action.

Continue reading “Animated X-mas Sign” →

Retrofitting A 60-year Old Electric Heater

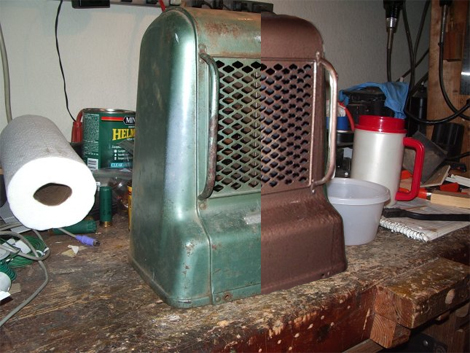
electric_heater_retrofit

[John] found an old Kenmore electric heater at a junk store one day, and thought it would look great in his bathroom. The only problem with the unit is that it was built back in the 1940s/1950s, so it lacked any sort of modern safeguards that you would expect from an indoor heater. There was no on/off switch, no fuse, no thermostat, and no tip switch – though it did have a nice, flammable cloth-covered power cord.

Since [John] wasn’t too keen on burning his house down in the name of staying warm, he decided to retrofit the old unit’s shell with a new ceramic heater. He found a $20 unit that looked like it would fit, so he disassembled both heaters and got to work. The Kenmore’s innards were scrapped, then he gave the unit a nice fresh coat of high-temp paint. The new heater was cut to fit inside the old unit’s shell, controls and safety features intact.

He says that it works very well, and that it looks great in his bathroom. If you’re considering doing something similar, be sure to check out his writeup – it is very thorough and has plenty of details that will help you along the way.

22 Miles Straight Up In 90 Seconds

Those little Estes rockets you built as a kid just got blown out of the water.

In response to the Carmack Prize to launch an amateur rocket above 100,000 feet, [Derek Deville] and the rest of the Qu8k team launched a 320 pound, 14-foot-long rocket through 99% of the Earth’s atmosphere.

Unlike our little toy rockets from years ago, more than half of the entire rocket is fuel. This isn’t a plastic or salami-powered hybrid rocket, though. It’s an entirely solid fuel rocket. The fuel grain is specially made for this rocket in a cylinder-with-fins shape that ensures an even burn through the entire flight.

The payload included 2 timers, an accelerometer, a cosmic ray detector (check out the Geiger tube) and 4 GPS units required of the Carmack Prize. The video from the on-board camera shows a fantastic flight, only partially obscured by the plastic aeroshroud that melted when the rocket was going about Mach 3.

Videos of the entire flight and a ‘highlights’ reel are available after the break.

Continue reading “22 Miles Straight Up In 90 Seconds” →

Sustainability Hacks: The Final Word

This theme has been tricky to write for. On one hand, here at Hackaday, we are excited about doing anything that will allow us to not consume as many resources but on the other hand, when you really look closely at things, pretty much everything that we do in our modern lives isn’t sustainable. We can certainly find ways to get by with less but doing without really isn’t an option. The exciting thing about the current state of technology is that things are becoming a lot more efficient so the things that we do every day, such as using a computer require less and less energy. Even our cars, which for nearly 100 years drove around at 25 miles per gallon are starting to slowly require less fuel to get from point A to point B. We have a long way to go but there are signs that we (or our children) might not have to give up a modern life to continue on when coal and oil start to become scarce.

Shown above is an oil lamp made to look like a light bulb created by Opossum Design. It is an interesting use of modern technology to create light in a much more sustainable way.

Tomorrow we will be starting a new unofficial theme that will continue for the rest of October. For the past several years, we have been a bit behind the curve about Halloween stuff but we intend to make up for that in a big way. Halloween is one of those holidays that brings out the tinkerer in a lot of us. We would like to show off those projects. Hit us up on our tip line. If we like what we see, we will post about your project. We’re expecting a bunch of projects so unlike our prior themes, if we happen to get more than one that we like on a given day, we’ll post more.

Open-source Sprinkler Controller Keeps Your Lawn Looking Great

open_source_sprinkler_controller

[Ray] wrote in to share a great project he just recently wrapped up, an open-source sprinkler valve controller. Built in collaboration with Wired Magazine’s editor-in-chief [Chris Anderson], the sprinkler controller is designed to replace the limited commercial sprinkler timers that typically come with a new home sprinkler setup.

Their system greatly expands on the idea of a standard sprinkler timer, adding Ethernet connectivity, web-based scheduling, and 8 separate controllable zones. At the heart of the controller is an ATmega328 running the Arduino bootloader, which means that the system is easily tweakable to fit your specific needs. The controller works off a standard 24V AC sprinkler transformer, which means that the controller can easily act as a drop-in replacement for your existing system.

The pair sells kits through the web site, but you can always simply download the schematics, PCB layout files, and BoM to build one yourself. Whichever path you choose, be sure to swing by [Ray’s] site and take a good look around – there is an incredibly detailed assembly and programming guide there that will be a great resource as you go along.

Continue reading to see a video of the sprinkler controller in action.

Continue reading “Open-source Sprinkler Controller Keeps Your Lawn Looking Great” →

Linear Motor Can Be Built From Trash

[Raul] built a cheap linear actuator out of a drawer slide and a surplus flatbed scanner.

A few builds we’ve seen, like the PCB drill press or the horribly inefficient thermostat, used linear actuators as key components of their builds. These linear actuators are fairly expensive compared to other parts we usually have lying around so going the homebrew route to reduce costs is always a welcome idea.

The first step of [Raul]’s build is to mount a drawer slide to a piece of wood. A stepper motor is attached to one end of the actuator and a timing belt is strung along the length of the assemblage. After a bracket is connected the drawer slide and the belt, you’ve got a very inexpensive linear motor.

In our days of dumpster diving, we can’t count the number of times we’ve passed up on drawer slides in unwanted furniture. Stepper motors, gear trains and timing belts from old ScanJets can be found for pocket change any day of the week. For cheap and accurate linear motion, we couldn’t come up with a build that does better than [Raul]’s.