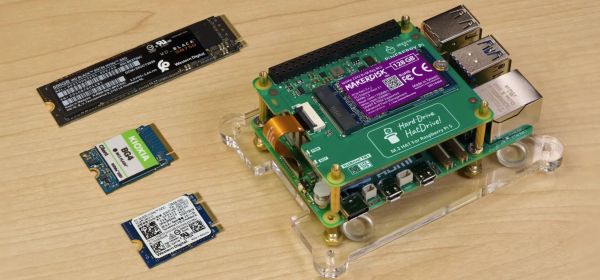
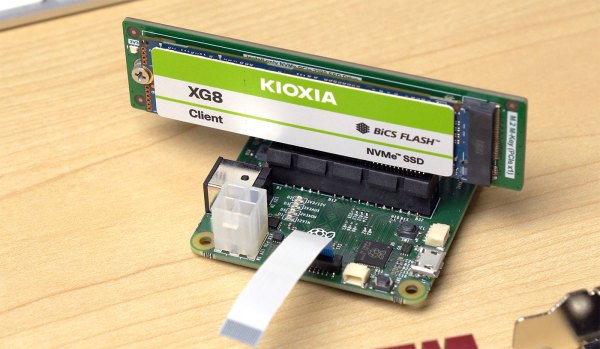
When the Raspberry Pi 5 launched, many were left chomping at the bit after seeing the PCIe FPC connector alongside the promise that an ‘NVMe SSD HAT would be forthcoming’. Although the official Raspberry Pi NVMe HAT is still a long while off, the Polish company Pineberry Pi is ramping up to release its Top & Bottom versions of its very wittily called HatDrive.
They sent a prototype to [Jeff Geerling], who has been putting his grubby mitts all over them before putting together a video showing off the HatDrive Top, which can accept 2230 and 2242 size NVMe drives.
The primary goal of adding an NVMe drive to the RPi is of course to get rid of those slow and fragile SD cards. Although the SD card standard supports near-NVMe-like speeds with UHS-III, the Raspberry Pi 5 bottoms out at UHS-I, around 100 MB/s. Despite this, using an NVMe drive for booting still takes some work, as [Jeff] lays out in a clear article. Most of this involves tweaking the /boot/config.txt file to enable external PCIe support, editing the onboard EEPROM to change the boot order (in lieu of having a PC-like BIOS screen) and getting the OS image flashed onto the NVMe drive you intend to boot from.
Although things seem to work fine during [Jeff]’s testing, some caveats remain, such as the RPi 5 officially supporting only PCIe Gen 2 x1, with Gen 3 possible, but with potential data integrity issues. There’s also the fundamental limit of having only a single lane of PCIe available. If that’s no problem, then Pineberry Pi offers the aforementioned HatDrive Top for traditional HAT-style mounting, and a Bottom version that can accept up to 2280 format NVMe SSDs. Including the provided ribbon cables, you can order the Top and Bottom for €20 and €25.99 respectively, with the first batch to ship in early December.
Continue reading “Pineberry Pi HatDrive: Using NVMe SSDs With The Raspberry Pi 5” →

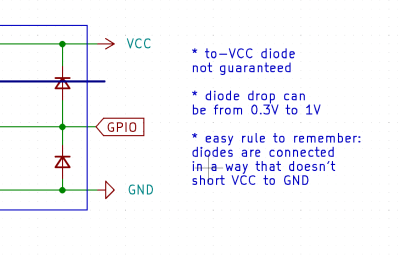 Thankfully, in modern-day Western climates and with modern tech, you are not likely to encounter ESD-caused problems, but they were way more prominent back in the day. For instance, older hackers will have stories of how FETs were more sensitive, and touching the gate pin mindlessly could kill the FET you’re working with. Now, we’ve fixed this problem, in large part because we have added ESD-protective diodes inside the active components most affected.