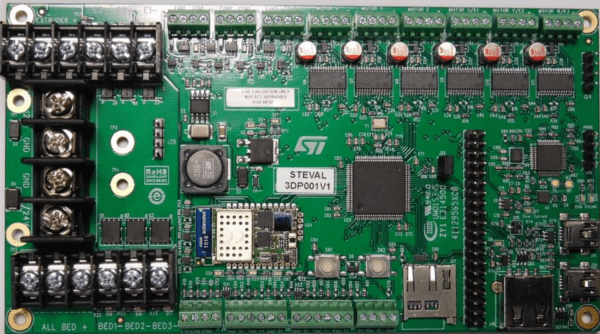
CaseRap - Folding RepRap

New RepRap With Integrated Case, Oddly Called Case-Rap

The great thing about RepRaps are that there are so many to choose from! No matter what features or design intent you could want, there is probably a RepRap for that. Even so, there has been a recent addition to the RepRap family. Creator [jlguil] calls it the Case-Rap, and for good reason, the frame of the printer folds up into a suitcase.

The Case-Rap is inspired by the Mendel90 which tries to improve on the original Mendel by replacing the threaded rods for a more rigid sheet material frame with bracing to keep the X, Y and Z axes perpendicular to each other. The Case-Rap goes a little further with the design to have the frame also perform double duty as a travel case.

Check out the video after the break, the printer is actually built in 2 complete separate assemblies. The X and Z axes are mounted in a 4-sided wooded frame. The Y axis and the electronics are mounted on a 2-sided wooden frame. When the frame pieces are latched together in one orientation, they conceal the printer inside a suitcase-sized box. The latch positions were thoughtfully placed so the frame pieces could also be latched together in ‘printer mode’. Setting up and breaking down the printer takes all of 30 seconds.

You may think a super portable printer has to be small… but you’d be wrong. The Case-Rap has a commendable 8x8x8 inch print area. According to [jlguil], the total DIY cost comes in around 350$ CAD, which is not too bad for a 3D printer, and pretty good for one that is unique, portable and capable.

Continue reading “New RepRap With Integrated Case, Oddly Called Case-Rap”

Open Source, 3D Printed Rocket Engines

A liquid-fuel rocket engine is just about the hardest thing anyone could ever build. There are considerations for thermodynamics, machining, electronics, material science, and software just to have something that won’t blow up on the test rig. The data to build a liquid engine isn’t easy to find, either: a lot of helpful info is classified or locked up in one of [Elon]’s file cabinets.

[Graham] over at Fubar Labs in New Jersey is working to change this. He’s developing an open source, 3D printed, liquid fuel rocket engine. Right now, it’s not going to fly, but that’s not the point: the first step towards developing a successful rocket is to develop a successful engine, and [Graham] is hard at work making this a reality.

This engine, powered by gaseous oxygen and ethanol, is designed for 3D printing. It’s actually a great use of the technology; SpaceX and NASA have produced 3D printed engine parts using DMLS printers, but [Graham] is using the much cheaper (and available at Shapeways) metal SLS printers to produce his engine. Rocket engines are extremely hard to manufacture with traditional methods, making 3D printing the perfect process for building a rocket engine.

So far, [Graham] has printed the engine, injector, and igniter, all for the purpose of shoving oxygen and ethanol into the combustion chamber, lighting it, and marveling at the Mach cones. You can see a video of that below, but there’s also a few incredible resources on GitHub, the Fubar Labs wiki, and a bunch of pictures and test results here.

Continue reading “Open Source, 3D Printed Rocket Engines”

3D Printer Plays Music

3D Printer Plays Classic MIDIs

For whatever reason we all seem to have this obsession with making things other than speakers into speakers. Hard drives, floppy drives, CD drives, fax machines, inanimate objects, dot-matrix printers, and now — well let’s stay with times — a 3D printer!

[Andrew Sink] wanted to give stepper music a try (is that seriously a genre now? (Yes, we’re calling it Stepstep – Ed.)), so he found HomeConstructor.de, which happens to have an awesome MIDI to G-CODE converter specifically designed for making those steppers hum. His instrument of choice is an original Printrbot but unfortunately it did require a few hours of tweaking the G-Code to get it to work just right.

Feast your ears on this beautiful rendition of the Jurassic Park Theme song below.

Continue reading “3D Printer Plays Classic MIDIs”

Optimized Molds With 3D Printing

[Florian] has a few arcade games and MAME machines, and recently he’s been trying to embed objects in those hard plastic spheres on the end of joysticks. A common suggestion is to 3D print some molds, but even though that’s a great idea in theory the reality is much different: you’re going to get layer lines on the casting, and a mirror finish is impossible.

No, a silicone mold is the way to do this, but here 3D printing can be used to create the mold for the silicone. Instead of a few pieces of hot glued cardboard or a styrofoam cup, [Florian] is 3D printing a a container to hold the liquid silicone around the master part.

After printing a two-piece part to hold both halves of a silicon mold, [Florian] put the master part in, filled it up with silicone, and took everything apart. There were minimal seam lines, but the end result looks great.

In addition to making a 3D printed mold container, [Florian] is also experimenting with putting 3D printed parts inside these joystick balls. The first experiment was a small 3D printed barrel emblazoned with the Donkey Kong logo. This turned out great, but there’s a fair bit of refraction that blows out all the proportions. Further experiments will include a Pac-Man, a skull, and a rose, to be completed whenever [Florian] gets a vacuum chamber.

Incubating Resin Prints Through The Chilly Months

FormLabs resins operate best between the comfortable temperature range of 18 – 28°C (64 – 82°F). For many of us experiencing the chillier weather these days, our garage workshops can easily drop below those temperatures and cause our prints to fail. Rather than hunker down for the freeze and wait for the world outside to defrost, [MarkStrohbehn] has discovered a budget heating technique that heats the print chamber from the inside instead.

This trick comes in two parts. First, to bring the temperature up, [Mark] installed an egg incubator inside the chamber using a powerful magnet attached to the fixture containing the lead screw. Next, to maintain the warm temperature, he’s taped together an insulating jacket composed of several layers of off-the-shelf mylar emergency blankets. Finally, he’s managed to slip the egg incubator power cable cleanly under the FormLabs lid without triggering the open-lid sensor. This hack is staggeringly simple but effective at reducing the odds of failed prints through the cold weather. Best of all, the modifications are far less invasive than other upgrades made to 3D printers, as it requires no modification of the Form1+. For those of us who haven’t seen the sun in a few months, rest assured that you can still churn out parts.

Checking Populated PCB Clearance With A 3D Printer

Laying out one PCB, sending it out to a fab, stuffing it with components, and having the whole thing actually work when you’re done is a solved problem. Doing the same thing and having it plug in to another PCB… well, that’s a bit harder. Forget about building a PCB and having it fit inside an enclosure the first time.

The usual solution to this problem is printing the board to be fabbed on a piece of paper, take some calipers, and measure very, very carefully. Extra points for sticking a few components you’re worried about to the paper before lining the mechanical prototype up to the existing board. [N8VI] over at the i3 Detroit hackerspace had a better idea – print the whole thing out on a 3D printer.

[N8VI] is working on a software defined radio cape for a BeagleBone. He was a bit concerned about a few caps getting in the way of a board stack. This was tested by printing out a bit of plastic in the shape of the new board, adding header spacers and parts that might be troublesome.

While the idea is great, there’s not much in the way of a software solution or a toolchain to make plastic copies of completed boards. We know rendering 3D objects from KiCAD is rather easy, but there aren’t many tools available for those of us who are still stuck with Eagle. If you know of a way to print populated boards, drop a note in the comments.

Midwest RepRap Festival, March 20-22nd

Right now there are two emails in my inbox inviting me to 3D printer conventions. If you’re not familiar with how these cons go, here’s a quick recap: a bunch of 3D printer manufacturers set up their booths the day before, put a printer behind an acrylic enclosure, start a very complex print, and come back the next day. This printer finally completes the print sometime Sunday afternoon, a bunch of people walk by the booths, and the entire venue is filled with enough morose faces as to be comparable to one of the higher circles of hell.

The Midwest RepRap Festival is not this con. It is, to the best of my knowledge, the only 3D printing convention that isn’t a trade show. It’s a blast, it’s March 20th through the 22nd, and we’re going to be there.

This will be our second expedition to the MRRF. Last year we saw 3D printed resin molds, and a strange Core XZ printer from [Nicholas Seward], the mind that brought you the odd Reprap Wally and Simpson. The most interesting man in the universe was there with a Smoothieboard. There were talks on 3D Bioprinting by [Jordan Miller] from Rice University, and everyone ate 3D printed waffles. If you’re looking for the possibilities 3D printing offers, this is the con to go to. If you’re looking for people to sell you stuff, look elsewhere.

This event is organized by the folks at SeeMeCNC, and it will be held on their home turf of Goshen, Indiana. Yes, you will be passing Amish buggies on the way to the event. Even though the MRRF is being held in the middle of nowhere, it was absolutely shocking how many people turned up last year and how good the con was. To put this in perspective, I’m driving nine hours to MRRF, and going to Maker Faire NYC takes me four hours. If I had to choose one 3D printing event to go to, this would be the one. That’s not just because I’m told there will be a t-shirt cannon at MRRF.

The event is free and open to everybody. You can just show up, although it would be a good idea to register. You’ll see the World’s Largest 3D Printed Trash Can. Yes, I’m serious. Call Guinness.