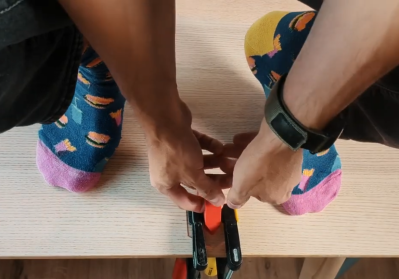
3D Printing With Plastic Cutlery

How many plastic spoons, knives, and forks do you think we throw away daily? [Stefan] noted that the compostable type is made from PLA, so why shouldn’t you be able to recycle it into 3D printing stock? How did it work? Check it out in the video below.

[Stefan] already has a nice setup for extruding filament. However, unsurprisingly, it won’t accept spoons and forks directly. A blender didn’t help, so he used an industrial plastic shredder. It reduced the utensils to what looked like coarse dust, which he then dried out. After running it through the extruder, the resulting filament was thin and brittle. [Stefan] speculates the plastic was set up for injection molding, but it at least showed the concept had merit.

In a second attempt, he cut the ground-up utensils with fresh PLA in equal measures. That is, 50% of the mix was recycled, and half was not. That made much more usable filament. So did a different brand of compostable plasticware.

The real test was to take dirty plasticware. This time, he soaked utensils in tomato sauce overnight. He cleaned, dried, and shredded the plastic. This time, he used 20% new PLA and some pigment, as well. We aren’t sure this is worth the effort simply on economics, but if you are committed to recycling, this might be worth your while.

It always seems like it should be easy to extrude filament. Until you try to do it, of course. Recycling plastic bottles is especially popular.

Continue reading “3D Printing With Plastic Cutlery”

3D Printing Stacks

There is a big difference between building one of something and building, say, 100 of the same item. It isn’t surprising, then, that 3D printing in bulk differs from printing one object at a time. Of course, filling up your build plate is not a new idea. But [Keep Making] wants to encourage you to think in three dimensions and fill up your build volume in the Z axis, as well.

When you fill your X and Y axes, it is easy to see how the parts separate. But with stack printing, you must separate the parts from different layers. Each part has a single-layer gap, and the top surfaces are ironed for a better finish. Sometimes the prints may stick, and the video shows how to use a screw to pop off recalcitrant prints. The technique produces one side that isn’t as nice a finish as the other side, but it isn’t bad, and for many applications, you don’t care, anyway.

Before you get too excited about your own designs, you might try a simple test file and get your print settings dialed in. Obviously, if you need just two or three copies of something small, it is easier to step and repeat them across the build surface. But if you need to maximize your throughput or make multiple copies of large objects, this might be the technique for you.

Looks like an interesting technique that doesn’t require you to do anything strange like, say, waterproof your printer. No strings attached.

Continue reading “3D Printing Stacks”

Slab Casting – A New Way To Combine 3D Printing And Ceramics

Slip casting can be messy both in processing and in making the original plaster mold. What if there was a better way, thanks to 3D printing?

[Allie Katz] has developed a new technique using 3D printed slab molds to make ceramics. By combining the ability of 3D printing to make intricate designs and the formability of clay, they have found a way to make reproducible clay objects without all that tedious mucking about with liquid clay.

[Katz] takes us through a quick “Mould Making 101” before showing how the slab casting press molds were made. Starting with a positive CAD design, the molds were designed to eliminate undercuts and allow for air infiltration since a plastic mold can’t suck the water out of the clay like a plaster one would. Some cookie clay cutters were also designed to help with the trickier bits of geometry. Once everything was printed, the molds were coated with cornstarch and clay was pressed in. After removal, any final details like handles can be added and the pieces are then fired as normal.

If you’d like to see some more 3D printing mixed up with ceramics, check out 3D printing glass with a laser, reliable ceramic slurry printing, or this TPU-based approach.

Continue reading “Slab Casting – A New Way To Combine 3D Printing And Ceramics”

Printing With Glass Fiber Filament

[ModBot] has been trying different engineering plastics for 3D printing. He recently looked at carbon fiber mixed with PET, but this time, he shows us his results with PET with glass fiber, or PET-GF. You can see how it all turned out in the video below.

The first part of the video compares the specifications, and, as you might expect, some factors are better for carbon fiber, and others are better for glass fibers. Once he gets to the printing, he covers the high temperatures needed (280-320C). He also talks about how either fiber will chew up nozzles and extruders.

Continue reading “Printing With Glass Fiber Filament”

Intentional Filament Stringing Helps Santa Soar

Stringing is when a 3D printer’s hot end moves through open air and drags a wisp of melted plastic along with it. This is normally undesirable, but has in the past been done intentionally to create some unconventional prints. Moonlight Santa from [3dprintbunny] shows considerable refinement in the technique, complete with color changes that really make the result pop.

Using a 3D printer’s stringing in a constructive way is something that has been leveraged really well. We remember seeing a lion with a fantastic mane by combining this method with a little post-processing and a blast from a heat gun. The technique has also been applied to make brush bristles (the printer strings filament across two handles, and after printing it is cut in half to make two brushes.)

This isn’t [3dprintbunny]’s first rodeo, either. We loved seeing her show what kind of objects were possible by using clever design, with no reliance on custom G-code or weird slicer tricks. The color changes by filament swaps really make this new one stand out.

Better 3D Printing Overhangs? Dive! Dive!

If you want better 3D-printed overhangs, you need better cooling, right? What would be better for cooling than printing submerged in water? It turns out [CPSdrone] tried it, and, at least for overhangs, it seems to work pretty well. Check it out in the video below.

Of course, there are some downsides. First, the parts of the 3D printer don’t want to work in water. The guys used deionized water to minimize water conductivity and also sealed open connections. Some components were replaced with equivalents that were less likely to corrode. However, the bearings in the stepper are still going to corrode at some point.

There’s no free lunch, though. Cooling is good for some parts of 3D printing. But for the hot parts, it could cool down too much. They encased the hot end in a large silicon block to help prevent this. They also potted the controller board, which works but makes future maintenance and upgrades painful. Initial tests looked promising.

Continue reading “Better 3D Printing Overhangs? Dive! Dive!”

Print Your Own Brain Lamp From MRI Data

MRIs generally fall somewhere on the scale from boring to stressful depending on why you’re having one and how claustrophobic you get. Regardless, they’re a wonderful diagnostic tool and they’ve saved thousands if not millions of lives over the years. In a fun use of the technology, [mandalaFractals] has shown us how to make a 3D-printed brain lamp using an MRI scan of the head.

The build starts with an off-the-shelf lamp base and a smart LED bulb as the light source, though you could swap those out as desired for something like a microcontroller, a USB power supply, and addressable LEDs if you were so inclined. The software package Slicer is then used to take an MRI brain scan and turn it into something that you can actually 3D print. It’ll take some cleaning up to remove artifacts and hollow it out, but it’s straightforward enough to get a decent brain model out of the data. Alternatively, you can use someone else’s if you don’t have your own scan. Then, all you have to do is print it in a couple of halves, and pop it on the lamp base, and you’re done!

It’s a pretty neat build. Who wouldn’t love telling their friends that their new brain lamp was an accurate representation of their own grey noodles, after all? It could be a fun gift next time Halloween rolls around, too!

Meanwhile, if you’ve got your own MRI hacks that you’ve been cooking up, don’t hesitate to let us know!