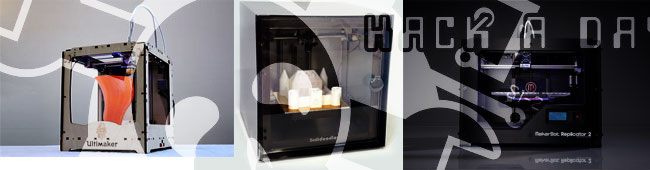
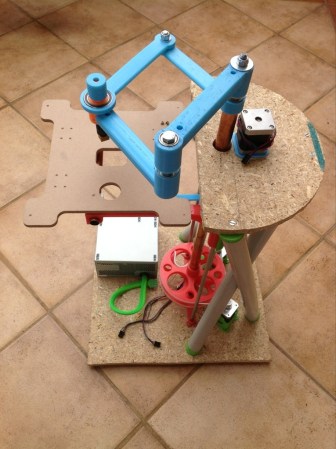
An Interview With The Creator Of Slic3r

[youtube=https://www.youtube.com/watch?v=vA6jmg_zcQo&w=580]

When in Rome, most people visit great works of art, see masterpieces of architecture, or simply try to convince random tourists that a modern recreation of naval battles in the Colosseum would be really cool and somebody should really get on that. [Andrew] had a different idea, though. He thought meeting up with Slic3r developer [Alessandro Ranellucci] would be just as educational and entertaining as visiting a basilica and thoughtfully decided to film his interview for all to see.

Whenever a file of a 3D object is sent to a 3D printer, the object must first be converted into GCode – the language of lines, circles, and computer aided design that all 3D printers speak. To convert 3D objects to GCode, every piece of 3D printer software from Pronterface, ReplicatorG, and Repetier must first ‘slice’ the file up so the object can be printed one layer at a time.

As the lead dev for Slic3r, [Alessandro], a.k.a. [Sound] goes over the current happenings of his STL to GCode converter – he’s even getting a little support from the very cool people at LulzBot – and the future of Slic3r. There’s still a lot of work to be done optimizing the current software, improving the user interface, and getting rid of all those nasty edge-case bugs.

For as much as we at Hackaday focus on the hardware half of 3D printers, it must be said the current state of the art in desktop manufacturing wouldn’t be where it is without [Alessandro] and other software devs. There’s still a lot of room for improvement – try printing a single wall thickness cylinder without a seam, for example – but without software projects like Slic3r, 3D printing wouldn’t be where it is today.

An Automat Of Wireless 3D Printers

vending

There’s a lot of really cool 3D printer stuff happening in the fashion district of NYC this month. It’s called 3DEA, and shows off  the awesomeness of Shapeways, Ultimaker, and the Up! 3D printer to all the fashionistas, trend setters, and the caliphate of coolness that is midtown Manhattan. The folks at Ultimaker wanted to bring something awesome to this exposition and came up with the Vendingwall: a wall of 3D printers connected into a vending machine able to print multiple objects at once.

Ultimaker has made a name for themselves as the top open source 3D printer manufacturer with absolutely impressive build quality and even a 20-foot-high printer able to manufacture entire rooms. The Vendingwall is their next step in the commercialization of 3D printers; all you need to do to create your own 3D printed object is walk up to the Vendingwall, order a print, and later retrieve from one of the many Ultimakers.

To control these ranks of Ultimakers, a piece of software runs on a wireless router loaded up with OpenWRT. From there, the router serves up a website powered by JQuery-mobile for all the Android and iDevices at the 3DEA open house, turning a wall of 3D printers into a vending machine reminiscent of the automats of yore.

Continue reading “An Automat Of Wireless 3D Printers”

Tutorial Designs 3D Printed Cases For Your Projects

[Landon Cox] recently finished up a 3-part tutorial on designing project enclosures for 3D printing. The series is great if you have not yet tried your hand at this realm of the 3D printing universe, but there’s a lot to take away about design and modeling even if you don’t plan to print your creations.

He starts off part one of the tutorial by explaining the need for 3D printed cases. He believes it’s the natural progression after you’ve made it far enough to have your own PCB manufactured. Why not add a well designed and fabricated case to compliment your meticulously laid out circuitry? In part two he gets the design ball rolling by modeling the top and bottom portions of the case seen above in blue. The final step is to design a face plate that matches the needs of your circuit; in this case it’s DB9 and RJ45 connectors.

It’s not all smooth sailing along the way. [Landon] does actually print the case and the faceplate is just a bit too big for the the rest of the enclosure. But better too big than too small as shaving away a bit of the edges fixes it right up.

[via Adafruit]

Simplifying Fabrication Of Soft Robots

Soft robots are a peculiar wing of technology. They don’t use frames and motors for locomotion, but as the name implies they are made of soft materials. They move by pumping fluid — it could be air or liquid — in and out of bladders that push or pull against the body itself. [Matthew] points out that fabricating soft robots has traditionally been a time-consuming and difficult task. He’s trying to make it easier by 3D printing molds into which soft robots can be cast. This way the parts can be designed in CAD, converted to a mold design, and pushed to a 3D printer.

The object with which he’s been testing the technique functions like an octopus tentacle. The image at the bottom left illustrates the internal structure, with rings separated to allow the appendage to flex, and tubes running parallel to the appendage to provide the force needed to bend it. Above that image you can see one of the molds that was used, and the final product is on the right. The video after the break shows a demonstration of this bending left and right as air is pumped in using the bulb of a blood pressure cuff (or Sphygmomanometer for those paying attention).

Continue reading “Simplifying Fabrication Of Soft Robots”

Making 3D Printing Easy At The Staples Copy Center

Mcor Technologies and Staples are teaming up to provide 3D printing services via the online Staples Office Center service.

This announcement comes from Mcor, the company behind the Iris 3D printer. Unlike just about every other 3D printer, the Iris doesn’t squirt plastic onto a bed or glue powder together – it makes its models out of sheets of paper. You probably won’t be ordering working steam engines or other heavy-duty engineering models from the Staples copy center, but this system does allow for high-quality full-color models to be created very, very easily. You can see a few examples of what the Mcor Iris can print after the break.

Unfortunately, unless you live in Belgium or The Netherlands, your local Staples won’t be installing a 3D printer in their copy center anytime soon. For those of us outside these countries, we’ll have to wait until services like Shapeways and Ponoko figure out how to make their business model include a brick and mortar presence.

Continue reading “Making 3D Printing Easy At The Staples Copy Center”

Printing Puzzles With Plastic Parts

A decade or so ago, a line of jigsaw puzzles called Puzz3D brought the joys of fitting pieces of cardboard together into three dimensions. If you’ve ever put one together, you’ll remember being slightly disappointed at these 3D puzzles – they were made of two-dimensional foam board and only lived up to their expectations on the vertices of their 3D objects. Now that just about every hackerspace in the land has a 3D printer, it might just be time to create better 3D puzzles, and [Rich Olson]’s OpenSCAD library is up to the task.

There are a few other tools that cut 3D models up into smaller objects, but none of these had the features [Rich] wanted. He created a library that is able to position the puzzle cuts anywhere on the X and Y axes, adjusts the kerf for a tighter or looser fit, and exports one piece at a time for 3D printers with a smaller build area.

Right now the library is limited to generating up to four interlocking pieces, but [Rich] says the code should be easy to modify for a truly absurd 500-piece puzzle of the Taj Mahal,

Conductive Filament Means Printable Sensors

The 3D printer world has the creation of plastic trinkets pretty much down pat. The next step, obviously, is the creation of multi-material models, whether they be made of two different colors of plastic, or completely different materials entirely. A few folks from the University of Warwick and GKN Aerospace in Bristol, UK have come up with a way of putting electronic sensors directly into 3D printed objects.

These new sensors rely on a conductive filament custom-made for this study. So far, the researchers have created flex sensors, capacitive buttons, and a ‘smart’ mug that can sense how much water is contained within.

To produce their ‘carbomorph’ filament, the researchers stirred regular old carbon black to a sample of polycaprolactone dissolved in a solvent. After shaking well, the mixture was laid out on a piece of glass for an hour resulting in a thin film that could then be rolled into a 3mm filament. While this is a great way of producing small quantities of carbomorph filament, we’re sure a few Hackaday readers can come up with an easier way of rolling their own conductive filament. Send us a link if you’ve figured out a better way.

Tip ‘o the hat to [Evan] for this one