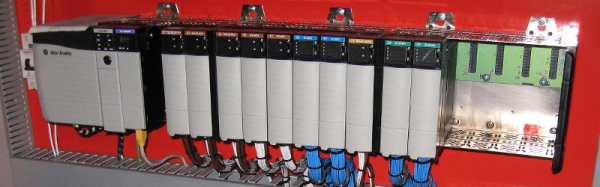
Arduino Development; There’s A Makefile For That

Hardware and software combined, Arduino does many things right. It lowers the entry level into embedded systems development with a nifty hardware abstraction layer. It aims for cross-platform compatibility by supporting Windows, Mac OSX, and Linux operation systems. It throws out the need for an external programmer to get you up-and-blinkin’ those LEDs quickly.

One thing most of us never cease to curse about, though, is the IDE. Many have cried out wildly against the Java-based text-editor for its cryptic compiling-and-linking process, its inability to accommodate bare C or C++ source files, and (shh!) its lack of Vim keybindings. Fortunately, our cries have been heard, and the like many community-based projects, the community fights back with a custom solution.

Calling all Grumpy Engineers: The Arduino-Makefile

Enter the Arduino Makefile.

What began as [Sudar’s] lightweight program to escape the IDE has become a fully-blown, feature rich Makefile that has evolved and adapted to grow with the changes of Arduino. With a community of 47 contributors, the Makefile enables you to escape from the IDE entirely by writing code in the cushy text editor of your choice and compiling with a simple incantation of make into your terminal, be you in Linux, Mac, or Windows.

Without further ado, let’s take a walking tour of the project’s highlights.

Continue reading “Arduino Development; There’s A Makefile For That”

KIM-1 Clock

Over on hackaday.io, [Arduino Enigma] posted the code for his clock that runs on a KIM Uno (the KIM-1 clone we mentioned late last year). Although the KIM Uno has a few demos preloaded (including Microchess and a scientific calculator), all of them take some interaction. The clock makes the KIM Uno a more dynamic desk display since it does something useful without any user interaction (once you set the clock, of course).

The project shows the code stored in ROM, but you can’t directly enter the program into ROM (which is really EEPROM on the host Arduino). The trick is to enter the address (that is press AD and then 0, 4, 0, 0) and then mash down the reset button for about a second. Then you can press DA and enter the hex codes provided (pressing + after each byte). Since the code is in nonvolatile storage, you can start it at any time by setting the time in RAM and executing the code at address 400.

Continue reading “KIM-1 Clock”

Sending The Internet From An LED Lightbulb

The number of things that can carry Internet traffic is always increasing. Now, you can add LED light bulbs to this list, as engineers in Disney Research have just demonstrated a system that transmits Internet traffic using an LED light bulb. This method of communication isn’t new: Visible Light Communication (VLC) has been demonstrated before by Disney and others, but this project puts it into a standard LED light bulb. This bulb has been modified to include an Atheros AR9331 SoC running OpenWRT and an Atmel ATmega328p that controls the LED elements and sensors that send and receive the data. So, the device is acting as a gateway between a WiFi network and a VLC one.

Disney’s new test system (PDF link) isn’t especially fast: it can only carry about 380 to 400 bits per second, so it won’t be streaming video anytime soon. That is definitely fast enough, though to send control data to a toy, or to send a continual stream of updated data to a device in the room, such as an ebook reader with a continually updated encyclopaedia. This being Disney, the authors coin a new phrase to end their paper: The Internet of Toys.

Demonstrating Baudot Code

Visualizing how electronic signals work can be difficult. A physical model can be darn useful in overcoming that difficulty. At a recent workshop entitled “Unboxing Black Boxes” [Julian Hespenheide’s] group created a device to show Baudot Code in operation. This amalgam of wood and Arduino they dubbed émile in honor of Émile Baudot (1845-1903).

Baudot developed his code to transmit telegraph signals from one machine to another, in contrast to Morse code which was principally for human communication. Both codes were used throughout the 20th century. For example, those big clattering, mechanical teletype machines use a minor variation of Baudot code.

Baudot is a fixed length code of 5 bits, as opposed to Morse’s variable length code. Morse has a separate code for each characters while Baudot uses “shift’ codes to change between alphabet and figure characters. For instance, a binary 11 would represent either an ‘A’ or a ‘-‘ depending on the shift state. If the shift code was missed the receiver would get gibberish.

In émile the Baudot code is sent by marbles. That’s right, marbles. There are five marbles, one for each bit in the Baudot code. Each marble rolls in a track toward the Arduino. How does the machine know which marbles to send? “Punch cards”! These are a marvelous aspect of the design.

Each card represents a code. Each position in the card has a gap to allow a marble to pass ( a set bit), or no gap to block the marble (an unset bit). The operator loads 5 marbles and a punch card and launches the marbles via a spring mechanism.

[Julian’s] really created a great visualization of Baudot code with this project! Take a look at émile in action after the break. Continue reading “Demonstrating Baudot Code”

School Of Friends Use Thought Control On A Shark

[Chip Audette] owns (at least) two gadgets: one of those remote control helium-filled flying shark (an Air Swimmer), and an OpenBCI EEG system that can read brain waves and feed the data to a PC. Given that information, it can hardly surprise you that [Chip] decided to control his flying fish with his brain.

Before you get too excited, you have to (like [Chip]) alter your expectations. While an EEG has a lot of information, your direct thoughts are (probably) not readable. However, certain actions create easily identifiable patterns in the EEG data. In particular, closing your eyes creates a strong 10Hz signal across the back of the head.

Continue reading “School Of Friends Use Thought Control On A Shark”

Air Rocket Launch Pad UI Entertains Eager Kids

Last spring [Mike] built a foam rocket launchpad which was a hit with the kids in his neighborhood. But the launch system was merely a couple of buttons so the early enthusiasm quickly wore off. He went back to the drawing board to make improvements and really hit the jackpot!

The original launch system had one button for building up air pressure with a second big red button of doom for launching the rocket. The problem was a complete lack of user feedback; all the kids could do is guess how long they needed to hold the button to achieve the highest launch. This revision adds flashing LEDs to hold the attention of the wee ones but to also function as a gauge for the new pressure control system. The visually fascinating control board also includes a removable key to prevent accidental launches.

The particulars of this are as you’d expect: it’s a bunch of plumbing to manage the air pressure, an Arduino to control it all, and additional electronics in between to make them work together.

We’re especially impressed by the leap in features and quality from the first version to this one. It’s a testament to the power of quick proofs-of-concept before committing to a more involved build. Great work [Mike]!

We’ve seen rocket launchers for adults and some neat mission control panels but [Mike’s] kid friendly launch controller really is out of this world (sorry, couldn’t resist). You’ll find a video demo of this launcher after the break.

Continue reading “Air Rocket Launch Pad UI Entertains Eager Kids”

Arduino Teaches Morse Code

You may wonder why anyone would want to learn Morse code. You don’t need it for a ham license anymore. There are, however, at least three reasons you might want to learn it anyway. First, some people actually enjoy it either for the nostalgia or the challenge of it. Another reason is that Morse code can often get through when other human-readable schemes fail. Morse code can be sent using low power, equipment built from simple materials or even using mirrors or flashlights. Finally, Morse code is a very simple way to do covert communications. If you know Morse code, you could privately talk to a concealed computer on just two I/O lines. We’ll let you imagine the uses for that.

In the old days, you usually learned Morse code from an experienced sender, by listening to the radio, or from an audio tape. The state of the art today employs a computer to randomly generate practice text. [M0TGN] wanted a device to generate practice code, so he built it around an Arduino. The device acts like an old commercial model, the Datong D70, although it can optionally accept an LCD screen, something the D70 didn’t have.

You can see the project in operation in the video below. Once you learn how to read Morse code, you might want to teach your Arduino to understand it, too. Or, you can check out some other Morse-based projects.

Continue reading “Arduino Teaches Morse Code”