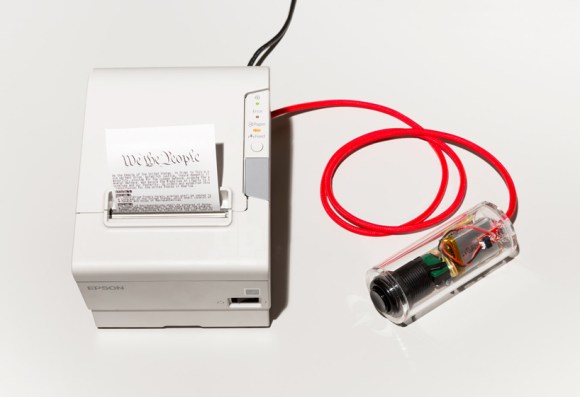
Autonomous Lighting With Intelligence

myra_light_01_29

Getting into home automation usually starts with lighting, like hacking your lights to automatically turn on when motion is detected, timer controls, or even tying everything into an app on your smart phone. [Ken] took things to a completely different level, by giving his lighting intelligence.

The system is called ‘Myra’, and it works by detecting what you’re doing in the room, and based on this, robotic lights will optimally adjust to the activity. For example, if you’re walking through the room, the system will attempt to illuminate your path as you walk. Other activities are detected as well, like reading a book, watching TV, or just standing still.

At the heart of the ‘Myra’ system is an RGBD Sensor (Microsoft Kinect/Asus Xtion). The space in the room is processed by a PC running an application to determine the current ‘activity’. Wireless robotic lights are strategically placed around the room; each with a 2-servo system and standalone Arduino. The PC sends out commands to each light with an angle for the two axis and the intensity of the light. The lights receive this command wirelessly via a 315MHz receiver, and the Arduino then ‘aims’ the beam according to the command.

This isn’t the first time we’ve seen [Ken’s] work; a couple of years ago we saw his extremely unique ‘real life’ weather display.  The ‘Myra’ system is still a work in progress, so we can’t wait to see how it all ends up.  Be sure to check out the video after the break for a demo of the system.

Continue reading “Autonomous Lighting With Intelligence”

The K9 Curfew Door

[Kenbob] is an awesome pet owner. He has two small dogs that have free access to the backyard through a doggy door. It’s great during the day, but they have to close it at night to stop the dogs from bothering the neighbors. So he decided to make an automatic curfew based doggy door!

Before setting out on his project, he determined some design goals that had to be met. Namely, he couldn’t have it lock the dogs outside by accident! The hack makes use of an old large format flat-bed scanner that had stopped working a while ago. As it so happened, this scanner had just enough carriage travel to be able to actuate a cover for the doggy door. After reinforcing the sliding cover, he hooked it up to an Arduino Nano, a RTC and a H-Bridge motor driver in order to control it.

In order to add scheduling ability and to program the door remotely, he has also hooked it into his existing x10 control infrastructure in his house — not too shabby! It also features a manual 3-position switch to lock it open, closed, or to leave it on automatic. The question is, can a raccoon get in?

He’s been testing it for a few weeks and it works quite well, although he admits it is not the most rugged solution — lucky for him, his dogs aren’t the type to run headfirst into things. Stick around after the break to see it in action.

Continue reading “The K9 Curfew Door”

Are We Not Indestructible? We Are Quiz Buttons!

In what we hope is a new trend in interviewing, some of the people at [Anthony]’s place of work asked him to make some wireless quiz buttons. He took the task quite seriously, making them extremely robust and low-power.

[Anthony] is experienced in the button arts, having made this party push button for a wedding reception. His design for the quiz buttons is a little different. Each button has an Arduino Pro mini and an nRF24L01 wireless RF module. On the receiver side is an Arduino Pro micro and an another RF module. A connected PC captures the serial data and  displays the pressed button’s ID. It also shows the order in which subsequent buttons were pressed and the time elapsed between them.

The really notable part of this build aside from the awesome laser-cut MDF Devo energy dome button housings is the extremely low power consumption of the transmitting Arduinos. [Anthony] has designed them to go into sleep mode which disables all on-board circuitry and only wakes on interrupt. He removed the power LED and the voltage regulator since they run on 2-AA batteries. The voltage regulator was drawing more than 25mA in sleep mode. Because of these mods, each button consumes < 1μA, which is less power than the batteries can self discharge over their lifetime.

[Thanks Jef]

How To Stop Grandma’s Wheelchair If She Goes Out Of RC Range

Okay, so he doesn’t have Grandma riding in it that we know of, but [zim] recently decided to turn a Jazzy mobility chair into “a radio-controlled platform for mischief”. RC offers more range than wifi or bluetooth, and he was able to find a reasonably priced secondhand radio on Craigslist. However, he found out that in the event of signal loss, the receiver keeps sending the last commands to the speed controller. [zim] didn’t want his 150 lb (68kg) mischief platform getting loose, so he devised a fail-safe that cuts power to the motor when the signal is lost.

[zim] discovered that the receiver returns channel 3 (the throttle) to a preset condition whenever the signal is lost. He used a 24V HVAC relay controlled by an Arduino Nano to sample the PW on channel 3 and shut it off when either the throttle or the signal are cut.

If Grandma is feisty, you could build this caged-in version with a shopping cart.

Continue reading “How To Stop Grandma’s Wheelchair If She Goes Out Of RC Range”

DIY Curved Display Makes Use Of Cool Thermochromic Properties

flexible screen

[Marin Davide] was on a mission. A mission to build his own curved display screen, using an Arduino, nichrome wire, and thermochromic liquid crystal ink.

The prototype he’s designed uses a sheet of plastic coated in thermochromic ink, curved on an MDF frame. This particular thermochromic ink turns bright blue when heated to around 27°C.

To display digits, he’s created tiny segments of the 7-segment display by wrapping the nichrome wire around pieces of cardboard, which then have been glued to the back of the display. Each of these is controlled separately from his Arduino Mega. He muses that you could also make a rudimentary dot matrix display with this — it would be interesting to see what kind of resolution you could obtain!

To see more photos check out the original DesignNews post linked above. We’re not sure why the bulk of the details are only available in this PDF. If we’re just missing a direct link to the original project page let us know in the comments and we’ll update the post.

Interested in more thermochromic black magic? How about these awesome temperature sensitive photos? Or what about a digital clock face, illuminated by heating resistors?

HackPhx Winter 2014 Hackathon Winners

HackPhx 2014

The HackPhx Winter 2014 hackathon was held at Heatsync Labs hackerspace in Mesa, Arizona, USA. The advertised theme was “Arduino Wearables”. Participating attendees were randomly placed on teams evenly distributed by their disclosed skills across all teams. There were 10 teams with 4 to 5 members per team competing for two winning spots.

Each team had to build an amazing wearable project utilizing the secret ingredient which was Seedstudio’s Arduino-compatible Xadow wearable platform and add-ons. The Xadow is similar to the Arduino Leonardo and participants used an Arduino cross compatibility and pin mapping chart to assist in development.

Top prize was the Judges’ prizes for the best completed and documented Xadow wearable team project. The second prize was the Jury’s prize given to the team project that the other teams liked the most regardless of event criteria.

Read more about the winning teams and watch their presentations after the break.

Continue reading “HackPhx Winter 2014 Hackathon Winners”

All-Terrain RC Car Has More Torque Than Your Grandpa’s Wheelchair

20131225_123421

[Charles] and his brother have been members of their school’s FIRST robotics team for many years, and using some of the knowledge they acquired during it, they have put together this awesome all-terrain, super over-powered, RC car — and soon to be robot.

It’s built like a tank using 1″ square steel tubing and custom corner brackets made of 1/8″ thick steel. Heavy duty U-bolts hold the over-sized 5/8″ axles, and everything is driven using #35 roller chain. A large 12V sealed lead acid battery powers two CIMs (FIRST Robotics motor) with the AndyMark CIMple gearbox — these give the car tons of torque, and it can even do wheelies!

The really cool part of this project is the method of remote control. He’s using a regular old Xbox controller that an Arduino Uno listens to through a USB host shield and the original Xbox USB receiver. Simple, but totally effective.

The project is not yet complete, and he’s planning on fully equipping it with lights, a larger battery, a roll-cage, a camera system, and some kind of manipulator tool. Check out the test drive video after the break!

Continue reading “All-Terrain RC Car Has More Torque Than Your Grandpa’s Wheelchair”