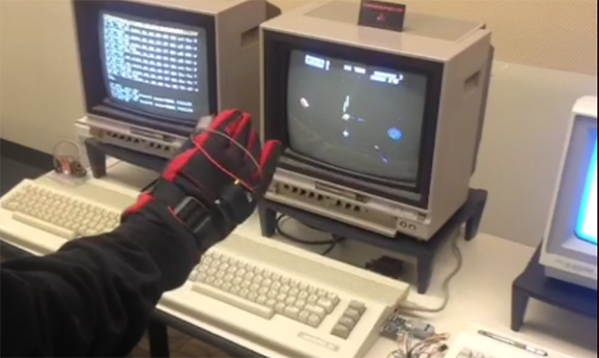
Stopping A Hackerspace From Rusting Away

steel

The illutron hackerspace in Copenhagen makes their home on a barge sitting in port. Not only is this awesome, but the members of the hackerspace also worry about corrosion to their beloved fablab. In an effort to ally some fears about rust slowly eating through the hull, [Dzl] has rigged up a cathodic protection system for their hull, essentially preserving their barge at the expense of a few old steel rails.

Cathodic protection systems are able to protect the steel of a ship’s hull by offering up a sacrificial anode made of aluminum or zinc. This can be done by either attaching a sacrificial anode directly to the hull, or with a more complex system that connects both the cathode (the ship) and the anode (an engine block) to a DC power source.

[Dzl] is converting mains voltage down to 12 VDC, then further lowering the voltage with an Arduino-controlled buck converter. The control panel allows for adjustments in the voltage, as well as a nice uptime meter to make sure it’s running.

The results are fairly impressive; in the above pic, the right piece of steel was electrically connected to the barge’s hull, while the left piece was free to rust in the North Sea. That’s only two days worth of corrosion there.

The Difference Between Bitcrushers And Sample Rate Reducers

bit

If you look around a few electronic music forums, you’ll see a lot of confusion over the difference between a bitcrusher – a filter that reduces the bit depth of an audio signal – and a sample rate reducer – a filter that does exactly what its name implies. With the popularization of 8-bit and retro synth music, this difference is obviously of grave import of concern to saints and kings alike. [Michael] is more than happy to walk us through the difference with real-time sample and bit rate adjustment with his audio hacker board.

The audio hacker board is an Arduino shield with a 12-bit DAC and a 12-bit ADC. With two 1/8″ jacks and a pair of pots, [Michael] was easily able to whip up a sketch that is able to adjust the sample rate and bit depth of an audio signal in real-time.

Contrary to nearly everyone’s opinion of what ‘8-bit’ music is, it’s actually the sample rate that makes music sound like a cassette deck jury rigged into a Nintendo Entertainment System. Reducing the bitrate just makes any audio source sound louder and worse.

Check out the excellent demo video of the effect of bitcrushers and sample rate reducers below.

Continue reading “The Difference Between Bitcrushers And Sample Rate Reducers”

Browsing The Web One Step At A Time

After modifying his new manual treadmill to fit under his standing desk, [Brian Peiris] found a way to let him stroll all over the internet.

After removing the treadmill’s original time/distance display, [Peiris] reverse engineered the speed sensor to send data to an Arduino and his PC.  We’ve seen a number of projects that interface treadmills with virtual worlds, but what really makes this project stand out is a simple script using the Throxy Python library which allows the treadmill to throttle his machine’s internet connection.

The end result is a browsing experience that reacts to how fast the user runs.  In the demonstration video, you can see Peiris tiptoe through images or jog through YouTube videos.  A minimum bandwidth setting keeps the connection live, so if you can’t make it all the way through that HD Netflix movie, taking a breather won’t time out the connection.

It’s certainly a great way to get in shape, or at the very least, it’ll make your ISP’s bandwidth cap feel a lot bigger.

Video after the jump.

Continue reading “Browsing The Web One Step At A Time”

TightLight: A 3D Projection Mapping Assistant

tightLight

Anyone can grab a projector, plug it in, and fire a movie at the wall. If, however, you want to add some depth to your work–both metaphorical and physical–you’d better start projection mapping. Intricate surfaces like these slabs of styrofoam are excellent candidates for a stunning display, but not without introducing additional complexity to your setup. [Grady] hopes to alleviate some tedium with the TightLight (Warning: “music”).

The video shows the entire mapping process of which the Arduino plays a specific role toward the end. Before tackling any projector calibration, [Grady] needs an accurate 3D model of the projection surface, and boy does it look complicated. Good thing he has a NextEngine 3D laser scanner, which you’ll see lighting the surface red as it cruises along.

Enter the TightLight: essentially 20 CdS photocells hooked up to a Duemilanove, each of which is placed at a previously-marked point on the 3D surface. A quick calibration scan scrolls light from the projector across the X then Y axis, hitting each sensor to determine its exact position. [Grady] then merges the photocell location data with the earlier 3D model using the TouchDesigner platform, and bam: everything lines up and plays nice.

Twitter Knitter Combines 40 Year Old Hardware With Modern Social Media

When presented with a vintage Empisal Knitmaster knitting machine, members of the TOG Dublin Hackerspace worked together to not only bring it back from the dead but to also add some custom hardware that allows for computer generated patterns.

At first the Knitmaster was in fairly bad shape requiring a few custom machined parts just to function.  It was originally designed to feed in special punch cards that mechanically directed the many moving parts of the machine (called “dibblers”) to knit patterns in yarn.  Using an Arduino, a number of servos, and a microswitch to detect when the knitting carriage is pulled across, this card-read system was replaced with a computer controlled mechanism that can direct the machine to print out images one row at a time.

Of course, you don’t get too many opportunities to name your project something as cute as “The Twitter Knitter”, so once the system was working, it was only a matter of writing some code to snatch tweets from the web and generate images out of the text.  Visitors of the Dublin Mini Maker Faire got to watch it in action as they posted tweets with a particular hashtag which the machine happily printed in yarn (as long as they weren’t too long).

Video demo after the jump.

Continue reading “Twitter Knitter Combines 40 Year Old Hardware With Modern Social Media”

Building An Entire Pinball Machine From Just The Playfield

It all started  when [Iancole] bought a Fireball Home edition playfield on some famous auction website for $135. Originally, he had the intent of lighting the lamps with an Arduino, framing it, and hanging it on the wall of his office — which often happens with old pinball parts. But then his boys asked if he “could make it play”.

[Iancole] managed to find the pinball schematics online and started designing the electronics required by the many LEDs, solenoids and switches. As the LEDs and switches are on the same matrix, he chose a simple Arduino to cycle through them, giving the player the impression that the lights are constantly on. [Iancole] originally planned on using his raspberry Pi to control the solenoids, but he later switched to another Arduino because of the precise timing required.

Therefore, his Pi was used as the heart of the machine. It is interfaced to the two Arduinos to read states and send commands while running the game program, displaying HD graphics on a 24″ screen, playing music and game event sounds. All the electronics are proudly displayed on the backbox, and many developments are planned for it. Also, the machine will be on display at the Orlando Mini Maker Faire on October 5th!

Rescuing An SD Card With An Arduino

A few days ago, one of [Severin]’s SD cards died on him, Instead of trashing the card, he decided to investigate what was actually wrong with the card and ended up recovering most of the data using an Arduino and an immense amount of cleverness.

SD cards can be accessed with two modes. The first is the SDIO mode, which is what cameras, laptops, and other card readers use. The second mode is SPI mode. SPI is slower, but much, much simpler. It turned out the SDIO mode on [Severin]’s card was broken, but accessing it with an Arduino and SPI mode worked. There was finally hope to get files off this damaged card.

[Severin] used a few sketches to dump the data on the SD card to his computer. The first looked at the file system and grabbed a list of files contained on the card. The second iterated over the file system and output all the files in hex over the serial port. With a bit of Python, [Severin] was able to reconstruct a few files that were previously lost forever.

Even though the SD card was completely inaccessible with a normal card reader, [Severin] was able to get a few files off the card. All the sketches and Python scripts are available on the Githubs, ready to recover files from your broken SD cards.