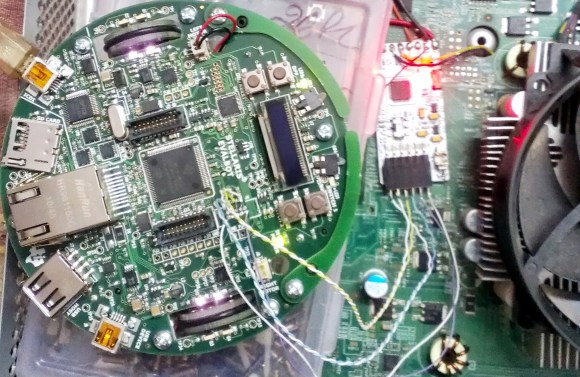
Controlling A Railroad With An Mbed

rr

The word hacking got its start with model railway clubs, and the state of the art belies the current advancements in computer control and very, very small microcontrollers. [Jim] put together a great tutorial for driving model locomotives with a microcontroller, in this case an ARM-powered mbed.

Low-end model locomotives are controlled with DC, so an H-bridge and a PWM out on the mbed makes sense to drive these trains. [Jim] wired up a Pololu H-bridge driver, connected it to his mbed, and everything ran great.

Rail switches are another matter entirely. These allow trains to move from one track to another, but having them go to the left or right requires powering a fairly high current solenoid with 15 to 24 volts. For this, [Jim] used a MOSFET power control board to switch the rails and came up with a pretty neat demo that shows a small locomotive going back and forth over a single rail switch.

There is another class of model locomotive – ones with Digital Command Control. This setup is just a small decoder chip that fits inside an engine and tells the locomotive to turn on a lamp or run a motor digitally, allowing the conductor to control multiple trains on the same track.

[Jim] goes through the basics of DCC using the mbed, allowing two trains to switch positions in a rail yard using computer control. It’s really cool stuff that leaves us wanting a little more room in the basement to start building a huge computer controlled model railway.

Continue reading “Controlling A Railroad With An Mbed”

Wireless Marble Labyrinth Uses TI Dev Hardware

wireless-marble-labrinth-using-ti-dev-hardware

There’s so much affordable dev hardware out there these days that you can do a lot without even touching a soldering iron. This is a prime example. Texas Instruments software Engineer [Jordan Wills] recently completed this wirelessly controlled marble labyrinth.

Marble mazes like this are a popular targets for electronic tinkering. We’ve seen smartphones used as the controller, and others that dispense chocolate candy. This time around [Jordan] stuck with the store-bought game to simplify the build. A coworker helped by swapping the two control knobs with servo motors. These interface with a Stellaris Launchpad that has a SensorHub booster pack (shield) and CC2533 radio transceiver module. The same hardware makes up the remote unit as well. This turns the remote into an air mouse by reading the gyroscope, accelerometer, and magnetometer from the booster pack.

He doesn’t specifically mention it in his project log, but we think the magnetometer is used to sync orientation between the base unit and the user remote. Even though the board for the base unit is mounted at 90 degrees compared to how you hold the remote, you should still be able to adjust for the readings in code, right?

Continue reading “Wireless Marble Labyrinth Uses TI Dev Hardware”

How To Use The Kenetis KL25Z Freedom Board As An HID Mouse

[Eric] is interested in turning this Freedom development board into an air mouse by using the onboard accelerometer. But he had to work through the particulars of the USB HID mouse class before he could get that done.

This Freescale FRDM-KL25Z is one of the awesome ARM boards we looked at a year ago. Can you believe you can get this thing for like thirteen bucks? We suppose the gotcha is that the CodeWarrior IDE meant for use with them is not entirely free. But there is a free trial, and [Eric] shows how much easier it is to tailor the USB stack for your needs with it.

Don’t worry though. If you’re like us and use Open Source For The Win he’s got you covered as well. When you’re done reading his HID mouse writeup head on over to his six-part tutorial for building a free toolchain for the Kenetis boards.

LED Strip Cape Drives Kilometers Worth Of LEDs

led-strip-cape

[Hudson] is looking to drive a lot of LEDs. A driver that effectively addresses kilometers worth of LED strips isn’t an easy thing to come by. So he’s in the process of designing his own BeagleBone Cape to do the work. Above you can see the board layout he’s working with. Notice the set of repeating red footprints in the center? Those are pads for 32 RS485 connectors!

Of course this is all in preparation for Burning Man where the mantra seems to be: he who has the most LEDs wins. Well, unless you’re the sort that likes to work with flames. But we digress. The scaling problem that [Hudson] is dealing with hinges around his desire not to include ridiculous numbers microcontrollers and the need to beef up the 3.3V logic levels of the BeagleBone to travel further on the data bus of the strips. By leveraging the RS485 protocol — which is designed to carry data over long distances — he can get away with a single processing unit by adding an RS485 translator at each remote strip connector. He plans to use the BeagleBone’s Programmable Realtime Units feature to address the eight drivers on the cape. But first he has to solve what looks like a doozy of a trace routing problem

[Sprite_TM] OHM2013 Talk: Hacking Hard Drive Controller Chips

Even if he hadn’t done any firmware hacking on this hard drive [Sprite_TM’s] digital exploration of the controller is fascinating. He gave a talk at this year’s Observe, Hack, Make (OHM2013) — a non-commercial community run event in the Netherlands and we can’t wait for the video. But all the information on how he hacked into the three-core controller chip is included in his write up.

[Sprite_TM] mentions that you’re not going to find datasheets for the controllers on these drives. He got his foot in the door after finding a JTAG pinout mentioned on a forum post. The image above shows his JTAG hardware which he’s controlling with OpenOCD. This led him to discover that there are three cores inside the controller, each used for a different purpose. The difference between [Sprite_TM’s] work and that of mere mortals is that he has a knack for drawing surprisingly accurate conclusions from meager clues. To see what we mean check out the memory map for the second core which he posted on page 3 of his article.

Using JTAG he was able to inject a jump into the code (along with a filler word to keep the checksum valid) and run his own code. To begin the firmware hacking portion of the project he pulled the flash ROM off of the board and installed it on that little board sticking out on the left. This made it easy for him to backup and reflash the chip. Eventually this let him pull off the same proof of concept as a firmware-only hack (no JTAG necessary). He goes onto detail how an attacker who has root access could flash hacked firmware which compromises data without any indication to they system admin or user. But we also like his suggestion that you should try this out on your broken hard drives to see if you can reuse the controllers for embedded projects. That idea is a ton a fun!

When we were poking around the OHM2013 website (linked above) we noticed that the tickets are sold out; good for them! But if you were still able to buy them they take Bitcoin as one payment option. Are there any other conferences that allow Bitcoin for registration?

BeagleBone SensorCape Lets You Measure Just About Anything

beaglebone-sensor-cape

Here’s another entry in the 2013 Intern Design Challenge which motivates summer Interns at Texas Instruments to build something cool for one of a handful of embedded platforms. This entry, developed by [Michael Leonard] is a cape for the BeagleBone Black which has footprints for a bunch of different sensors.

Use it to turn your BeagleBone into a weather station by populating the temperature, pressure, and humidity sensors. Or perhaps you’d prefer an IMU for your next quadcopter by populating the MPU-9150 chip on the pad labeled ‘9-Axis’. This part is an accelerometer, gyroscope, and digital compass all in one. There’s also room for a light sensor and an IR remote control receiver, with the large square pads on the right servung as breakouts for input buttons. If you want all the nitty-gritty on the sensors he designed for [Michael’s] done a great job of compiling a reference manual for the board.

[Michael] didn’t send us a link until he saw the retro-gaming cape we featured on Tuesday. Come on people! Don’t hide in the basement and build stuff unless you’re going to tell us about it.

Continue reading “BeagleBone SensorCape Lets You Measure Just About Anything”

How To Use CoIDE With LPCXpresso Board

lpcxpresso-coocox

[James Lynch] picked up an LPCXpresso board because he wanted play around with ARM processors. The board, which is shown on the right, provides everything you need to get started. It even ships with a free IDE. But unfortunately the free version of that Code Red IDE is size limited. If he wanted to remove the restriction he would have to pony up $999 for a licensed version. A company might not think twice about this payment, but in the hobby realm that’s simply out of the question. Instead, [James] figured out how to use the CooCox programmer with the LPCXpresso hardware. To get at his 59-page guide on the process follow that link and hit the “Download Zip” button in the lower right for a copy of the PDF file.

The hack comes in two parts. First you need to alter the LPCXpresso board. There is a center line that separates the dev board form the debugger/programmer. These are connected with solder bridges between rows of a dual pin-header. [James] removed the bridges and added said pin header. This allows him to jumper the connections and use it as normal, or attach it to his CooCox programmer as seen above. The second part of the project walks through the process of getting the free CoIDE (also based on Eclipse) to compile and program code for the LPCXpresso.

We’ve seen this dev board here and there, notably in an oscilloscope build.