Equal parts art project and social media experiment, with a dash of backyard hackery “robotics” thrown in for good measure, hitchBot was an experiment in the kindness of strangers. That is, the kindness of strangers toward a beer bucket filled with a bunch of electronics with a cute LED smiley face.
The experiment came to a tragic end (vandalism, naturally) in Philadelphia PA, after travelling a month across Canada, ten days in Germany, and yet another month across the Netherlands. It survived two weeks in the USA, which is more than the cynics would have guessed, but a few Grand Canyons short of the American Dream.
Professors [David Smith] and [Frauke Zeller] built hitchBot to see how far cuteness and social media buzz could go. [Smith], a former hitchhiker himself, also wanted hitchBot to be a commentary on how society’s attitudes toward hitching and public trust have changed since the 70s. Would people would pick it up on the side of the street, plug it in to their own cigarette lighters, and maybe even take it to a baseball game? Judging by hitchBot’s Twitter feed, the answer was yes. And for that, little bucket, we salute you!
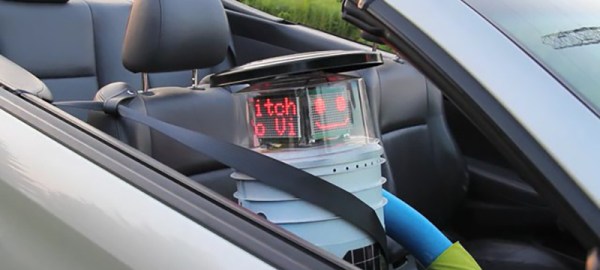
But this is Hackaday, and we don’t pull punches, even for the recently deceased. It’s not clear how much “bot” there was in hitchBot. It looks like it had a GPS, batteries, and a solar cell. We can’t tell if it took its own pictures, but the photos on Twitter seem to be from another perspective. It had enough brains inside to read out Wikipedia entries and do some rudimentary voice recognition tasks, so it was a step up from Tweenbots but was still reassuringly non-Terminator.
Instead, hitchBot had more digital marketing mavens and social media savants on its payroll than [Miley Cyrus] and got tons of press coverage, which seems to have been part of the point from the very start. And by writing this blog post, we’re playing right into [Smith] and [Zeller]’s plan. If you make a robot / art project cute enough to win the hearts of many, they might just rebuild it. [Margaret Atwood] has even suggested on Twitter that people might crowdfund-up a hitchBot 2.0.
Our suggestion? Open-source the build plans, and let thousands of hitchBots take its place.