Build Your Own Stand Alone Web Radio

If you’re the type who enjoys passing idle time by keeping up with podcasts or listening to web stations but don’t always want to occupy your laptop or tablet, this Arduino based radio player will provide a base station for tunes.

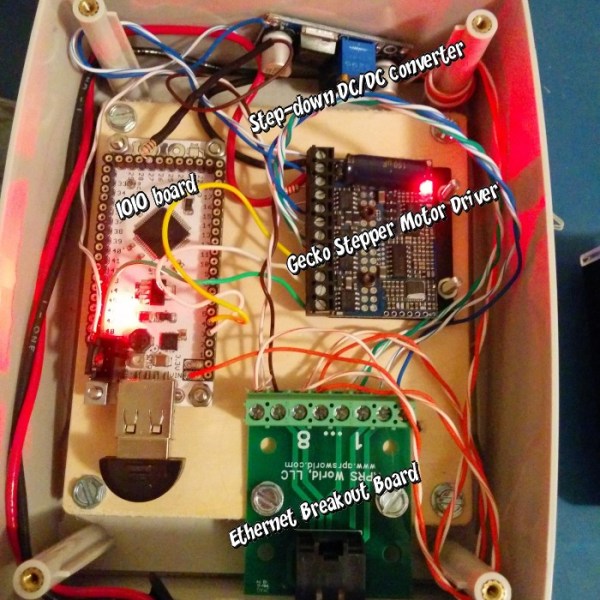
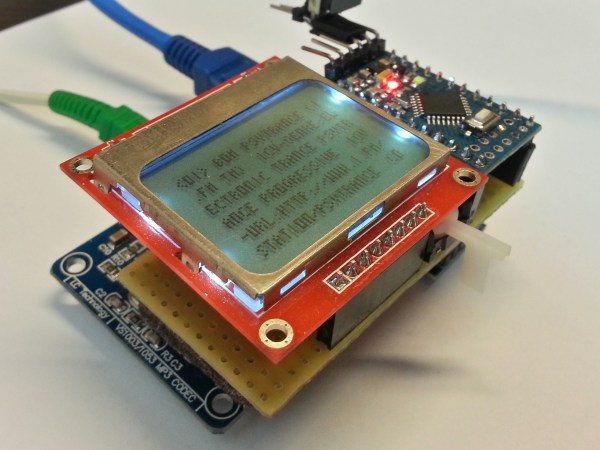
The Web Radio project by [Vassilis Serasidis] outlines in a pleasing amount of detail exactly how to wire up a short list of four modules. These including an Ethernet shield, LCD screen, MP3 decoder, and USB serial converter, with an Arduino Mini in order to bookmark and play fourteen of your favorite channels. His hand-soldered board couples everything into one neatly stacked package. The instructional video shows this off and he even explains how to locate your favorite stations on internet-radio.com and copy their port and IP number directly into an example sketch which is provided for use. If you’ve been wanting to build a self contained radio node for your desk free of extra baggage, this is a no-sweat project for both the hardware savvy and those more oriented with code writing.

If you’re going to build your own radio, it’s always cool to disguise your high-tech creation as something more rustic. Check out this project by [Dominic Buchstaller] for a great example of a vintage radio given a second calling.

Continue reading “Build Your Own Stand Alone Web Radio”

Mutant Kitchen TV Computer

In need of a kitchen entertainment system, [BoaSoft] headed to the parts bin and produced a project that can easily be called a mutant. That being said, we love the results!

Here’s the link to the original Russian language post. If your Russian is a bit rusty here’s a really awful machine translation. So let’s see if we can decipher this hack.

Sounds like [BoaSoft] had a broken Acer laptop on hand. Problem was the laptop can’t play over-the-air television (and similarly, a television can’t surf the net). The solution was to figure out how to utilized a TV tuner of unknown origin, combine that with the laptop and a computer monitor, then add back all the user interface you’d expect from an entertainment device.

The board shown in the first post of the thread is familiar to us. It seems to be based on the IgorPlug board which is a hack that goes waaaay back. This allows for the use of an IR media center remote and those input signals are easy to map to functions. The computer runs Windows Media Center which is already optimized for remote control but can use a wireless keyboard and mouse when more computer-centric functions are necessary.

With all on track the rest of the hack deals with hacking together a case. The laptop’s original body was ditched for some extended sides for the back of the monitor. [BoaSoft] did a great job of installing all the necessary ports in these extensions. Once in the kitchen everything is nice and neat and should stand the test of time.

[Thanks Dmitry]

Breadboard Circuit of a Funduino, a DS18B20 Temperature Sensor, and an ESP8266 module.

Keep An Eye On Your Fermenting Beer With BrewMonitor

The art of brewing beer is as old as civilization itself. Many people enjoy brewing their own beer at home. Numerous steps must be taken before you can take a swig, but fermentation is one of the most critical. [Martin Kennedy] took up the hobby with his friends, and wanted a convenient way to monitor the fermentation temperature remotely. He started working on the BrewMonitor, a cloud-based homebrewing controller powered by an Arduino clone.

His goal was to create something cheap, convenient, and easy to set up. Traditional fermentation monitoring equipment is very expensive. The typical open-source alternative will set you back 80 euros (roughly $101), using the Arduino-sensor with a Raspberry Pi gateway via the BrewPi webserver. [Martin] did not want to go through the hassle of viewing BrewPi remotely, since it requires a home network and all of the configuration that would entail. Instead, he coupled an Arduino clone with a DS18B20 temperature sensor while using an ESP8266 module for wireless communication, all for less than 18 euros ($23). This connects to a simple webpage based on Scotch.io with a PHP backend (Laravel with RESTful API), a MySQL database, and an AngularJS frontend to display the graph. Once the sensor is placed into the fermenter bucket’s thermowell, the temperature is transmitted once a minute to the REST API. You can see the temperature over time (in Celsius). The design files are available on GitHub.

[Martin] would like to expand the functionality of BrewMonitor, such as adding the ability to adjust the temperature remotely by controlling a heater or fridge, and lowering its cost by single boarding it. Since the information is stored on the cloud, upgrading the system is much easier than using a separate gateway device. He doesn’t rule out crowdfunding campaigns for the future. We would like to see this developed further, since different yeast species and beer styles require very stringent conditions, especially during the weeks-long fermentation process; a 5-degree Celsius difference can ruin an entire brew! Cloud-based temperature adjustment seems like the next big goal for BrewMonitor. DIY brewers salute you, [Martin]!

[via Dangerous Prototypes]


Toaster Oven Reflow Controllers

With a lot of people who are suddenly too cool for through hole and of course the a few generations of components that are only available in SMD packages, it’s no surprise the humble toaster oven has become one of the mainstays of electronic prototyping. You’re gonna need a controller to ramp up those temperatures, so here are two that do the job quite nicely.

[Nathan]’s Zallus Oven Controller is a bit different than other reflow controllers we’ve seen on Kickstarter. He’s offering three versions, two with different sized touch screen displays, and one that is controlled with a PC and push buttons. The display for these is beautiful, and of course you can program your own temperature profiles.

If Kickstarter isn’t your thing, [Dirk] created his own reflow controller. Like the Zallus, this has a graphical display, but its homebrew lineage means it should be simpler to maintain. It uses a K-type thermocouple, and unlike every other reflow controller we’ve ever seen, [Dirk] is actually checking the accuracy of his temperature probe.

No, reflow oven controllers aren’t new, and they aren’t very exciting. They are, however, tools to build much cooler stuff, and a great addition to any lab.

PCB Drill Microscope

PCB Drill Press Gets A Microscopic Upgrade

If you get into more complicated PCB design, you’ll find the need to drill tiny and accurate holes much more often. Wouldn’t it be nice to have a precise way of doing that? Maybe even something as simple as strapping a $10 USB digital microscope to it?

That was [mlerman’s] thought anyway, and from the looks of it, it seems to work quite well! If you already have a PCB drill press then it’s just a matter of installing the microscope opposite the drill — align it to the center point with some cross hairs and boom you’re in business.

But if you don’t yet have a PCB drill, [mlerman’s] got you covered there too, as he explains in great detail how to modify a cheap drill press into an inverted PCB drill press.

Inverted PCB Drill Press

Wait, why is it inverted? Besides making more room for the USB microscope to sit, it also ensures the microscope lens doesn’t get covered in the PCB fairy dust that would fall on it if it were in a normal orientation.

[via Embedded-Lab]

Hackaday 10th Anniversary: Wrap-up

A little more than a month ago we saw the 10 year anniversary of the first Hackaday post ever, and last week we had a little get together in Pasadena to celebrate the occasion. Everyone had a great time, building tiny line-following robots and LiPo chargers, listening to some great talks, and in the evening we all had a lot of fun emptying some kegs. We couldn’t ask for a better crowd, and we thank everyone who came (and those of you who watched everything on the livestream) for participating.

As far as specific people go, we need to thank [charliex], [arko] and everyone else from Null Space Labs for helping out with the weird rotary encoder two-player version of Duck Hunt. The folks from Crashspace were also there, helping out and lending a steady hand and hot soldering iron during the workshops. Shoutouts also go to [datagram] and [jon king] for running the lockpicking workshop, and [Todd Black] deserves a mention for his lithium battery charger workshop. All the speakers deserve to be mentioned again, and you can check out a playlist of their talks below:

Continue reading “Hackaday 10th Anniversary: Wrap-up”

camera dolly

Timelapse Photography On An Android-Powered Dolly

If you’re heading off on a trip to Alaska, you need to make sure you have plenty of supplies on hand for the wilderness that awaits. If you’re [Bryce], that supply list includes some interesting photography equipment, including a camera dolly that he made to take time-lapse video of the fantastic scenery.

On the hardware side, the dolly carries the camera on a rail that is set up on a slant. The camera starts on one side and moves up and towards the otherside which creates a unique effect in the time-lapse. The rig is driven by a stepper motor, and rides on some pretty fancy bearings. The two cameras [Bryce] plans to use are a Canon T2i and a EOS-M which sit on the top from a tripod.

The software and electronics side is interesting as well. Instead of the usual Arduino, [Bryce] opted for controlling the rig through Android and a IOIO board. This gives the project a lot of options for communications, including Bluetooth. The whole thing is powered by a 19V battery pack. If you’re looking for something a little simpler, you might want to check out the egg timer for time lapse! Check out the video of [Bryce]’s rig in action after the break.

Continue reading “Timelapse Photography On An Android-Powered Dolly”