Prototyping A Bluetooth To IR Remote Control Translator

[James] is one of those guys on a quest to control everything with one device. His tool of choice is an Android phone, which can do quite a lot right out of the box. But he was never satisfied with its lack of IR remote control abilities. He fixed that feature-gap by building a Bluetooth to Infrared translator.

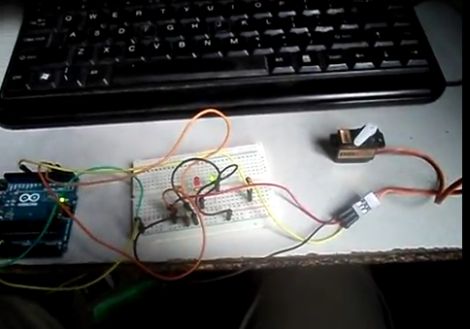
The hardware he used for the prototype is quite simple. A cheap serial Bluetooth modem from eBay lets him connect to his phone. An Arduino board listens for data from the modem and converts incoming commands to flashes on an IR LED. Voila, he can control the tube with his phone.

We love the potential of this hack. The Bluetooth module runs from 3.3V, and reading serial data and flashing an LED is extremely simple. You should be able to use a small uC, say an ATtiny13, and a 3.3V regulator to miniaturize the module. We could see this plugging into the USB port on the back of a TV for power, with a wire extension to put the LED into position. The only shortfall is the inability to turn the TV on remotely when drawing power this way.

Remote codes aren’t particularly large to store either. So this would be pretty easy to extend to full control of all IR-compatible home entertainment devices. You just need a tool to discover the remote control codes.

Continue reading “Prototyping A Bluetooth To IR Remote Control Translator”

Bluetooth Communications For Android Devices Via Processing

[Oscar] shows us how to use a Processing sketch for Android to communicate with Bluetooth devices (translated). It turns out this is easier than you might think. Processing and Android are both closely related to Java, and you can just import the Android libraries that deal with Bluetooth within the Processing sketch. That makes it easy to enable the Bluetooth modem when the sketch is launched, and manages connecting with devices as well as sending and receiving data.

For this example [Oscar] is using an Arduino with a Bluetooth module as a test device. His sketch first shows what devices are available, then connects to the one you select from the list. The 11 lines of Arduino code transmit a value via the serial port, and listens back for a command to toggle the LED on pin 13. [Oscar] takes time in his tutorial to show us how each step of the Processing sketch is assembled, instead of only posting the finished code.

[Thanks Sara]

SNES Gamepad Coversion To USB

[Kekszumquadrat] wanted to use a classic controller to play emulator games on his Android tablet so he set out to convert an SNES gamepad to connect via USB. He found an old USB keyboard at a yard sale for about 3 Euros. He knew that the emulator he prefers has the option of remapping all the inputs to keyboard keys which means a USB keyboard has all of the electronics he would need to pull this off.

Once he had separated the keyboard circuitry from the case [Kekszumquadrat] plugged it into his Linux box and used Xev to establish how the keyboard matrix is set up. Xev is a common package that opens up an active window on the X desktop. When run from command line, any events that happen to the window will be echoed along with verbose data about that event. When it comes to keypresses, you’ll get the keycode you need. He simply shorted columns and rows until he found the desired mapping, then it was on to soldering.

The SNES controllers are very simple devices. As we’ve seen with previous projects, they use a serial-to-parallel shift register to gather button data and send it to the console. [Kekszumquadrat] simply soldered between button traces and keyboard matrix contacts. Once he finished, the keyboard parts were tucked inside of the controller case and he’s left with a USB controller that appears to be unaltered.

Have You Got What It Takes To Code Android Apps Using Assembly?

Do you have a rooted Android device and a computer running Linux? If so, you’re already on your way to coding for Android in Assembly. Android devices use ARM processors, and [Vikram] makes the argument that ARM provides the least-complicated Assembly platform, making it a great choice for those new to Assembly programming. We think his eight-part tutorial does a great job of introducing the language and explaining how to get the development tools up and running. You’ll need to know some basic programming concepts, but from what we saw you don’t need any prior experience with ARM or Android.

So why learn Assembly at all? We took a stab at Assembly for AVR a few months ago and really learned a lot about the hardware that we just never needed to know writing in C. It’s a great way to optimise functions that waste too much time because of quirks with higher-level language compilers. That means you don’t need to write your entire application in Assembly. You can simply use it to streamline hairy parts of your code, then include those Assembly files at compile time.

Android Phone Serves As Arduino Terminal

Looking to use his Arduino when on-the-go, [Oleg] has been working on a way to use the Android ADK terminal emulator with the Arduino. The Android side uses ADK features along with a custom application. [Oleg] received help from his friend [Victor] when developing the program for Android (you can check out our own Android Development tutorials if you’re interested in learning how this is done). The .apk file is available for download, but they’re waiting to release the source code until they can clean it up and get some of the gnarly bugs out of the beta version.

A USB host shield for the Arduino is needed to connect to an Android hand set. You’ll be able to send and receive strings via the terminal, with support for carriage return and life feed characters. Unfortunately this doesn’t allow you to change, compile, or write sketches to the Arduino. But it might come in very handy when trouble shooting a project when a computer is not around, or just for using an Android phone as an output.

Update: Bluetooth Super Nintendo Controller For Android

[Rich’s] newest version of a Bluetooth connected Super Nintendo controller takes what was already good and makes it better. We looked at the original version back in May, which is built into a knockoff controller  — [Rich] mentions that he got a lot of flack for defacing retro equipment and wants to set the record straight. The most notable difference between the two controllers is that the batteries are now housed inside the case. He switched over to an 850 mAh Lithium Ion battery, which takes much less room than the four AA batteries did. There is an integrated charger which connects via a mini USB jack as seen in the image above. Bother versions of the controller can be used to play emulators without rooting your Android device.

Unfortunately you won’t get to look inside the case. What we can tell you is that the build no longer uses a BlueSMiRF board , opting for a less expensive Bluetooth solution. We also know that the build is still Arduino compatible, sporting an ATmega328 chip running the bootloader. The lack of detail is because [Rich] is working to market the controller with a limited-quantity preorder. Check out his video presentation of the new version after the break.

Continue reading “Update: Bluetooth Super Nintendo Controller For Android”

Robust Wireless DSLR Control Over Bluetooth

yanis_android_bluetooth_camera_controller

[Manishi] wrote in to share his latest project, a Bluetooth DSLR controller that works with Android. More than a mere Bluetooth shutter trigger, his device lets you control a wide array of other settings such as aperture, shutter speed, ISO, white balance, focus position and live view.

His “YaNis” control system was built using an Arduino Pro Mini, along with a USB host shield and a Bluetooth module he picked up from SparkFun. Obviously any other Arduino and SPP compatible Bluetooth board can be used, though component size is definitely a consideration for this project, and his selections are pretty well-suited to the job. The Arduino half of the software relies heavily on [Oleg Maruzov’s] PTP/USB libraries to get things done, but the free Android control app is all [Manishi’s] creation.

The Bluetooth dongle connects to the camera via USB, and once it’s paired with his Android phone, [Manishi] has total control at his fingertips. He has plenty of improvements planned for the near future including additional camera support, so we expect that we’ll see an even more robust control application before too long.

Continue reading to see a quick video demo of YaNis in action.

Continue reading “Robust Wireless DSLR Control Over Bluetooth”