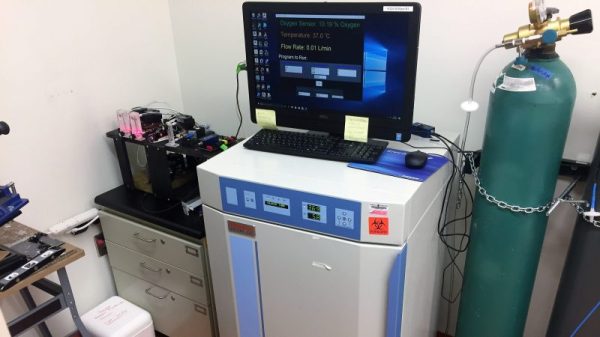
Morbid Battery Uses Blood Electrolyte

Building a battery out of common household products is actually pretty simple. All that is required is two dissimilar metals and some sort of electrolyte to facility the transfer of charge. A popular grade school science experiment demonstrates this fairly well by using copper and zinc plates set inside a potato or a lemon. Almost anything can be used as the charge transfer medium, as [dmitry] demonstrates by creating a rather macabre battery using his own blood.

The battery was part of an art and science exhibition but it probably wouldn’t be sustainable on a large scale, as it took [dmitry] around 18 months to bank enough blood to make a useful battery. Blood contains a lot of electrolytes that make it perfect for this application though, and with the addition of the copper anode and aluminum cathode [dmitry] can power a small speaker which plays a sound-generating algorithm that frankly adds a very surreal element to the art installation.

While we can’t recommend that you try to build one of these batteries on your own without proper medical supervision, the video of the art piece is worth checking out. We’ve seen a few other hacks that involve blood, but usually they are attempting to use it for its intended purpose rather than as an alternative energy source.

Old Batteries Yield Thermite And Manganese

Some people collect stamps, some collect coins, some even collect barbed wire. But the aptly named [Plutonium Bunny] is an element collector, as in one who seeks a sample of as many elements on the periodic table as possible. Whatever, we don’t judge – after all, there are more than a few Hackaday readers who collect lots of silicon, right?

So what’s a collector to do when he gets to the 25th place on the periodic table? Easy – harvest manganese from alkaline batteries with a thermite reaction. There’s a surprising amount of manganese in depleted alkaline batteries, which of course are easy to come by in bulk. The chemistry of [Plutonium Bunny]’s process is pretty straightforward and easy to reproduce with common ingredients, but you’ll want to be careful with a few steps – chlorine gas is not something to trifle with. The basic idea is to solubilize and purify the manganese dioxide from the other materials in the battery cathodes, recrystallize it, and mix it with aluminum powder. The aluminum acts as the fuel, the manganese dioxide is the oxidizer, and once the satisfyingly exothermic reaction shown in the video below is over, the collector-grade elemental manganese can be chipped away from the aluminum oxide slag.

So once you’ve got a few manganese nuggets, what can you do with them? Not much really – it turns out the oxides recovered from the battery are far more useful for things like supercapacitors. But it’s still a neat trick.

Continue reading “Old Batteries Yield Thermite And Manganese”

Sodium bicarbonage diode steering circuit

Soda Bicarb Diode Steering Circuit For 7-Segment Display

[Hales] has been on a mission for a while to make his own diodes and put them to use and now he’s succeeded with diodes made of sodium bicarbonate and water, aluminum tape and soldered copper. By combining 49 of them he’s put together a soda bicarb diode steering circuit for a 7-segment display capable of showing the digits 0 to 9.

He takes the idea for his diode from electrolytic capacitors. A simple DIY electrolytic capacitor has an aluminum sheet immersed in a liquid electrolyte. The aluminum and the conductive electrolyte are the two capacitor plates. The dielectric is an aluminum oxide layer that forms on the aluminum when the correct polarity is applied, preventing current flow. But if you reverse polarity, that oxide layer breaks down and current flows. To [Hales] this sounded like it could also act as a diode and so he went to work doing plenty of experiments and refinements until he was confident he had something that worked fairly well.

In the end he came up with a diode that starts with a copper base covered in solder to protect the copper from his sodium bicarbonate and water electrolyte. A piece of aluminum tape goes on top of that but is electrically insulated from it. Then the electrolyte is dabbed on such that it’s partly on the solder and partly on the aluminum tape. The oxide forms between the electrolyte and the aluminum, providing the diode’s junction. Connections are made to the soldered copper and to the aluminum.

To truly try it out he put together a steering circuit for a seven segment display. For that he made a matrix of his diodes. The matrix has seven columns, one for each segment on the display. Then there are ten rows, one for each digit from 0 to 9. The number 1, for example, needs only two segments to light up, and so for the row representing 1, there are only two diodes, i.e. two dabs of electrolyte where the rows overlap the columns for the desired segments. The columns are permanently wired to their segments so the final connection need only be made by energizing the appropriate row of diodes. You can see [Hales] demonstrating this in the video below the break.

Continue reading “Soda Bicarb Diode Steering Circuit For 7-Segment Display”

Microfluidic LEGO Bricks

Years ago, prototyping microfluidic systems was a long, time-intensive task. With inspiration from DIY PCB fabrication techniques, that time is now greatly reduced. However, even with the improvements, it still takes a full day to go from an idea to a tangible implementation. However, progress creeps in this petty pace from day to day, and in accordance, a group of researchers have found a way to use 3D printed molds to create microfluidic LEGO bricks that make microfluidic prototyping child’s play.

For the uninitiated, microfluidics is the study and manipulation of very small volumes of water, usually a millionth of a liter and smaller (nL-pL). Interestingly, the behavior of fluids at small scales differs greatly from its larger scale brethren in many key ways. This difference is due to the larger role surface tension, energy dissipation, and fluidic resistance play when distances and volumes are minimized.

By using 3D printed molds to create microfluidic bricks that fit together like LEGOs, the researchers hope to facilitate medical research. Even though much research relies on precise manipulation of minuscule amounts of liquid, most researchers pipette by hand (or occasionally by robot), introducing a high level of human error. Additionally, rather than needing multiple expensive micropipettes, a DIY biohacker only needs PDMS (a silicon-based chemical already used microfluidics) and 3D printed molds to get started in prototyping biological circuits. However, if you prefer a more, ahem, fluid solution, we’ve got you covered.

[via Adafruit]

Ask Hackaday: What’s Your Etchant?

Although the typical cliché for a mad scientist usually involves Bunsen burners, beakers, and retorts, most of us (with some exceptions, of course) aren’t really chemists. However, there are some electronic endeavors that require a bit of knowledge about chemistry or related fields like metallurgy. No place is this more apparent than producing your own PCBs. Unless you use a mill, you are probably using a chemical bath of some sort to strip copper from your boards.

The standard go-to solution is ferric chloride. It isn’t too tricky to use, but it does work better hot and with aeration, although neither are absolutely necessary. However, it does tend to stain just about everything it touches. In liquid form, it is more expensive to ship, although you can get it in dry form. Another common etchant is ammonium or sodium persulphate.

pcbyThere’s also a variety of homemade etchants using things like muriatic acid and vinegar. Most of these use peroxide as an oxidizer. There’s lots of information about things like this on the Internet. However, like everything on the Internet, you can find good information and bad information.

When [w_k_fay] ran out of PCB etchant, he decided to make his own to replace it and wrote a great guide on how this is done. He found a lot of vague and conflicting information on the Internet. He read that the vinegar solution was too slow and the cupric acid needs a heated tank, a way to oxygenate the solution, and strict pH controls. However, he did have successful experiments with the hydrochloric acid and peroxide. He also used the same materials (along with some others) to make ferric chloride successfully.

Continue reading “Ask Hackaday: What’s Your Etchant?”

DIY Syringe Pump Saves Big Bucks For Hacker’s Lab

If you had a choice between going to your boss and asking for funds for a new piece of gear, would you rather ask for $3000 to buy off-the-shelf, or $200 for the parts to build the same thing yourself? Any self-respecting hacker knows the answer, and when presented with an opportunity to equip his lab with a new DIY syringe pump for $200, [Dr. D-Flo] rose to the challenge.

The first stop for [Dr. D-Flo] was, naturally, Hackaday.io, which is where he found [Naroom]’s syringe pump project. It was a good match for his budget and his specs, but he needed to modify some of the 3D printed parts a little to fit the larger syringes he intended to use. The base is aluminum extrusion, the drive train is a stepper motor spinning threaded rod and a captive nut in the plunger holders, and an Arduino and motor shield control everything. The drive train will obviously suffer from a fair amount of backlash, but this pump isn’t meant for precise dispensing so it shouldn’t matter. We’d worry a little more about the robustness of the printed parts over time and their compatibility with common lab solvents, but overall this was a great build that [Dr. D-Flo] intends to use in a 3D food printer. We look forward to seeing that one.

It’s getting so that that you can build almost anything for the lab these days, from peristaltic pumps to centrifuges. It has to be hard to concentrate on your science when there’s so much gear to make.

Continue reading “DIY Syringe Pump Saves Big Bucks For Hacker’s Lab”

Growing Plants On Mars… On Earth

One of the biggest challenges of traveling to Mars is that it’s far away. That might seem obvious, but that comes with its own set of problems when compared to traveling to something relatively close like the Moon. The core issue is weight, and this becomes a big deal when you have to feed several astronauts for months or years. If food could be grown on Mars, however, this would make the trip easier to make. This is exactly the problem that [Clinton] is working on with his Martian terrarium, or “marsarium”.

The first task was to obtain some soil that would be a good analog of Martian soil. Obtaining the real thing was out of the question, as was getting similar dirt from Hawaii. [Clinton] decided to make his own by mixing various compounds from the hardware store in the appropriate amounts. From there he turned to creating the enclosure and filling it with the appropriate atmosphere. Various gas canisters controlled by gas solenoid valves mixed up the analog to Martian atmosphere: 96% dioxide, 2% argon, and 2% nitrogen. The entire experiment was controlled by an Intel Edison with custom circuits for all of the sensors and regulating equipment. Check out the appropriately dramatic video of the process after the break.

While the fern that [Clinton] planted did survive the 30-day experiment in the marsarium, it wasn’t doing too well. There’s an apparent lack of nitrogen in Martian soil which is crucial for plants to survive. Normally this is accomplished when another life form “fixes” nitrogen to the soil, but Mars probably doesn’t have any of that. Future experiments would need something that could do this for the other plants, but [Clinton] notes that he’ll need a larger marsarium for that. And, if you’re not interested in plants or Mars, there are some other interesting ramifications of nitrogen-fixing as well.

Continue reading “Growing Plants On Mars… On Earth”