[fotoopa] just put up a Flikr build log of his 3D macro photography rig he uses to take pictures of insects in flight. Outside Hollywood or National Geographic, we’ve never seen a crazier photography rig.
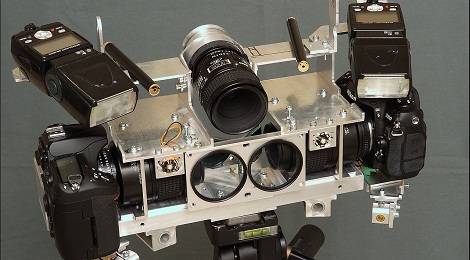
[fotoopa]’s build is based around two cameras – a Nikon D200 and D300. These cameras are pointed towards the subject insect with two mirrors allowing for a nice stereo separation for 3D images. Of course, the trouble is snapping the picture when an insect flies in front of the rig.
For shutter control, [fotoopa] used two IR laser pointers pointed where the two cameras converge. A photodiode in a lens above the rig detects this IR dot and triggers the shutters. To speed up the horribly slow 50ms shutters on the Nikons, a high-speed shutter was added so the image is captured within 3ms.
[fotoopa]’s 2011 rig took things down a notch; this year he’s only working with one camera. Even though he didn’t get any 3D images this year, the skill in making such an awesome rig is impressive.
via (diyphotraphy.net)


