This excellent content from the Hackaday writing crew highlights recurring topics and popular series like Linux-Fu, 3D-Printering, Hackaday Links, This Week in Security, Inputs of Interest, Profiles in Science, Retrotechtacular, Ask Hackaday, Teardowns, Reviews, and many more.
Saturday evening at the Hackaday SuperConference is reserved for the Hackaday Prize Party. Our engineering initiative each year, The Hackaday Prize, starts in the spring and ends in the fall. What happens in between is magic: thousands of engineers and engineering enthusiasts focus their skills on building something that matters. The top entries take home some pretty amazing prizes. At this year’s prize ceremony (seen below) we announced the five top entries which took home $200,000 in addition to the $100,000 already awarded to 100 final projects.
Check out the presentation which includes appearances by several of our amazing judges, then join us after the break for a bit more about this year’s Hackaday Prize.
Do you know how to harvest data from your bench tools, like plotting bandwidth from your oscilloscope with a computer? It’s actually pretty easy. Many bench tools make this easy using a standard protocol with USB to make the connection.
In the previous installment of this article we talked about the National Instruments VISA (Virtual Instrument Software Archetecture) standard for communicating with your instruments from a computer, and introduced its Python wrapper with a simple demonstration using a Raspberry Pi. We’ll now build on that modest start by describing a more useful application for a Raspberry Pi and a digital oscilloscope; we’ll plot the bandwidth of an RF filter. We’ll assume that you’ve read the previous installment and have both Python and the required libraries on your machine. In our case the computer is a Raspberry Pi and the instrument is a Rigol DS1054z, but similar techniques could be employed with other computers and instruments.
A while back I looked at lubricants for the home shop, with an eye to the physics and chemistry behind lubrication. Talking about how to keep parts moving got me thinking about the other side of the equation – what’s the science behind sticking stuff together? Home shops have a lot of applications for adhesives, so it probably pays to know how they work so you can choose the right glue for the job. We’ll also take a look at a couple of broad classes of adhesives that are handy to have around the home shop. Continue reading “Glues You Can Use: Adhesives For The Home Shop”→
[Prusa]’s business is doing great. This year, he released the Prusa i3 Mk. 2, a four color upgrade to the printer, and sales are through the roof. There’s just one problem: Paypal just locked his funds. Prusa is turning away from Paypal and given Paypal’s history, this will eventually be worked out. Be warned, though: don’t use Paypal for your hardware business. We’ve seen this same story played out too many times before.
Those millennials are always on their phones. How do you get rid of that distraction? Airplane mode? No, that’s stupid. Put those phones in a metal box. It’s the exact same thing as airplane mode – which is free – but this extra special metal box costs $45 and ships in March. Is this metal box different from any other metal box, like a cookie tin, perhaps? Probably not.
The holidays are here, and it’s time for Cards Against Humanity to do something stupid with other people’s money. This year, they’re throwing money into a hole. No, really. People are contributing money to dig a gigantic hole. There’s a livestream of the digging. Five dollars lets the dig continue for another few seconds. Join in on the holiday spirit: throw your money into a hole.
You don’t want to throw your money into a hole? Buy some stuff on Tindie! There’s robots, CNC controllers, servo drivers, MIDI arpeggiators, USB testers, power supplies, blinky glowy things, and retro gaming stuff. Go plug your Raspberry Pi into some of these gizmos.
Individually addressable RGB LEDs exist, and we’re waiting for Clark Griswold to electrify his house in red, green, and blue. Until then, [Michel built a holiday ornament loaded up with 16 WS2812b LEDs. The star features caps and diodes to make everything work as it should and requires only three wires per star.
Imagine this, you have a friend who grew up in Shenzhen, China. The place from whence all your really cool electronics come these days. They speak Chinese in a way only someone born there can, and given that you know them through a shared interest in hardware hacking you can assume they know their way round those famous electronics marts of their home town.
Now, imagine that in a rash move, your friend has offered to pick up a few bits for you on their next trip home. A whole city-sized electronic candy store opens up in front of you, but what do you ask for them to seek out?
Before you continue, consider this. Why has Shenzhen become the powerhouse of electronic manufacturing (and everything else) that it is? Economists will give you pages of fascinating background, but if you want a simple answer it is that those electronics are produced for export, and that its citizens are only too happy to export them to you. Therefore if you want to get your hands on electronics from Shenzhen you do not need a friend who is a native of the city, all you need is a web browser and a PayPal account.
We have all become used to seeking out the cool stuff and eagerly waiting for a padded envelope from China Post a week or two later, so there are very few items that are worth putting a friend to the extra task of finding. At which point you realize that it is the candy store rather than the candy itself which is so alluring, and you ask your friend for a video walkthrough with commentary of their travels through the electronics marts. Oh, and maybe a Chinese Raspberry Pi with red solder resist, just for the collection.
If you had a friend about to board a plane to Shenzhen, what would you ask them to find for you that you can’t just buy for yourself online? Remember, nothing that’ll land them with awkward questions at either airport, nor anything that’ll land them with a hefty customs bill. That’s a very good way to end a friendship.
Huaqiangbei skyline image: Edward Rivens (PD) via Wikimedia Commons.
Does everyone watch a load of videos on YouTube that are somewhat on the unadmissibly geeky side? In my case I might not care to admit that I have a lot of videos featuring tractors in my timeline. The mighty Russian Kirovets hauling loads through the impossible terrain of the taiga, tiny overloaded 2WD tractors in India pulling wheelies, and JCB Fastracs tearing around the British Fenland. You can take the girl off the farm, but you can’t take the farm out of the girl.
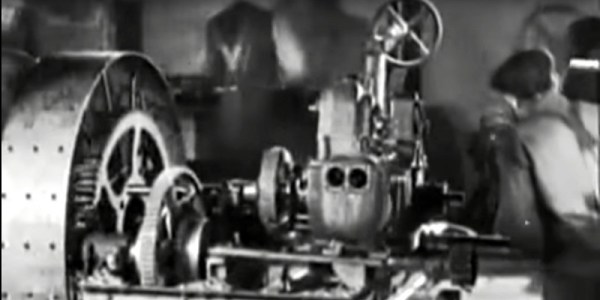
So my recommendations have something of an agricultural flavor. Like the video below the break, a 1917 silent film promoting the Ford Model B tractor. This one was eye-catching because it was a machine I’d not seen before, a rather unusual three-wheeler design with two driving wheels at the front and a single rear steering wheel.
During the early years of the twentieth century the shape of the modern tractor was beginning to evolve, this must have been a late attempt at an alternative. Speaking from the viewpoint of someone who has operated a few tractors in her time it does not look the easiest machine to control, that cloud of exhaust smoke surrounding the driver would not be pleasant, and the operating position hanging over the implement coupling at the rear does not look particularly comfortable or safe.
The film has a charming period feel, and tells the tale of a farmer’s son who tires of the drudgery of manual farm labor, and leaves for the city. He finds a job at the tractor factory and eventually becomes a tractor salesman, along the way meeting and marrying the daughter of a satisfied customer. He returns home with his bride, and a shiny new tractor to release his father from ceaseless labor. Along the way we gain a fascinating look at agriculture on the brink of mass mechanization, as well as the inside of a tractor factory of the time with an assembly sequence in which they appear to use no fasteners.
[Image Source: Tractor Industry Fraud on Farm Collector]All of this is very interesting, but the real nugget in the story lies with its manufacturer. This is a Ford Model B tractor. But it’s not a Ford Model B. Confused? So, it seems were the customers. The Ford we all know is the Michigan-based motor company of Henry Ford, who were already very much a big name in 1917. This Ford however comes from the Ford Tractor Co, of South Dakota, an enterprise set up by a shady businessman to cash in on the Ford brand, manufacturing an already outdated and inferior machine backed up by dubious claims of its capabilities.
On the staff was an engineer called Ford who lent his name to the company, but he bore no relation to Henry Ford. The company didn’t last long, collapsing soon after the date of this film, and very few of its products survived. It did have one legacy though, the awful quality of one of its tractors is reputed to have been the impetus behind the founding of the Nebraska Tractor Test Laboratory, the place where if you sell a tractor in the USA, you’ll have to have it tested to ensure it performs as it should. In their museum they house one of the few surviving Ford Model B tractors.
Meanwhile the Ford in Michigan produced their own very successful line of tractors, and their Fordson Model F from the same year is a visible ancestor of today’s machines. But as the video below shows, there’s nothing new about a fake.
Apex Minecraft hosting recently held a scholarship competition. The person who sent in the best essay would win a $2,000 scholarship. The winning essay starts, “Five years ago, at age 13, I built an entire computer from scratch. Assembled from basic components: wires, torches, repeaters, pistons, and blocks, it was capable of rendering images to a display, multiplying and dividing numbers, and even calculating square roots.” I had to read it twice before it clicked that he was talking about a computer built entirely in a fictional universe.
It’s no wonder that he’s now a freshman at college, pursuing a degree in computer engineering. After reading this, I started to reminisce. The first computer I ever had access to was my mother’s laptop. It had an install of QBASIC on it, and I remember using it to make a few text based games. Later on when we got our first family computer I remember spending hours getting no better at video game programming using QBASIC.
It went on and on. I remember doing AI for video games in DarkBasic. I remember doing physics and collisions. Eventually I found my way to html, then php, to make websites about games (which are too terrible to share with you). So when the time came to program robots I was absolutely fearless. It just seemed like such a natural extension of what I already knew that it never occurred to me to be thankful for the time I spent trying to make my own simple little games until much later.
In the end I am still occasionally making little forays into game programming when I want to learn a new language or get back up to speed. It never occurred to me that perhaps this was just the way I’ve always learned a language.
Later on in the winner’s essay he goes on to describe his minecraft community. They taught new players. They taught themselves. They hung out and became friends. The writer gained a sense of self as a user of computers, a teacher of skills, a good member of a community, and a solver of problems. Unlike some of his classmates he won’t go to college and have to learn if he’s good enough. He’ll already know. All it took was a silly block based game.
Did any of you have seemingly frivolous endeavors show up as a foundation for your life and learning far into the future? Tell in the comments below how this ended up shaping your career.


![[Image Source: Tractor Industry Fraud on Farm Collector]](https://hackaday.com/wp-content/uploads/2016/11/ford-tractor-company-poster.jpg)