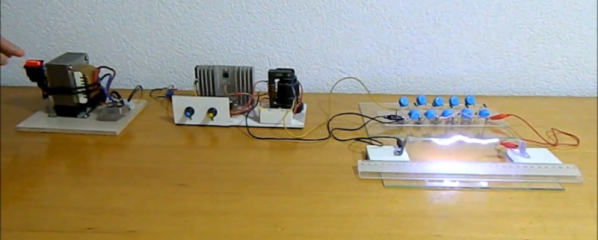
There’s something satisfying about creating high voltages. Sure, there are practical uses like neon signs or doing certain experiments, but be honest — you really just want to see some giant arcs lighting up your dark mad scientist lair. [Mircemk] has just the prescription for what ails you. Using a two-stage approach, he shows a simple setup that generates about 110KV from a pretty tame 15V supply.
From the 15V, there is a stage that uses a flyback transformer and a switch to generate a reasonably high voltage. The final stage is a Cockroft-Walton voltage multiplier that can produce quite a bit of voltage. You can see the impressive arcs in the video below.
The multiplier circuit found fame with experiments by Cockroft and Walton, obviously, but was actually originated in the early 1900s with a physicist named Greinacher. The circuit uses diodes as switches and charges a bank of capacitors in parallel. The discharge, however, puts the capacitors in series. Neglecting losses and loads, the output voltage is equal to the peak-to-peak input voltage times the number of stages present. Real-world considerations mean you won’t quite get that voltage out of it, but it can still provide a potent punch. Click through the break for a video of the circuit in action!
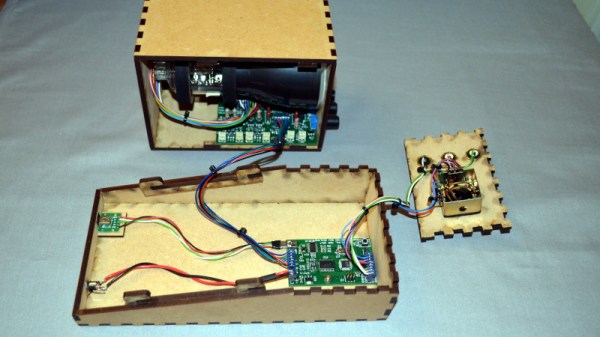
Controlling blinds using off the shelf solutions can be expensive – more so if you have multiple blinds you want to control. [HumanSkunk87] felt the cost was too high, so they designed a controller to automatically open and close the blinds.
The main part of this build is a motor and a ball chain gear – a wheel that captures the balls of a ball chain so that the chain can be pulled. The wheel was designed using Fusion3D and then printed out. The motor requires enough power to pull the chain — [HumanSkunk87] figures it needs to be able to pull about 2.5kg in order to raise the blind. After giving up on stepper motors, a DC motor with a worm gear was found to have enough torque to work. A WEMOS D1 Mini controls the motor controller that drives the ball chain wheel. Two micro switches tell the WEMOS when to stop at the bottom and top of the window.
The WEMOS is programmed using ESPHome and it connects to [HumanSkunk87]’s HomeAssistant to complete the automation. Check out the descriptions in the link for the parts and the code used to run everything. There are many other creative ways to open your blinds, It’s even possible to automate curtains instead of blinds.
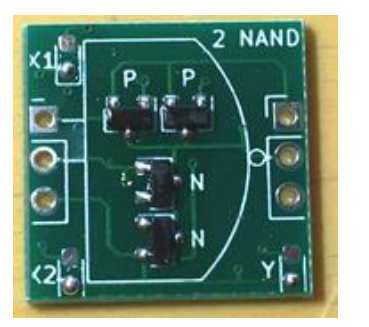
What do you get when you stick 1738 MOSFETs together? If your answer was a ‘4-bit CPU’, you would be totally correct. Available as a product over at Marutsu as the ‘CPU1738’, it seems to target beginners to computer theory, with build instructions that explain how the CPU is built up from individual MOSFETs that are combined into logic gates.
A CPU1738 NAND PCB.
While decidedly more compact in its SMD format than it would have been with pure through-hole parts, the use of countless small PCBs on top of the larger PCBs make for a pretty hefty package. Board after board build up the CPU, and the assembly continues with the addition of sensors, motors, and wheels. In the end, a robot emerges, albeit a somewhat wobbly-looking one.
Check out the video linked after the break, though before starting one up, note the 50,000 Yen (approximately $500) price tag for the CPU block alone. On the other hand, in addition to the 1738 MOSFETs, there are also 1070 LEDs, so you get what you pay for in blinkies.
Game cartridges are perhaps the hardiest of all common storage schemes. Short of blunt traumatic force or application of electrical surges to the cartridge’s edge connectors, damaging a game cartridge is hard to do by accident. The same is also true for the data on them, whether one talks about an Atari 2006 cartridge from the late 1970s or a 1990s Nintendo 64 cartridge.
The secret sauce here are mask ROMs (MROM), which are read-only memory chips that literally have the software turned into a hardware memory device. A mask layer unique to each data set is used when metalizing the interconnects during chip fabrication. This means that the data stored on them is as durable as the processor in the game console itself. Yet this is not a technology that we can use in our own hobby projects, and it’s not available for personal long-term data storage due to the costs associated with manufacturing what is essentially a custom chip.
Despite its value as truly persistent storage, MROM has fallen out of favor over the decades. You may be surprised to find a lot of what’s currently used in the consumer market is prone to data corruption over time spans as short as one year to one decade depending on environmental conditions.
So what are we to do if we need to have read-only data that should remain readable for the coming decades?
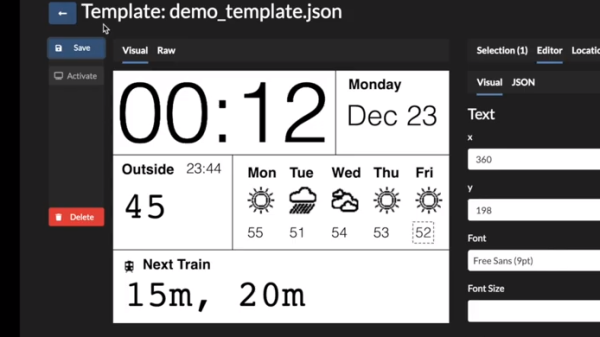
To date, e-paper technology has been great for two things, displaying static black and white text and luring hackers with the promise of a display that is easy on the eyes and runs forever. But poor availability of bare panels has made the second (we would say more important) goal slow to materialize. One of the first projects that comes to mind is using such a display to show ambient information like a daily summary weather, train schedules, and calendar appointments. Usually this means rolling your own software stack, but [Christopher Mullins] has put together a shockingly complete toolset for designing and updating such parameterized displays called epaper_templates.
To get it out of the way first, there is no hardware component to epaper_templates. It presupposes you have an ESP32 and a display chosen from a certain list of supported models. A quick search on our favorite import site turned up a wide variety of options for bare panels and prebuilt devices (ESP32 and display, plus other goodies) starting at around $40 USD, so this should be a low threshold to cross.
Once you have the device, epaper_templates provides the magic. [Christopher]’s key insight is that an ambient display is typically composed of groups of semi-static data displayed in a layout that never changes. The only variation is updates to the data which is fully parameterized: temperature is always integer Fahrenheit, train schedules are lists of minutes and hours, etc. Layouts like this aren’t difficult to make, but require the developer to reimplement lots of boilerplate. To make them easy to generate, epaper_templates provides a fully featured web UI to let the user freely customize a layout, then exports it as JSON which the device consumes.
The sample layout configured in the video below
The web UI is shockingly capable, especially for by the standards of the embedded web. (Remember it’s hosted on the ESP32 itself!) The user can place text and configure fonts and styles. Once placed, the text can be set to static strings or tied to variables, and if the string is a timestamp it can be formatted with a standard strftime format string.
To round out the feature set, the user can place images and lines to divide the display. Once the display is described, everything becomes simple to programmatically update. The ESP can be configured to subscribe to certain MQTT topics from which it will receive updates, or if that is too much infrastructure there is a handy REST API which accepts JSON objects containing variables or bitmaps to update on device.
We’re totally blown away by the level of functionality in epaper_templates! Check out the repo for more detail about its capabilities. For a full demo which walks through configuration of a UI with train arrival times, weather, both instant temperature and forecast with icons, and date/time check out the video after the break. Source for the example is here, but be sure to check out examples/ in the repo for more examples.
Over the years we’ve seen quite a few projects involving vector graphics, but the spaceship game created by [Mark Aren] especially caught our eye because in it he has tackled building a vector display from scratch rather than simply using a ready-made one such as an oscilloscope. As if the vector game itself wasn’t interesting enough, the process of designing the electronics required to drive a CRT is something that might have been commonplace decades ago but which few electronics enthusiasts in 2020 will have seen.
In his write-up he goes into detail on the path that took him to his component choices, and given the unusual nature of the design for 2020 it;s a fascinating opportunity to see the job done with components that would have been unheard of in the 1950s or 1960s. He eventually settled on a high voltage long-tailed pair of bipolar transistors, driven by a single op-amp to provide the differential signal required by the deflection electrodes. The mix of old and new also required a custom-fabricated socket for the CRT. On the game side meanwhile, an ATmega328 does the heavy lifting, through a DAC. He goes into some detail on DAC selection, having found some chips gave significant distortion.
All in all this is an impressive project from all angles, and we’re bowled over by it. Of course, if you fancy a play with vector graphics, perhaps there’s a simpler way.
Given an unknown PCBA with an ARM processor, odds are good that it will have either the standard 10 pin 0.05″ or 20 pin 0.1″ debug connector. This uncommon commonality is a boon for an exploring hacker, but when designing a board such headers require board space in the design and more components to be installed to plug in. The literally-named Debug Edge standard is a new libre attempt to remedy this inconvenience.
The name “Debug Edge” says it all. It’s a debug, edge connector. A connector for the edge of a PCBA to break out debug signals. Card edge connectors are nothing new but they typically either slot one PCBA perpendicularly into another (as in a PCI card) or hold them in parallel (as in a mini PCIe card or an m.2 SSD). The DebugEdge connector is more like a PCBA butt splice.
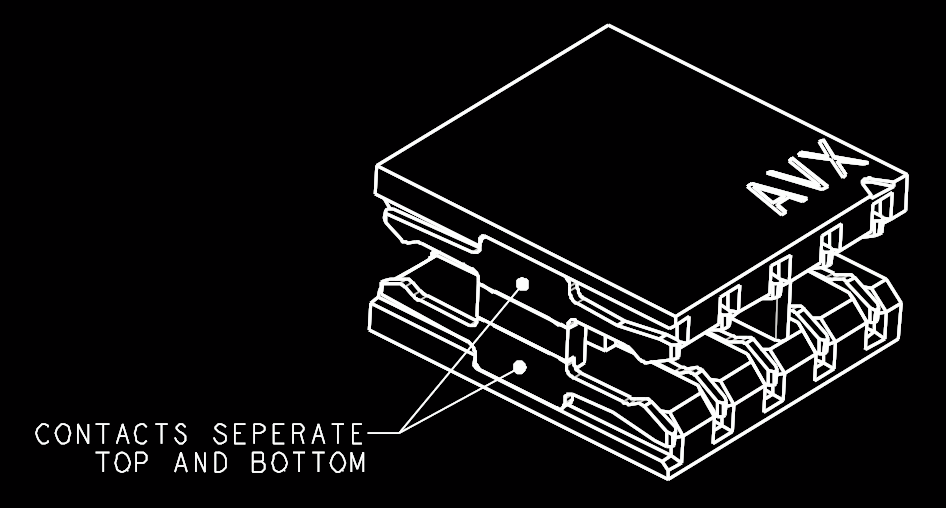
It makes use of a specific family of AVX open ended card edge connectors designed to splice together long rectangular PCBAs used for lighting end to end. These are available in single quantities starting as low as $0.85 (part number for the design shown here is 009159010061916). The vision of the DebugEdge standard is that this connector is exposed along the edge of the target device, then “spliced” into the debug connector for target power and debug.
Right now the DebugEdge exists primarily as a standard, a set of KiCAD footprints, and prototype adapter boards on OSHPark (debugger side, target side). A device making use of it would integrate the target side and the developer would use the debugger side to connect. The standard specifies 4, 6, 8, and 10 pin varieties (mapping to sizes of available connector, the ‘010’ in the number above specifies pincount) offering increasing levels of connectivity up to a complete 1:1 mapping of the standard 10 pin ARM connector. Keep in mind the connectors are double sided, so the 4 pin version is a miniscule 4mm x 4.5mm! We’re excited to see that worm its way into a tiny project or two.
 The main part of this build is a motor and a ball chain gear – a wheel that captures the balls of a ball chain so that the chain can be pulled. The wheel was designed using Fusion3D and then printed out. The motor requires enough power to pull the chain — [HumanSkunk87] figures it needs to be able to pull about 2.5kg in order to raise the blind. After giving up on stepper motors, a DC motor with a worm gear was found to have enough torque to work. A WEMOS D1 Mini controls the motor controller that drives the ball chain wheel. Two micro switches tell the WEMOS when to stop at the bottom and top of the window.

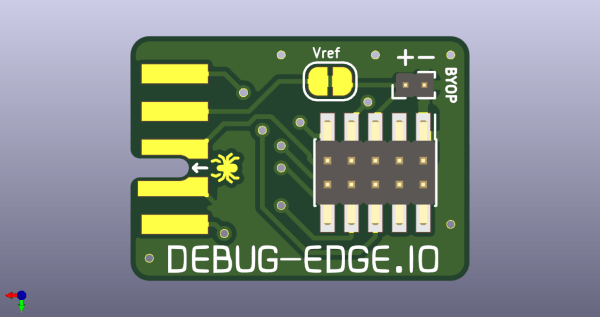
 The name “Debug Edge” says it all. It’s a debug, edge connector. A connector for the edge of a PCBA to break out debug signals. Card edge connectors are nothing new but they typically either slot one PCBA perpendicularly into another (as in a PCI card) or hold them in parallel (as in a mini PCIe card or an m.2 SSD). The DebugEdge connector is more like a PCBA butt splice.


