Simulating Cable TV

[Wrongdog Recons] suffers from a severe case of nostalgia. His earlier project simulated broadcast TV, and he was a little surprised at how popular the project was on GitHub. As people requested features, he realized that he could create a simulated cable box and emulate a 1990s-era cable TV system. Of course, you also needed a physical box, which turned into another project. You can see more about the project in the video below.

Inside is, unsurprisingly, a Raspberry Pi. Then you have to pretend to be a cable TV scheduler and organize your different video files for channels. You can interleave commercials and station breaks.

One addition was a scheduler so you could set up things like football games only play during football season. You can also control timing so you don’t get beer commercials during Saturday morning cartoons.

Continue reading “Simulating Cable TV”

Edison Phonograph Plays The Cylinders

You might be old enough to remember record platters, but you probably aren’t old enough to remember when records were cylinders. The Edison Blue Amberol records came out in 1912 and were far superior to the earlier wax cylinders. If you had one today, how could you play it? Easy. Just build [Palingenesis’] record player. You can even hear it do its thing in the video below.

The cylinders are made of plaster with a celluloid wrapper tinted with the namesake blue color. They were more durable than the old wax records and could hold well over four minutes of sound.

Continue reading “Edison Phonograph Plays The Cylinders”

Onkyo Receiver Saved With An ESP32

[Bill Dudley] had a problem. He had an Onkyo AV receiver that did a great job… until it didn’t. A DSP inside failed. When that happened, the main microprocessor running the show decided it wouldn’t play ball without the DSP operational. [Bill] knew the bulk of the audio hardware was still good, it was just the brains that were faulty. Thus started a 4-month operation to resurrect the Onkyo receiver with new intelligence instead.

[Bill’s] concept was simple. Yank the dead DSP, and the useless microprocessor as well. In their place, an ESP32 would be tasked with running things. [Bill] no longer cared if the receiver had DSP abilities or even the ability to pass video—he just wanted to use it as the quality audio receiver that it was.

His project report steps through all the hard work he went through to get things operational again. He had to teach the ESP32 to talk to the front panel display, the keys, and the radio tuner. More challenging was the core audio processor—the obscure Renaisys R2A15218FP. However, by persevering, [Bill] was able to get everything up and running, and even added some new functionality—including Internet radio and Bluetooth streaming.

It’s a heck of a build, and [Bill] ended up with an even more functional audio receiver at the end of it all. Bravo, we say. We love to see older audio gear brought back to life, particularly in creative ways. Meanwhile, if you’ve found your own way to save a piece of vintage audio hardware, don’t hesitate to let us know!

Everyone’s Talking GPMI, Should You?

The tech press has been full of announcements over the last day or two regarding GPMI. It’s a new standard with the backing of a range of Chinese hardware companies, for a high-speed digital video interface to rival HDMI. The Chinese semiconductor company HiSilicon have a whitepaper on the subject (Chinese language, Google Translate link), promising a tremendously higher data rate than HDMI, power delivery well exceeding that of USB-C, and interestingly, bi-directional data transfer. Is HDMI dead? Probably not, but the next few years will bring us some interesting hardware as they respond to this upstart.

Reading through pages of marketing from all over the web on this topic, it appears to be an early part of the push for 8k video content. There’s a small part of us that wonders just how far we can push display resolution beyond that of our eyes without it becoming just a marketing gimmick, but it is true to say that there is demand for higher-bandwidth interfaces. Reports mention two plug styles: a GPMI-specific one and a USB-C one. We expect the latter to naturally dominate. In terms of adoption, though, and whether users might find themselves left behind with the wrong interface, we would expect that far from needing to buy new equipment, we’ll find that support comes gradually with fallback to existing standards such as DisplayPort over USB-C, such that we hardly notice the transition.

Nearly a decade ago we marked the passing of VGA. We don’t expect to be doing the same for HDMI any time soon in the light of GPMI.

Designing A Tone Control Properly

Many years ago, audio equipment came with a tone control, a simple RC filter that would cut or boost the bass to taste. As time passed, this was split into two controls for bass and treble, and then finally into three for bass, mid, and treble. When audiophile fashion shifted towards graphic equalisers, these tone controls were rebranded as “3-band graphic equalisers”, a misleading term if ever we heard one. [Gabriel Dantas] designed one of these circuits, and unlike the simple passive networks found on cheap music centres of old, he’s doing a proper job with active filters.

The write-up is worth a read even if you are not in the market for a fancy tone control, for the basic primer it gives on designing an audio filter. The design contains, as you might expect, a low-pass, a bandpass, and a high-pass filter. These are built around TL072 FET-input op-amps, and an LM386 output stage is added to drive headphones.

The final project is built on a home-made PCB, complete with mains power supply. Audiophiles might demand more exotic parts, but we’re guessing that even with these proletarian components it will still sound pretty good. Probably better than the headphone amplifier featured in a recent project from a Hackaday writer, at least. There’s a build video, below the break.

Continue reading “Designing A Tone Control Properly”

Newspaper clipping with words 'speaking personally' and a photo

A Fast Rewind To The Era Of Tapesponding

Imagine a time before Discord servers and cheap long-distance calls. Back in the 1950s, a curious and crafty group of enthusiasts invented their own global social network: on reels of magnetic tape. They called it tapesponding (short for tape corresponding), and it was a booming hobby for thousands of radio hams, tinkerers, and audio geeks. Here’s the original video on this analog marvel.

These folks weren’t just swapping mixtapes. They crafted personal audio letters, beamed across the globe on 3-inch reels. DIY clubs emerged everywhere: World Tape Pals (Texas-based, naturally) clocked 5,000 members from “every Free Nation” – which frames it in a world in terms of East vs. West. Some groups even pooled funds to buy shared tape decks in poorer regions – pure hacker spirit. The tech behind it: Speeds of 3¾ IPS, half-track mono, round-robin reels, and rigorous trust networks to avoid ghosters. Honestly, it makes IRC net ops look soft. Tapesponding wasn’t just for chatty types. It fostered deep friendships, even marriages. It was social engineering before that term was coined. The video is below the break.

What are your thoughts on this nostalgic way of long-distance communication? The warm whirring of a spinning tape reel? The waiting time before your echo is returned? Or are have you skipped all the analog mechanics and shouted out into the LoRaWAN void long ago?

Continue reading “A Fast Rewind To The Era Of Tapesponding”

Closeup of a rackmounted custom HiFi setup

Rackmount All The Things, Hi-Fi Edition

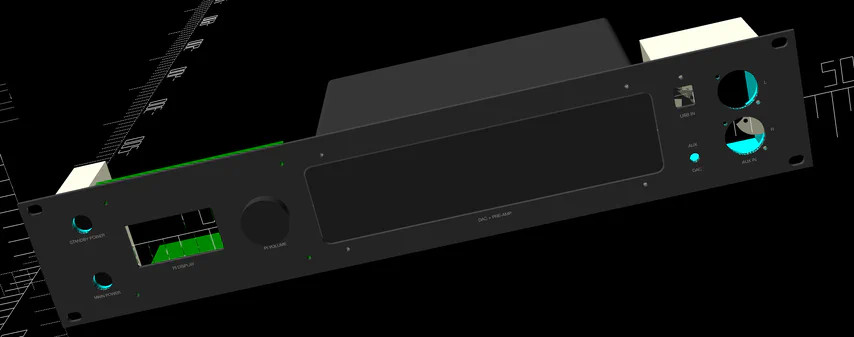
For those who love systems and structure, owning a 19-inch rack with just one slot filled is just not it. But what if the rest of your gear isn’t 19-inch? Well, then you go out and make it so, just like [Cal Bryant] did recently.

The goal was to consolidate multiple devices — DAC, input selector, streamer, and power routing — into a single 2U rackmount unit. His first attempts involved drilling 1U panels to attach gear with removable faceplates. That worked, but not all devices played nice. So his next step became a fully custom enclosure with CAD-modeled brackets and front panels.

OpenSCAD turned out to be a lifesaver, letting [Cal] design modular mounting solutions. Exporting proper circles for CNC turret punching however appeared to be a nightmare. It was FreeCAD to the rescue for post-processing. After some sanding and auto-shop painting, the final faceplate looked factory-made.

Custom switch boxes for power and audio routing keep things tidy, housing everything from USB to XLR inputs. A 4-pole switch even allows seamless swapping between his DAC and DJ controller, while UV-printed graphics bring the finishing touch to this project. For those looking to clean up their Hi-Fi setup (or just love modding for the sake of it), there’s a lot to learn from this build.

If buying a rack is not within your budget, you could start with well-known IKEA LACK furniture.