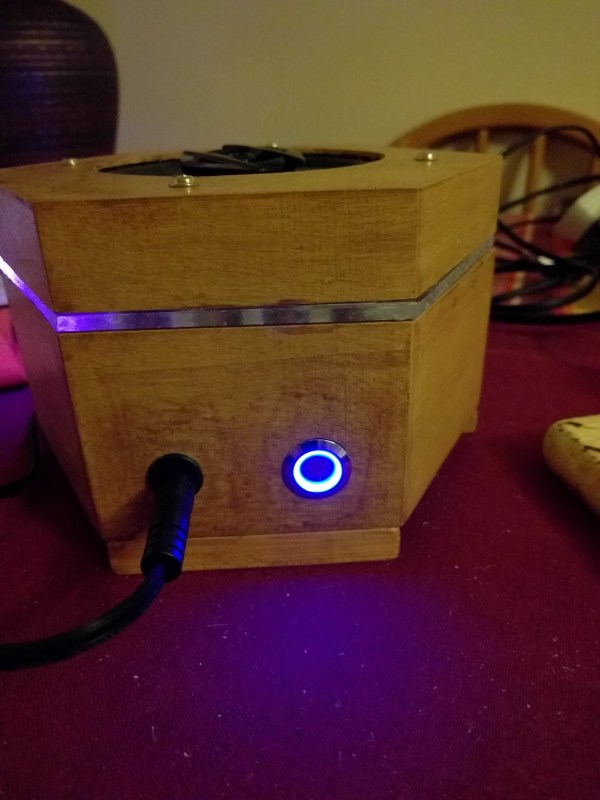
Pelican makes a great remote lighting system. Unfortunately, it’s the kind of great that comes with a “Request Quote” button instead of “Add to Cart”. It’s designed to be thrown in the back of a tank and guaranteed to work at the end of the day. [mep1811]’s system is not that system. It’s the store-in-a-Rubbermaid-tote and throw in the back of the family Honda kind of great, but it’s made from stuff you can buy anywhere.
The build is contained by a water resistant plastic box. Two sealed lead acids and a battery charger sit inside. The system is hooked together with simple car outlets — also known as the worst accidental electrical connector standard of all time. For the lights, [mep1811] simply made mounts for chinese LED spots and bought some inexpensive camera tripods. With a full charge, he says it runs for forty hours.
In the end it’s not a complicated hack, but its simplicity adds a certain amount of ruggedness, and it will definitely do the trick in a power outage.
If you have ever entertained yourself by reading comprehensive electronic-theory textbooks you’ll have seen references to technologies that sound really interesting but which you will rarely hold in your hand. They may be dead-ends that have been superseded by more recent innovations, or they may be technologies that have found uses but in other fields from those in which they originally showed promise. What if you could take these crazy parts and actually build something?
If you’ve used a thermocouple thermometer or a semiconductor thermoelectric generator then you’ll have encountered the thermoelectric effect. Perhaps you’ve even operated a Peltier cooling element in this mode. When a circuit is made with two junctions between different types of conductor with a temperature difference between the two junctions, a current will flow in the circuit which is dependent on both the scale of the temperature difference and the properties of the conductors.
A thermopile is a collection of these thermoelectric junction circuits between metal conductors, arranged in series to increase the voltage. [Fedetft]’s thermopile uses chromel and alumel wires taken from a K-type thermocouple. He’s made six sets of junctions, and supported them with small pieces of mica sheet. Using the heat from a candle he found he could generate about 200mV with it, at about 3.7mW.
The RCA tunnel diode inverter circuit
Such a tiny source of electricity would be of little use to light an LED directly, so he needed to build an inverter. And that’s where the tunnel diode comes in. Tunnel diodes have a negative-resistance region that can be used to amplify and oscillate at extremely high frequencies in extremely simple circuits, yet they’re not exactly a device you’d encounter very often in 2016. [Fedetft] has a Russian tunnel diode, and he’s used it with a toroidal transformer in an inverter circuit he found in an RCA tunnel diode manual from 1963. It’s a two-component Joule Thief. The RCA manual is a good read in itself for those curious about tunnel diodes.
The resulting circuit produces a 15kHz oscillation with 4.5v peaks, and has just enough power to light an LED.
While it might seem pointless to barely light an LED from a brightly lit candle, the important part of [Fedetft]’s project is to gain some understanding of two of those technological backwaters from the textbooks. And we applaud that.
Imagine how impressed your friends will be when you tell them about your homebrew 4K LED panel. Just don’t tell them it is a 64X64 grid. (Hey, that’s 4K LEDs total!) We’ll keep your secret. [Tom Nelson] has a good write up on how to create such a panel from 16X16 WS2812B panels.
At first glance, this doesn’t sound like a tough project. But if you read [Tom’s] log, you’ll see that he has a lot of good advice about heat management and the use of a diffuser to get good performance. The build uses several ECG-P2-2 controllers, plus it is mechanically neatly done.
The 64 cm square array is a precursor to a planned 128X128 display that [Tom] wants to build. He mentions he will release the custom driver software for the panel, so check his site for more details. We’ve seen some panels and diffusers before if you want to start with something smaller and work your way up.
This massive LED display was assembled on a PVC banner (it can be rolled up!) measuring 2m by 1.5m, it boasts well over 6000 pixels, and as you can see from the photo — looks fantastic.
We recently published a post on How Many LEDs are Too Many, which spawned many comments showing off even more impressive displays with even higher LED counts. This is just one of them — and making it flexible as well? That’s just the icing on the cake.
To make the display flexible, [Elektric-Junkys] had a custom PVC banner printed with stripes to help them align 58 parallel strips of WS2811 LEDs on the surface.
It’s basically a Spark Core and a 60 LED-per-meter strip of WS2812Bs. A 1000µF cap filters the power coming in from a switching adapter and a resistor limits the level-shifted logic going to the LEDs. Eight barriers made from card stock keep the light zones from bleeding together. The sides of the square canvas panel indicate cardinal directions and are oriented to [Savage]’s southern-facing house.
The server gets prediction data every 30 seconds using the RESTbus JSON API. [Savage] added in a bit of time for walking down the stairs, putting shoes on, and walking to each stop. TrainLight receives these times over WiFi and lights the LEDs accordingly. If a section isn’t lit at all, the wait time for that line is greater than 10 minutes. Dark green means you have 5-10 minutes to get there, and pale green means 2-5 minutes. If the LEDs are yellow, you’d better put on your running shoes.
This is a fairly simple build with a focus on subtlety. Even before guests in his house understand what they’re looking at, [Savage]’s TrainLight makes for an interesting conversational piece of blinkenlights and doubles as illumination for the stairs. There’s a slightly sped-up demo after the break.
“Should you answer a rhetorical question?” But anyway, the answer is that you can never have enough LEDs. At least that’s what [Adam Haile] at maniacallabs seems to think. So far, he’s up to 3,072.
We’ve reported on a previous big-LED build of [Adam]’s before, called the “Colossus”. And while this current display is physically smaller, it’s got a lot more LEDs. And that means a lot more, well, everything else. Weighing in at roughly 500W when full-on, with 175-part 3D printed frame and diffuser elements and driven by three Teensy 3.2 microcontrollers driving shift registers, this display is capable of putting out 60 frames per second of blinding RGB LED goodness.
The designs, adapter boards, and animation code will be posted once they’ve “had a chance to clean things up a little”. Here’s hoping that’s soon! [Edit: Code and designs are here. Thanks Adam!]
If you’re in the greater Washington DC area, you can even swing by the NoVA Maker Faire in Reston to check it out in person. If you do, tell ’em Hackaday sent you.
[nebulous] has a lot of problems with his kitchen cabinets. Aside from a noted lack of micro-controllers, he was especially suspicious of the dark spaces under them. Anything could be hiding there.
The core of the project is a $10 Arduino-compatible esp8266 board from digistump. The board is powered by the five volt regulator of an L298N motor driver module hooked to a power-supply. All this controls a set-of LED strips adhered to the underside of the cabinets with the traditionally bad adhesive strips with which they come standard. We can predict an hour spent bent awkwardly cursing at them, a hot-glue gun in one hand, in [nebulous]’s future. The whole set-up is housed in a SparkFun cardboard box above the microwave. You can barely tell it’s not a commercial product.
We’re not certain if we like a future where even our cabinetry has an IP address. However, this is a good weekend project that could make all our cabinetry brighter, safer, and more connected.