Controlling High Voltage 7-Segment Displays

highvoltage7seg

The MAX7219 is one of those parts in your bin that has a “done and done” attitude. In case you’re unfamiliar, this chip can be used to control 7-Segment displays, 8×8 Matrix displays, or even a pile of random LEDs. You talk to it via a simple serial interface and it handles the tasks you don’t want to fuss with, such as multiplexing and modulation. Not all displays are alike, however, so [Raj] wrote in to show how he used the MAX7219 to control high voltage 7-segment displays.

The spec on the MAX7219 only allows an input voltage of 5V, which limits the driver output to around 4V and can cause problems when using large displays that series-connect LEDs internally. [Raj’s] solution allows the MAX7219 to control displays with combined forward voltages of up to 24V, and as an added bonus, the circuit maintains compatibility with existing microcontroller libraries. We imagine this could be a nifty trick to keep on hand the next time you need to control large scoreboard displays.

The circuit works with the help of intermediate drivers to essentially level-shift the voltage to the display, which both provides the high voltage and protects the MAX7219’s inputs. One of the drawbacks of this circuit is losing the MAX7219’s constant current feature, requiring that each segment connection includes a current-limiting resistor. We appreciate this design’s attention to default states, because you wouldn’t want all of your LEDs turning ON during boot-up!

Flying Spaghetti Monster Display

[Anthony Liekens], one of our favorite hackers from Belgium, recently completed this large (and awesome!) Flying Spaghetti Monster LED display!

With so many different holidays in December, [Anthony] decided he wanted his family to celebrate a slightly less traditional deity. The body is a massive 4′ by 8′ wooden board that we think [Anthony] cut out by hand, with a total of 300 RGB LEDs driven by an Arduino. Chicken wire mesh provides support for the LEDs in the FSM’s mouth and eyes. [Anthony] built everything in his very own backyard hackerspace called the Open Garage, which is a fantastic neighborhood hackerspace (and we should know—we stayed at his place during our European Hackerspace Tour!)

[Anthony] has a bunch of videos showing off the display on his personal YouTube channel, but stick around after the break for a quick sample that features the Flying Spaghetti Monster in the front window of his home.

Continue reading “Flying Spaghetti Monster Display”

Status Light Tells You The Code Is Borked Again

status light

[Arthur] is teaching himself product development. Rather than create a few mock-up products, he’s taking the path of designing real devices he can use. His current device is a status light for automated software tests.  We’ve seen test and GitHub status lights before, however this is the first one to integrate with an outside web service. The status light’s state is based upon output from CodeShip, an online continuous deployment test engine.

The electronic design is simple. An Electric Imp retrieves test status data from CodeShip. The Imp then sends the status data over two GPIO lines to an AdaFruit Trinket. The Trinket controls a NeoPixel ring. A green ring indicates all tests are passing. Purple means tests are in progress. A spinning red ring (of death) means one or more tests have failed. Power is supplied via a mini USB connector.

[Arthur] spent quite a bit of time on the mechanical design of the status light as well. All the parts are 3D printed. This allowed him to quickly go through several revisions of each part. We like the use of white PLA for a frosted effect on the top section of the light, as it diffuses the eye piercing glow from all those RGB LEDs. As a finishing touch, [Arthur] created a fake product page for his light. He doesn’t have any plans to sell it, but we hope he drops the source and STL files so we can create one of our own.

Continue reading “Status Light Tells You The Code Is Borked Again”

Finally, An Animated GIF Light Painter

led_strips_dragon-flap

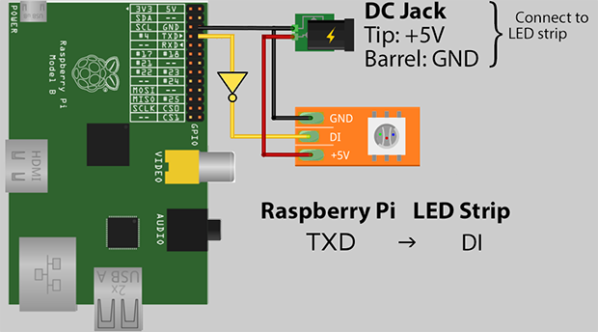
Light painting, or taking a picture of a moving RGB LED strip with a very long exposure, is the application du jour of Arduinos, photography, and bright, glowey, colorful things. Hackaday alumnus [Phil Burgess] has come up with the best tutorial for light painting we’ve seen. It’s such a good setup, it can be used to create animated .gifs using multiple camera exposures.

The build uses an Arduino Uno, SD card shield, and Adafruit’s new NeoPixel strip with 144 RGB LEDs per meter. Despite a potentially huge mess of wires for this project, [Phil] kept everything very, very neat. He’s using an Altoids case for the ‘duino, an 8 AA-cell battery holder and 3A UBEC  for the power, and a wooden frame made out of pine trim.

Part of the art of light painting involves a lot of luck, exponentially so if you’re trying to make a light painted animated .gif. To solve this problem, [Phil] came up with a very clever solution: using a rotary encoder attached to a bicycle. With the rotary encoder pressed up against the wheel of a bike, [Phil] can get a very precise measurement of where the light strip is along one dimension, to ensure the right pixels are lit up at the right time and in the right place.

It’s a wonderful build, and if Santa brings you some gift certificates to your favorite electronics retailer, we couldn’t think of a better way to bring animated .gifs into the real world.

LED Concert Dress

[Geri] has an awesome brother. He made this amazing LED dress for her to wear at the [Taylor Swift] concert last weekend!

As you may or may not know, she encourages her fans to bring “glowy”  things to wave around at her concerts. A quick check of the exhibition arena’s conditions of entry, and it seemed like LEDs would be allowed, so [Patrick] got to work.

He’s using a set of waterproof red LED strips and a cheap controller ordered from China. They needed a rather beefy battery pack so [Patrick] threw together a switchmode buck converter to drop a 19.8V 4.5A/h battery pack to a constant 12V for the LED controller. Not wanting to mess up the red cocktail dress, their mom sewed the strips into place. The dress is super bright and looks great — it draws about 25W, so the battery pack should last for the entire duration of the concert.

Unfortunately about a week before the concert they discovered Vector Arena is not allowing LED lights into the concert, which as you can imagine, was quite heartbreaking.

Thankfully, someone reached out to the organizers and they made an exception for them! [Geri] even ended up on the front page of their local newspaper! Stick around after the break to see a video of the dress in action!

Continue reading “LED Concert Dress”

Tiny 3x3x3 SMD LED Cube

led cube

LED cubes are cool, but they’re usually pretty big and clunky. [One49th] set out to make one of the smallest LED cubes we’ve seen yet, and he’s shared how he did it in his Instructable!

His first LED cube was the traditional kind, and it turned out pretty nice. But he wanted to go smaller — what about using SMD’s? What he did next was no simple feat — in fact, we’d be willing to call him an artist with a soldering iron. The array is just over one centimeter across.

Using a combination of vices and pliers he soldering each SMD onto his structure one by one. Each LED anode is tied together on each horizontal layer. Each cathode is tied together on each vertical column. This allows the TinyDuino to control any one LED by knowing which of the 9 columns and 3 layers the LED is on. Send a high signal to chosen layer, and a low signal to the column to light the LED. Doing this quickly allows you to create the illusion of different LEDs being on at the same time. Take a look through his image gallery to see just how tight the soldering quarters were, it’s definitely not something we’re planning on doing anytime soon!

Looking for a bigger cube? Check out this gorgeous 7x7x7 one that is capable of 142 frames per second!

Fabricate Your Own 7-Segment Displays

We see more and more projects that use custom molds and casting materials. The latest is this custom seven segment display which [Ray74] put together. The idea of making your own LED displays couldn’t be much easier than this — everything but the LEDs and wire is available at the craft store.

He started by making models of each segment out of pink erasers. The lower left image of the vignette above shows the eraser segments super glued to some poster board. The decimal is a pencil eraser, with a fence of wood to contain the molding material. Amazing Mold Putty was mixed and pressed into place resulting in the mold shown in the upper right.

From there, [Ray] cast the clear epoxy three times. Once dried the clear pieces were sanded, which will shape them up physically but also serves to diffuse the light. They were then placed inside of another mold form and an epoxy pour — this time doped with black enamel paint — finishes the 7-segment module. The final step is to glue the LEDs on the back side and wire them up.

This definitely trumps the build which Hackaday Alum [Kevin Dady] pulled off using hot glue sticks as light pipes.