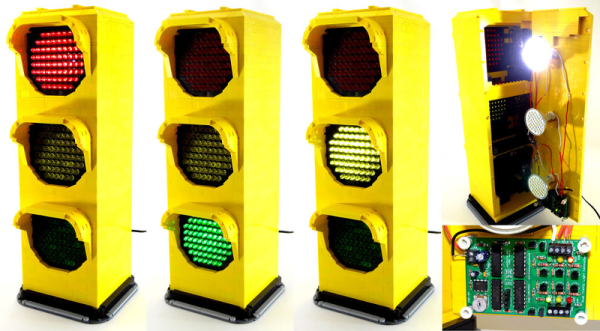
LEDs Turn The Heat Up On Flameless Pumpkin Lights

led-peter

When tea lights just won’t do, why not move up to a 5 channel LED candle simulator?

Halloween is fast approaching. Peter’s local hackerspace, The Rabbit Hole had a meeting to carve pumpkins and talk Halloween hacks. After seeing how poorly a tea light illuminated a medium size pumpkin, this hack was born. We’ve seen LED jack-o’-lantern hacks before, but this one was worth a second look.

In true hackerspace style, [Peter] used what was available to him. A PIC12F508 is the heart of the project. The 12X508/9 series has been around for at many years, and is still a great chip to work with. We remember using the ‘C’ version of this chip to bypass region locks on original PlayStation systems. [Peter] created a simple circuit with two basic modes. In “value mode” the 508 drives LED’s directly from its I/O pins. This limits the total output to 60mA. In “premium mode”, some 2N3904 NPN transistors are brought in to handle the current.  This allows the PIC to drive up to 5 LEDs.

Candles can be tricky to simulate with LEDs. [Peter] used 5 independent 16 bit linear feedback shift registers to generate pseudo random bit streams. The effect is quite impressive. A “wind simulation” completes the illusion of a real flame. Continue reading “LEDs Turn The Heat Up On Flameless Pumpkin Lights”

Android Controlled RGB Lights

ScreenShot032

Here’s a handy hack for an Android controlled, Arduino driven, RGB light setup.

[Kerimil] recently wrote up this project on the Arduino.cc, and is sharing all of the source code and plans. While many of our seasoned Arduino-lovers can easily throw together the code for an RGB LED circuit in their sleep, [Kerimil] also threw in the Android app, and the source file to be modified in App Inventor, an Android app development program originally released by Google, but now maintained by MIT.

We’ve seen many commercial versions of this product, but it’s nice to see one that can be easily hacked to our liking. Next up is writing an app to use the phone’s camera to identify colors and reproduce them with the LED! While you’re at it, why not mix it with an easy to build infinity mirror!

To see the board and app in action, check out the video after the break.

Continue reading “Android Controlled RGB Lights”

Backlit PCB Panel As Wall Art

For his buddy’s wedding [Saar Drimer] wanted a one-of-a-kind gift, and what’s more unique than a piece of art? He set out to design something that would speak to his geeky game-loving friend. This full-panel PCB is what he came up with. It’s a wall hanging that uses addressable LEDs and a PCB for the enclosure and as a diffuser.

On the right you can see the panel as it was delivered to him. He used routed slots to separate the main body of the enclosure from the four side pieces and the mounting bracket. This design lets him snap off the parts and solder them in place. The only thing you need to add to it is a pair of screws (well, and the components that make it light up).

We’re shocked by how well the PCB works as a diffuser. The substrate is translucent when not covered with silk screen or the copper layers. The outline of the letters uses that, as well as circular areas along the side pieces. The letters themselves are copper fills that have artistic patterns removed from them. This really adds to the visual appeal when the piece is illuminated by 42 WS2812B LEDs. The video below shows the piece in action. It really takes PCB as art to the next level

Continue reading “Backlit PCB Panel As Wall Art”

FlowFree Goes Life Sized At Maker Faire NY

Maker Faire 2013SetupWillow Glen MakersTeam PathfinderFlow*26

What began as a smartphone game turned into a Maker Faire New York 2013 project for the [Willow Glen Makers]. FlowX26 is a life sized version of the game FlowFree. [The Willow Glen Makers] wanted to build an extendable, easy to set up grid of floor tiles to emulate the game. A CNC machine was employed to create a plywood framework. Not visible in the picture is the fact that each cross member is cut slightly concave.  This concavity allows the clear plastic top to deflect just enough to activate a micro switch inside the tile. The switch sends a signal to the tile’s Arduino Mega controller. The Mega then uses this data to control an array of RGB LEDs.

The next problem was interconnection and communication between the tiles. [The Makers] used copper tape, along with a 3D Printed latch system between each tile side. Six connections per side allow power and data to be transmitted throughout the grid.

Continue reading “FlowFree Goes Life Sized At Maker Faire NY”

An “ill” Logical PWM Control

illogicalPWMcontrol

[James] recently finished up a gigantic seven segment display for Nottingham Hackerspace, and although it looks great, the display isn’t the interesting part. The PWM dimmer control implemented in logic is the true head-turner. That’s right: this is done without a programmable controller.

Unsatisfied with the lack of difficulty he faced when slapping together the rest of the electronics, [James] was determined to complicate the auto-dimmer by foregoing all sensible routes. He started by building an 8-bit timer made from a 555 timer fed into a 12-bit 4040 counter. He then used an 8-bit ADC IC to read a photoresistor. The outputs from both the ADC and from the scratch-built 8-bit timer plug into an 8-bit comparator; If the values match, the comparator outputs LOW for a single clock period.

Though this set the groundwork for PWM control, [James] had to add a couple of additional logic gates into the mix to nail everything down. You can find a diagram and the details behind flip-flopping out a duty cycle on his project blog. Clever builds like this one are a rarity when a few lines of code and a microcontroller can give you numerous shortcuts. [James] doesn’t recommend that you over-engineer your PWM controller, but we’re glad he did.  Meanwhile, Moore’s Law marches on; check out what people are doing with Low-Energy Bluetooth these days.

A Spinning Beachball Of Doom That You Can Carry In Your Pocket

175353_115989

Need a way to tell the world that you’re mentally ‘out to lunch’? Or what about a subtle hint to others that your current thought process is more important than whatever they are saying? [Caleb Kraft] — who earlier this year bid farewell to Hackaday for a position with EETimes — is heading to the World Maker Faire in New York this weekend, and he decided to build just that device. If you’re heading to Maker Faire too, keep an eye out for his eye-catching Spinning Beachball of Doom. He was inspired by iCufflinks from Adafruit, and ended up with a great little device that is small enough to be worn, or just thrown around for fun.

A couple of weeks ago, we linked you to the Adafruit announcement of their new Trinket product line. [Caleb] wasted no time in finding a use for the tiny microcontroller board. He paired it with the Neopixel LED ring, and had it working with just a tiny tweak to the test code. He then used DesignSpark Mechanical to design a 3D-printed case… the most complicated part of the project. It’s too bad his original plan to power the whole thing with button cells didn’t work out, because it could have been a neat (albeit expensive) upgrade to LED throwies. That said, [Caleb] mentions that a small LiPo battery would be a good alternative.

This is a fun little project that most anyone could throw together in an afternoon. Don’t be surprised if we start seeing these show up more and more.

To see what it looks like in action, check out the video after the break.

Continue reading “A Spinning Beachball Of Doom That You Can Carry In Your Pocket”

FLASH.IT: The RGB LED Climbing Wall

rockWallLEDs2

[Chris] and his friends were kicking around ideas for a Burning Man project, and this is the one that stuck: a rock climbing wall with RGB LEDs embedded in the holds. The holds themselves were custom made; the group started by making silicone molds of varying shapes and sizes, then added the electronics and poured in polyurethane resin to create the casting. The boards for these LEDs are equipped with a central hole that pairs up with a peg in the silicone mold. [Chris] also solved an annoying spinning problem by affixing a bolt to the far end of the LED board: once embedded in the polyurethane, the bolt provides resistance that the thin board cannot. The finished holds bolt onto the wall with all their wires neatly sticking out of the back to be hooked up to a central controller.

The Instrucables page suggests a few ways to get the lights working, including grabbing the nearest Arduino and relying on the Neopixel Library from Adafruit. [Chris] went the extra mile for Burning Man, however, designing Arduino-software-compatible controller boards capable of communicating via DMX, which expanded the system from a simple display to one capable of more complex lighting control. Stop by the Github for schematics and PCB layouts, and stick around for a video of the wall after the break. If the thrill-seeking outdoorsman inside you yearns for more, check out WALL-O-TRON from earlier this summer.

Continue reading “FLASH.IT: The RGB LED Climbing Wall”