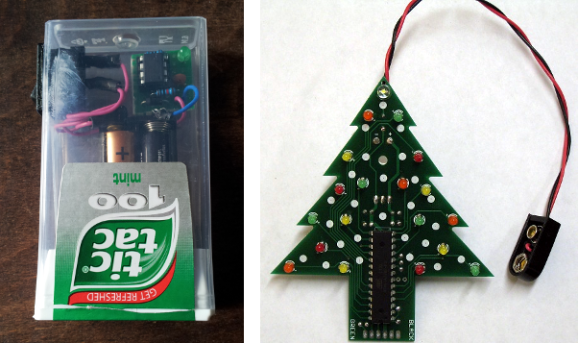
FlowFree Goes Life Sized At Maker Faire NY

Maker Faire 2013SetupWillow Glen MakersTeam PathfinderFlow*26

What began as a smartphone game turned into a Maker Faire New York 2013 project for the [Willow Glen Makers]. FlowX26 is a life sized version of the game FlowFree. [The Willow Glen Makers] wanted to build an extendable, easy to set up grid of floor tiles to emulate the game. A CNC machine was employed to create a plywood framework. Not visible in the picture is the fact that each cross member is cut slightly concave.  This concavity allows the clear plastic top to deflect just enough to activate a micro switch inside the tile. The switch sends a signal to the tile’s Arduino Mega controller. The Mega then uses this data to control an array of RGB LEDs.

The next problem was interconnection and communication between the tiles. [The Makers] used copper tape, along with a 3D Printed latch system between each tile side. Six connections per side allow power and data to be transmitted throughout the grid.

Continue reading “FlowFree Goes Life Sized At Maker Faire NY”

An “ill” Logical PWM Control

illogicalPWMcontrol

[James] recently finished up a gigantic seven segment display for Nottingham Hackerspace, and although it looks great, the display isn’t the interesting part. The PWM dimmer control implemented in logic is the true head-turner. That’s right: this is done without a programmable controller.

Unsatisfied with the lack of difficulty he faced when slapping together the rest of the electronics, [James] was determined to complicate the auto-dimmer by foregoing all sensible routes. He started by building an 8-bit timer made from a 555 timer fed into a 12-bit 4040 counter. He then used an 8-bit ADC IC to read a photoresistor. The outputs from both the ADC and from the scratch-built 8-bit timer plug into an 8-bit comparator; If the values match, the comparator outputs LOW for a single clock period.

Though this set the groundwork for PWM control, [James] had to add a couple of additional logic gates into the mix to nail everything down. You can find a diagram and the details behind flip-flopping out a duty cycle on his project blog. Clever builds like this one are a rarity when a few lines of code and a microcontroller can give you numerous shortcuts. [James] doesn’t recommend that you over-engineer your PWM controller, but we’re glad he did.  Meanwhile, Moore’s Law marches on; check out what people are doing with Low-Energy Bluetooth these days.

A Spinning Beachball Of Doom That You Can Carry In Your Pocket

175353_115989

Need a way to tell the world that you’re mentally ‘out to lunch’? Or what about a subtle hint to others that your current thought process is more important than whatever they are saying? [Caleb Kraft] — who earlier this year bid farewell to Hackaday for a position with EETimes — is heading to the World Maker Faire in New York this weekend, and he decided to build just that device. If you’re heading to Maker Faire too, keep an eye out for his eye-catching Spinning Beachball of Doom. He was inspired by iCufflinks from Adafruit, and ended up with a great little device that is small enough to be worn, or just thrown around for fun.

A couple of weeks ago, we linked you to the Adafruit announcement of their new Trinket product line. [Caleb] wasted no time in finding a use for the tiny microcontroller board. He paired it with the Neopixel LED ring, and had it working with just a tiny tweak to the test code. He then used DesignSpark Mechanical to design a 3D-printed case… the most complicated part of the project. It’s too bad his original plan to power the whole thing with button cells didn’t work out, because it could have been a neat (albeit expensive) upgrade to LED throwies. That said, [Caleb] mentions that a small LiPo battery would be a good alternative.

This is a fun little project that most anyone could throw together in an afternoon. Don’t be surprised if we start seeing these show up more and more.

To see what it looks like in action, check out the video after the break.

Continue reading “A Spinning Beachball Of Doom That You Can Carry In Your Pocket”

FLASH.IT: The RGB LED Climbing Wall

rockWallLEDs2

[Chris] and his friends were kicking around ideas for a Burning Man project, and this is the one that stuck: a rock climbing wall with RGB LEDs embedded in the holds. The holds themselves were custom made; the group started by making silicone molds of varying shapes and sizes, then added the electronics and poured in polyurethane resin to create the casting. The boards for these LEDs are equipped with a central hole that pairs up with a peg in the silicone mold. [Chris] also solved an annoying spinning problem by affixing a bolt to the far end of the LED board: once embedded in the polyurethane, the bolt provides resistance that the thin board cannot. The finished holds bolt onto the wall with all their wires neatly sticking out of the back to be hooked up to a central controller.

The Instrucables page suggests a few ways to get the lights working, including grabbing the nearest Arduino and relying on the Neopixel Library from Adafruit. [Chris] went the extra mile for Burning Man, however, designing Arduino-software-compatible controller boards capable of communicating via DMX, which expanded the system from a simple display to one capable of more complex lighting control. Stop by the Github for schematics and PCB layouts, and stick around for a video of the wall after the break. If the thrill-seeking outdoorsman inside you yearns for more, check out WALL-O-TRON from earlier this summer.

Continue reading “FLASH.IT: The RGB LED Climbing Wall”

Octoscroller Takes The Hexascroller To The Next Level

octosc2

The folks at NYCResistor have a new toy in the Octoscroller. For a couple of years now the NYCResistor crew has used the HexaScroller as a clock and general alert system. Now that RGB LED panels are cheaply available, the group decided to upgrade both the number of sides and the number of colors.

Octoscroller uses eight 16×32 RGB LED panels. These panels are relatively easy to interface to, but require constant refresh even to display a static image. This makes them both memory and CPU intensive for smaller microcontrollers. Brightness control via PWM only increases the difficulty.

On the plus side, the panels are structurally strong. This allows the Octoscroller to avoid the plywood ring which made up the frame of the Hexascroller. 3D printed brackets and hardware were all that was needed to complete the Octoscroller frame.

The brain of the this beast is a BeagleBone Black running LEDscape along with some custom software. Imagery comes from the Disorient Pyramid.

If you’re in the New York area, NYCResistor plans to offer classes on building your own Octoscroller.  You can also see the Octoscroller in person at MakerFaire NYC this weekend.

Smart Brake Lights And More With OpenXC

smart-brake-light

At a recent hack-a-thon event, [Al Linke] tapped into a vehicle’s OBD port with an OpenXC vehicle interface and hacked an LED screen in the rear window to display data based on events. If you haven’t heard of OpenXC, you can expect to read more about it here at Hackaday in the near future. For now, all you need to know is that OpenXC is Ford’s open source API for real-time data from your vehicle: specifically 2010 and newer model Ford vehicles (for now).

[Al] connected the OpenXC interface to his Android phone over Bluetooth, transmitting data from the OBD port to the phone in real time. From here, the Android can do some really cool stuff. It can use text to speech to announce how much your lead foot cost you, add sound effects for different car events, and even interact with additional devices. Although he managed all of those features, [Al’s] primary goal was to add an LED screen that displayed messages on the vehicle’s back window.

When the phone detected a braking event from the car, it directed the LEDs to light up with a “braking” image, adding some flavor to the process of stopping. He could also change the image to a “Thank You” sign with a waving hand, or—for less courteous drivers—an “F U” image with a slightly different hand gesture. You’ll want to check your local and/or national laws before attempting to strap any additional lighting to your vehicle, but you can watch [Al’s] car light up in the video below. For a more detailed look under the hood, he’s also provided an Instructables page.  If OpenXC catches on, the number of vehicle hacks such as the Remote Controlled Car may skyrocket.

Continue reading “Smart Brake Lights And More With OpenXC”

A 23 Feet Tall Pyramid With 0.31 Mile Of LED Strips

This year the Disorient Camp at Burning Man built a 7m tall pyramid with over half a kilometer of LED strips. For this special occasion several artists had developed patterns for this massive LED display, animating the parties happening every night in front of this build.

To handle the dusty environment, a Toughbook was running the pyramid’s main code, which was rendering the animation frames to 24-bit bitmaps and sending them over UDP to the network. For each face of the pyramid, a $45 BeagleBone Black running a dedicated program was slicing the images into the individual panels. Finally, each panel composed of eight WS281x LED strips was driven by a Teensy 3.0 microcontroller, receiving the piece to display by USB from the BeagleBone. To power the pyramid, 5V 40A power supplies were used for the tall panels, 5V 30A power supplies for the smaller ones.

Unsurprisingly, many of the power supplies failed due to the heat and dust.  The adhesive holding the LED strips also failed, and some screw terminals rattled loose from the 25KW sound system, requiring constant maintenance. Nevertheless, the sixteen thousand LEDs sure made quite an impression.

If anyone attending Burning Man managed to capture video of this thing in action we’d love to see it. Leave a link in the comments.